Autodesk 00126-050008-1640A User Guide - Page 55
Calibration Dialog Box
 |
UPC - 606121662006
View all Autodesk 00126-050008-1640A manuals
Add to My Manuals
Save this manual to your list of manuals |
Page 55 highlights
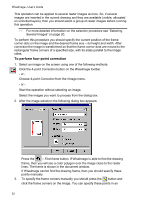
WiseImage - User's Guide Calibration Pairs types Every calibration pair has one of the follow types: Grid - if a pair is a part of a calibration Grid, used in calculation of calibration parameters and estimating calibration accuracy. Control - if a pair is used in calculation of calibration parameters and estimating calibration accuracy. Check - if a pair is used only for estimating the calibration accuracy and does not affect the calibration parameters. Unused - if a pair is not used in calculation of calibration parameters and estimating calibration accuracy. The main steps of Calibration 1. Open the Calibration dialog box. 2. Create a set of calibration pairs. 3. Specify the measured point's positions. 4. Choose an appropriate calibration method. 5. Run calibration. Note: it may be useful to define the coordinate system, the coordinate system origin and scale before the calibration Calibration Dialog Box An image is calibrated using the Calibration dialog box. To open the Calibration dialog box From the rImage menu, choose Calibration or click the WiseImage toolbar. button on the 56
-
 1
1 -
2
-
3
-
4
-
5
-
6
-
7
-
8
-
9
-
10
-
11
-
12
-
13
-
14
-
15
-
16
-
17
-
18
-
19
-
20
-
21
-
22
-
23
-
24
-
25
-
26
-
27
-
28
-
29
-
30
-
31
-
32
-
33
-
34
-
35
-
36
-
37
-
38
-
39
-
40
-
41
-
42
-
43
-
44
-
45
-
46
-
47
-
48
-
49
-
 50
50 -
 51
51 -
 52
52 -
 53
53 -
 54
54 -
 55
55 -
 56
56 -
 57
57 -
 58
58 -
 59
59 -
 60
60 -
61
-
62
-
63
-
64
-
65
-
66
-
67
-
68
-
69
-
70
-
71
-
72
-
73
-
74
-
75
-
76
-
77
-
78
-
79
-
80
-
81
-
82
-
83
-
84
-
85
-
86
-
87
-
88
-
89
-
90
-
91
-
92
-
93
-
94
-
95
-
96
-
97
-
98
-
99
-
100
-
101
-
102
-
103
-
104
-
105
-
106
-
107
-
108
-
109
-
110
-
111
-
112
-
113
-
114
-
115
-
116
-
117
-
118
-
119
-
120
-
121
-
122
-
123
-
124
-
125
-
126
-
127
-
128
-
129
-
130
-
131
-
132
-
133
-
134
-
135
-
136
-
137
-
138
-
139
-
140
-
141
-
142
-
143
-
144
-
145
-
146
-
147
-
148
-
149
-
150
-
151
-
152
-
153
-
154
-
155
-
156
-
157
-
158
-
159
-
160
-
161
-
162
-
163
-
164
-
165
-
166
-
167
-
168
-
169
-
170
-
171
-
172
-
173
-
174
-
175
-
176
-
177
-
178
-
179
-
180
-
181
-
182
-
183
-
184
-
185
-
186
-
187
-
188
-
189
-
190
-
191
-
192
-
193
-
194
-
195
-
196
-
197
-
198
-
199
-
200
-
201
-
202
-
203
-
204
-
205
-
206
-
207
-
208
-
209
-
210
-
211
-
212
-
213
-
214
-
215
-
216
-
217
-
218
-
219
-
220
-
221
-
222
-
223
-
224
-
225
-
226
-
227
-
228
-
229
-
230
-
231
-
232
-
233
-
234
-
235
 |
 |
