Autodesk 00126-050008-1640A User Guide - Page 47
Cropping by frame
 |
UPC - 606121662006
View all Autodesk 00126-050008-1640A manuals
Add to My Manuals
Save this manual to your list of manuals |
Page 47 highlights
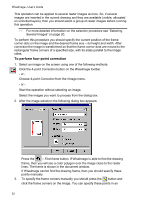
4 Operations with Images To crop an image automatically Select an image on the screen and run the operation in one of the following ways: Click the Crop Auto button on the Raster Image toolbar. Choose Crop in the rImage menu, then Crop/Crop/Auto. - or Start the operation without selecting an image. Select an image you want to process from the dialog box. The program automatically finds empty areas in the image and crops them. To obtain optimal results it is recommended that you apply the deskewing procedure or four-point correction before cropping. Cropping by frame If the image has a frame, then this command automatically resizes document to the frame size, ignoring insignificant speckles and sometimes even small objects and texts. Note that since autocropping by frame is completely automatic, a skewed frame and/or too many speckles on the image can spoil the results. It would be a good idea to apply rImage > Deskew and/or rFilters > Speckle Remover to the image before autocropping by frame. To crop image by frame Select an image on the screen and run the operation in one of the following ways: Click the Crop By Frame button on the Raster Image toolbar. Choose Crop/Auto in the rImage menu. To clip an image in WiseImage LT: 1. Activate an image to clip. 2. From the Raster menu, choose Image Clipping. 3. Point to Polygonal or Rectangular, then draw the clipping boundary on the image. If you are drawing a polygonal boundary, then you are prompted to draw consecutive vertices. To finish drawing a polygon, right-click anywhere. To show/hide the clipping boundary 1. Activate an image. 2. From the Raster menu, choose Image Clipping. 3. Point to On or Off to show or hide the clipping boundary of the active image. To delete the clipping boundary 1. Activate an image. 2. From the Raster menu, choose Image Clipping>Delete. 47
-
 1
1 -
2
-
3
-
4
-
5
-
6
-
7
-
8
-
9
-
10
-
11
-
12
-
13
-
14
-
15
-
16
-
17
-
18
-
19
-
20
-
21
-
22
-
23
-
24
-
25
-
26
-
27
-
28
-
29
-
30
-
31
-
32
-
33
-
34
-
35
-
36
-
37
-
38
-
39
-
40
-
41
-
 42
42 -
 43
43 -
 44
44 -
 45
45 -
 46
46 -
 47
47 -
 48
48 -
 49
49 -
 50
50 -
 51
51 -
 52
52 -
53
-
54
-
55
-
56
-
57
-
58
-
59
-
60
-
61
-
62
-
63
-
64
-
65
-
66
-
67
-
68
-
69
-
70
-
71
-
72
-
73
-
74
-
75
-
76
-
77
-
78
-
79
-
80
-
81
-
82
-
83
-
84
-
85
-
86
-
87
-
88
-
89
-
90
-
91
-
92
-
93
-
94
-
95
-
96
-
97
-
98
-
99
-
100
-
101
-
102
-
103
-
104
-
105
-
106
-
107
-
108
-
109
-
110
-
111
-
112
-
113
-
114
-
115
-
116
-
117
-
118
-
119
-
120
-
121
-
122
-
123
-
124
-
125
-
126
-
127
-
128
-
129
-
130
-
131
-
132
-
133
-
134
-
135
-
136
-
137
-
138
-
139
-
140
-
141
-
142
-
143
-
144
-
145
-
146
-
147
-
148
-
149
-
150
-
151
-
152
-
153
-
154
-
155
-
156
-
157
-
158
-
159
-
160
-
161
-
162
-
163
-
164
-
165
-
166
-
167
-
168
-
169
-
170
-
171
-
172
-
173
-
174
-
175
-
176
-
177
-
178
-
179
-
180
-
181
-
182
-
183
-
184
-
185
-
186
-
187
-
188
-
189
-
190
-
191
-
192
-
193
-
194
-
195
-
196
-
197
-
198
-
199
-
200
-
201
-
202
-
203
-
204
-
205
-
206
-
207
-
208
-
209
-
210
-
211
-
212
-
213
-
214
-
215
-
216
-
217
-
218
-
219
-
220
-
221
-
222
-
223
-
224
-
225
-
226
-
227
-
228
-
229
-
230
-
231
-
232
-
233
-
234
-
235
 |
 |
