Autodesk 00126-050008-1640A User Guide - Page 49
Deskewing
 |
UPC - 606121662006
View all Autodesk 00126-050008-1640A manuals
Add to My Manuals
Save this manual to your list of manuals |
Page 49 highlights
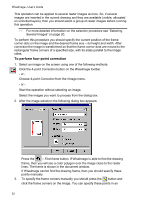
4 Operations with Images - or - Click the Rotate 90cw,180, 90ccw button on the Raster Image toolbar. Choose Rotate 90cw,180, 90ccw from the rImage menu. Start the operation without selecting an image. Select the image you want to process from the dialog box. To rotate an image by an arbitrary angle 1. Select an image on the screen and run the operation using one of the following methods: Click the Rotate custom angle on the Raster Image toolbar. Choose Rotate, then Rotate /Custom angle from the rImage toolbar. - or - Start the operation without selecting an image. Select an image you want to process from the dialog box. After image selection the following dialog box is displayed: 2. Type the desired rotation angle in the Angle box. - or Click the angle measurement button and specify the start and end points of the segment that defines the rotation angle. The measured value will be automatically entered in the Angle box. The angle between the specified segment and the X-axis is measured. 3. Click OK. Deskewing This operation enables a user to correct an image skew resulting from scanning. The whole image is rotated about its central point in order to eliminate either horizontal or vertical skew. The image automatically expands to fit the rotated image. 49
-
 1
1 -
2
-
3
-
4
-
5
-
6
-
7
-
8
-
9
-
10
-
11
-
12
-
13
-
14
-
15
-
16
-
17
-
18
-
19
-
20
-
21
-
22
-
23
-
24
-
25
-
26
-
27
-
28
-
29
-
30
-
31
-
32
-
33
-
34
-
35
-
36
-
37
-
38
-
39
-
40
-
41
-
42
-
43
-
 44
44 -
 45
45 -
 46
46 -
 47
47 -
 48
48 -
 49
49 -
 50
50 -
 51
51 -
 52
52 -
 53
53 -
 54
54 -
55
-
56
-
57
-
58
-
59
-
60
-
61
-
62
-
63
-
64
-
65
-
66
-
67
-
68
-
69
-
70
-
71
-
72
-
73
-
74
-
75
-
76
-
77
-
78
-
79
-
80
-
81
-
82
-
83
-
84
-
85
-
86
-
87
-
88
-
89
-
90
-
91
-
92
-
93
-
94
-
95
-
96
-
97
-
98
-
99
-
100
-
101
-
102
-
103
-
104
-
105
-
106
-
107
-
108
-
109
-
110
-
111
-
112
-
113
-
114
-
115
-
116
-
117
-
118
-
119
-
120
-
121
-
122
-
123
-
124
-
125
-
126
-
127
-
128
-
129
-
130
-
131
-
132
-
133
-
134
-
135
-
136
-
137
-
138
-
139
-
140
-
141
-
142
-
143
-
144
-
145
-
146
-
147
-
148
-
149
-
150
-
151
-
152
-
153
-
154
-
155
-
156
-
157
-
158
-
159
-
160
-
161
-
162
-
163
-
164
-
165
-
166
-
167
-
168
-
169
-
170
-
171
-
172
-
173
-
174
-
175
-
176
-
177
-
178
-
179
-
180
-
181
-
182
-
183
-
184
-
185
-
186
-
187
-
188
-
189
-
190
-
191
-
192
-
193
-
194
-
195
-
196
-
197
-
198
-
199
-
200
-
201
-
202
-
203
-
204
-
205
-
206
-
207
-
208
-
209
-
210
-
211
-
212
-
213
-
214
-
215
-
216
-
217
-
218
-
219
-
220
-
221
-
222
-
223
-
224
-
225
-
226
-
227
-
228
-
229
-
230
-
231
-
232
-
233
-
234
-
235
 |
 |
