Autodesk 00126-050008-1640A User Guide - Page 51
Auto Correction, Four-Point Correction Framing
 |
UPC - 606121662006
View all Autodesk 00126-050008-1640A manuals
Add to My Manuals
Save this manual to your list of manuals |
Page 51 highlights
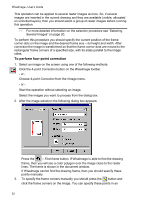
4 Operations with Images To deskew raster objects automatically Select an image on the screen and run the operation using one of the following methods: Click the Deskew Auto button on the Raster Image toolbar. From the rImage menu choose Deskew, then Deskew Auto. - or Start the operation without selecting an image. Select an image you want to process from the dialog box. If WiseImage can calculate the rotation angle, then raster objects will be deskewed. Otherwise a message appears prompting use of the manual deskewing procedure. Auto Correction This operation processes an image, using a predefined set of standard operations. The set of applied operations is specified in the AutoCorrect section of the WiseImage tab from the AutoCAD Options dialog box. * For more information on this tab see "Autocorrect Section" on page 36. When auto-correction is performed, the specified operations are applied step-bystep in the order they are arranged in the AutoCorrect tab. If any of the specified operations cannot be performed, then that operation is ignored and the next operation starts. To perform auto-correction Specify a set and an order of operations in the AutoCorrect section. Select an image on the screen and run the operation using one of the following methods: Click the Autocorrection button on the Raster Image toolbar. Choose Autocorrection from the rImage menu. - or Start the operation without selecting an image. Select an image you want to process from the dialog box. Four-Point Correction (Framing) Four-point correction is a simple way to eliminate trapezoid, parallelogram or projective distortions in images (technical drawings mainly). This procedure is based on the assumption that an image frame and its contents are distorted in the same way. This procedure can be used to correct image geometry if its frame has a shape of trapezium or parallelogram, rather than rectangular. 51
-
 1
1 -
2
-
3
-
4
-
5
-
6
-
7
-
8
-
9
-
10
-
11
-
12
-
13
-
14
-
15
-
16
-
17
-
18
-
19
-
20
-
21
-
22
-
23
-
24
-
25
-
26
-
27
-
28
-
29
-
30
-
31
-
32
-
33
-
34
-
35
-
36
-
37
-
38
-
39
-
40
-
41
-
42
-
43
-
44
-
45
-
 46
46 -
 47
47 -
 48
48 -
 49
49 -
 50
50 -
 51
51 -
 52
52 -
 53
53 -
 54
54 -
 55
55 -
 56
56 -
57
-
58
-
59
-
60
-
61
-
62
-
63
-
64
-
65
-
66
-
67
-
68
-
69
-
70
-
71
-
72
-
73
-
74
-
75
-
76
-
77
-
78
-
79
-
80
-
81
-
82
-
83
-
84
-
85
-
86
-
87
-
88
-
89
-
90
-
91
-
92
-
93
-
94
-
95
-
96
-
97
-
98
-
99
-
100
-
101
-
102
-
103
-
104
-
105
-
106
-
107
-
108
-
109
-
110
-
111
-
112
-
113
-
114
-
115
-
116
-
117
-
118
-
119
-
120
-
121
-
122
-
123
-
124
-
125
-
126
-
127
-
128
-
129
-
130
-
131
-
132
-
133
-
134
-
135
-
136
-
137
-
138
-
139
-
140
-
141
-
142
-
143
-
144
-
145
-
146
-
147
-
148
-
149
-
150
-
151
-
152
-
153
-
154
-
155
-
156
-
157
-
158
-
159
-
160
-
161
-
162
-
163
-
164
-
165
-
166
-
167
-
168
-
169
-
170
-
171
-
172
-
173
-
174
-
175
-
176
-
177
-
178
-
179
-
180
-
181
-
182
-
183
-
184
-
185
-
186
-
187
-
188
-
189
-
190
-
191
-
192
-
193
-
194
-
195
-
196
-
197
-
198
-
199
-
200
-
201
-
202
-
203
-
204
-
205
-
206
-
207
-
208
-
209
-
210
-
211
-
212
-
213
-
214
-
215
-
216
-
217
-
218
-
219
-
220
-
221
-
222
-
223
-
224
-
225
-
226
-
227
-
228
-
229
-
230
-
231
-
232
-
233
-
234
-
235
 |
 |
