Autodesk 00126-050008-1640A User Guide - Page 52
To perform four-point correction
 |
UPC - 606121662006
View all Autodesk 00126-050008-1640A manuals
Add to My Manuals
Save this manual to your list of manuals |
Page 52 highlights
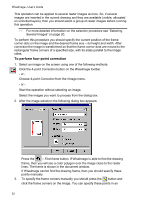
WiseImage- User's Guide This operation can be applied to several raster images at once. So, if several images are inserted in the current drawing and they are available (visible, allocated on unlocked layers), then you should select a group of raster images before running this operation. * For more detailed information on the selection procedure see "Selecting Several Images" on page 20. To perform this procedure you should specify the current position of the frame corner dots on the image and the desired frame size - its height and width. After correction the image is transformed so that the frame corner dots are moved to the rectangular frame corners of a specified size, with its sides parallel to the image sides. To perform four-point correction 1. Select an image on the screen using one of the following methods: Click the 4-point Correction button on the WiseImage toolbar. - or Choose 4-point Correction from the rImage menu. - or - Start the operation without selecting an image. Select the images you want to process from the dialog box. 2. After the image selection the following dialog box appears: Press the - Find frame button. If WiseImage is able to find the drawing frame, then you will see a color polygon over the image close to the raster lines. The frame is shown in the document window. If WiseImage cannot find the drawing frame, then you should specify these points manually. 3. To specify the frame corners manually you should press the button and click the frame corners on the image. You can specify these points in an 52
-
 1
1 -
2
-
3
-
4
-
5
-
6
-
7
-
8
-
9
-
10
-
11
-
12
-
13
-
14
-
15
-
16
-
17
-
18
-
19
-
20
-
21
-
22
-
23
-
24
-
25
-
26
-
27
-
28
-
29
-
30
-
31
-
32
-
33
-
34
-
35
-
36
-
37
-
38
-
39
-
40
-
41
-
42
-
43
-
44
-
45
-
46
-
 47
47 -
 48
48 -
 49
49 -
 50
50 -
 51
51 -
 52
52 -
 53
53 -
 54
54 -
 55
55 -
 56
56 -
 57
57 -
58
-
59
-
60
-
61
-
62
-
63
-
64
-
65
-
66
-
67
-
68
-
69
-
70
-
71
-
72
-
73
-
74
-
75
-
76
-
77
-
78
-
79
-
80
-
81
-
82
-
83
-
84
-
85
-
86
-
87
-
88
-
89
-
90
-
91
-
92
-
93
-
94
-
95
-
96
-
97
-
98
-
99
-
100
-
101
-
102
-
103
-
104
-
105
-
106
-
107
-
108
-
109
-
110
-
111
-
112
-
113
-
114
-
115
-
116
-
117
-
118
-
119
-
120
-
121
-
122
-
123
-
124
-
125
-
126
-
127
-
128
-
129
-
130
-
131
-
132
-
133
-
134
-
135
-
136
-
137
-
138
-
139
-
140
-
141
-
142
-
143
-
144
-
145
-
146
-
147
-
148
-
149
-
150
-
151
-
152
-
153
-
154
-
155
-
156
-
157
-
158
-
159
-
160
-
161
-
162
-
163
-
164
-
165
-
166
-
167
-
168
-
169
-
170
-
171
-
172
-
173
-
174
-
175
-
176
-
177
-
178
-
179
-
180
-
181
-
182
-
183
-
184
-
185
-
186
-
187
-
188
-
189
-
190
-
191
-
192
-
193
-
194
-
195
-
196
-
197
-
198
-
199
-
200
-
201
-
202
-
203
-
204
-
205
-
206
-
207
-
208
-
209
-
210
-
211
-
212
-
213
-
214
-
215
-
216
-
217
-
218
-
219
-
220
-
221
-
222
-
223
-
224
-
225
-
226
-
227
-
228
-
229
-
230
-
231
-
232
-
233
-
234
-
235
 |
 |
