HP ZBook Studio x360 Maintenance and Service Guide - Page 110
POST, No video (with power)
 |
View all HP ZBook Studio x360 manuals
Add to My Manuals
Save this manual to your list of manuals |
Page 110 highlights
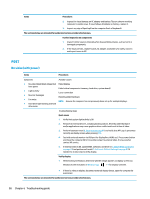
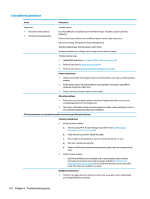
Items Procedures 2. Inspect for visual damage on AC adapter and battery. Test on a known working computer to isolate issue. If issue follows AC adapter or battery, replace it. 3. Inspect any sign of liquid spill on the computer (back of keyboard). The sections below are intended for authorized service providers/technicians. Further inspection on components 1. Inspect further sources internally after disassembling chassis, such as burnt or damaged components. 2. If the issue persists, replace boards, AC adapter, and battery for safety concern and report issues to HP. POST No video (with power) Items Procedures Symptoms Possible causes ● No video (black/blank image) but Failed display have power Failed critical components (memory, hard drive, system board) ● Light activity Loose connection ● No error messages Recently added hardware ● Fan noise NOTE: Assume the computer has not previously been set up for multiple displays. ● Hard drive light blinking and hard drive noise Troubleshooting steps Quick check 1. Verify that system light activity is OK. 2. Remove all external devices, including docking station. Recently added hardware and/or applications may cause graphics driver conflict and result in loss of video. 3. Perform hardware reset (8. Hard reset on page 86) and verify that HP Logo is presented correctly on display screen when pressing F10. 4. Test with external monitor via VGA port (or DisplayPort, HDMI, etc). Press power button and close the computer lid to force video output to external video. If unsuccessful, contact HP service. 5. If external video is OK, update BIOS, software, and drivers (4. Update BIOS and drivers on page 79) and perform soft reset (9. Soft reset (Default Settings) on page 87) if needed. Go to next step to verify display. Verify display ● When booting to Windows, determine whether image appears on display screen (via Windows Screen Solutions or Windows logo + P for display switcher). ● If there is video on display, disconnect external display device, open the computer lid and restart. The sections below are intended for authorized service providers/technicians. 98 Chapter 6 Troubleshooting guide
-
 1
1 -
2
-
3
-
4
-
5
-
6
-
7
-
8
-
9
-
10
-
11
-
12
-
13
-
14
-
15
-
16
-
17
-
18
-
19
-
20
-
21
-
22
-
23
-
24
-
25
-
26
-
27
-
28
-
29
-
30
-
31
-
32
-
33
-
34
-
35
-
36
-
37
-
38
-
39
-
40
-
41
-
42
-
43
-
44
-
45
-
46
-
47
-
48
-
49
-
50
-
51
-
52
-
53
-
54
-
55
-
56
-
57
-
58
-
59
-
60
-
61
-
62
-
63
-
64
-
65
-
66
-
67
-
68
-
69
-
70
-
71
-
72
-
73
-
74
-
75
-
76
-
77
-
78
-
79
-
80
-
81
-
82
-
83
-
84
-
85
-
86
-
87
-
88
-
89
-
90
-
91
-
92
-
93
-
94
-
95
-
96
-
97
-
98
-
99
-
100
-
101
-
102
-
103
-
104
-
 105
105 -
 106
106 -
 107
107 -
 108
108 -
 109
109 -
 110
110 -
 111
111 -
 112
112 -
 113
113 -
 114
114 -
 115
115 -
116
-
117
-
118
-
119
-
120
-
121
-
122
-
123
-
124
-
125
-
126
-
127
-
128
-
129
-
130
-
131
-
132
-
133
-
134
-
135
-
136
-
137
-
138
-
139
-
140
-
141
-
142
-
143
-
144
-
145
-
146
-
147
-
148
-
149
-
150
-
151
-
152
-
153
-
154
-
155
-
156
-
157
-
158
-
159
-
160
-
161
-
162
-
163
-
164
-
165
-
166
-
167
-
168
-
169
-
170
-
171
-
172
-
173
-
174
-
175
-
176
-
177
-
178
-
179
-
180
-
181
-
182
-
183
-
184
-
185
-
186
-
187
-
188
-
189
 |
 |
