HP ZBook Studio x360 Maintenance and Service Guide - Page 108
Troubleshooting guide, Use HP Support Assistant tools in Windows
 |
View all HP ZBook Studio x360 manuals
Add to My Manuals
Save this manual to your list of manuals |
Page 108 highlights
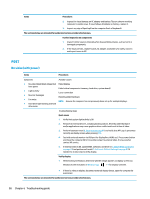
Items Tips and tricks Procedures Visual inspections 1. Inspect battery connectors for any signs of damage. 2. Verify that battery is installed properly in battery bay without gap or obstructions and latch locks are tight. Reseat battery (for models with removable batteries). 3. Determine whether battery gets hot (batteries heat up when charging, but not too hot to touch). Check battery warranty to see whether the battery is new or its warranty is expired. Battery capacity degrades over time. Verify front battery status light 1. Battery status light is off: battery not recognized. 2. Battery status light is blinking amber: critically low battery level. Reset 1. Hard reset (8. Hard reset on page 86) 2. Soft reset (9. Soft reset (Default Settings) on page 87) Verify AC adapter 1. Determine whether the computer needs the AC adapter to boot and operate. Sometimes, intermittently bad AC adapter and loose connection between adapter and computer results in inability to charge battery which causes short run time. 2. Inspect AC adapter to verify that it is functioning. 3. Test with a working AC adapter and confirm whether battery is charging. 4. Be sure that battery is fully charged (AC adapter plugged in at least 2.5 hours). Diagnostics: HP tools will report results such as passed, calibrate, weak, replace, no battery and unknown, and suggest corresponding actions. Use HP Hardware Diagnostics (UEFI) (6. HP Hardware Diagnostics and Tools on page 80) ● HP PC Hardware Diagnostics (UEFI) is a good tool to use to isolate and determine faulty battery, especially for quickly discharging (short life) battery. Use HP Support Assistant tools in Windows (HP Support Assistant (HPSA) on page 82) 1. Verify that battery is recognized and charging. 2. Verify battery condition if battery cycle life is over specs (i.e., long life of 1000-cycle life and 3-year warranty). Battery may have premature capacity loss within its cycle life or warranty. 3. If issue remains, test with a verified working battery and verify battery status lights and battery conditions. 4. If issue remains, replace system board. 5. Verify the new replacement. See the computer user guide for instructions regarding battery maintenance and increasing battery life. Also reference http://support.hp.com/us-en/document/c01297640? jumpid=hpr_r1002_usen_link3. 96 Chapter 6 Troubleshooting guide
-
 1
1 -
2
-
3
-
4
-
5
-
6
-
7
-
8
-
9
-
10
-
11
-
12
-
13
-
14
-
15
-
16
-
17
-
18
-
19
-
20
-
21
-
22
-
23
-
24
-
25
-
26
-
27
-
28
-
29
-
30
-
31
-
32
-
33
-
34
-
35
-
36
-
37
-
38
-
39
-
40
-
41
-
42
-
43
-
44
-
45
-
46
-
47
-
48
-
49
-
50
-
51
-
52
-
53
-
54
-
55
-
56
-
57
-
58
-
59
-
60
-
61
-
62
-
63
-
64
-
65
-
66
-
67
-
68
-
69
-
70
-
71
-
72
-
73
-
74
-
75
-
76
-
77
-
78
-
79
-
80
-
81
-
82
-
83
-
84
-
85
-
86
-
87
-
88
-
89
-
90
-
91
-
92
-
93
-
94
-
95
-
96
-
97
-
98
-
99
-
100
-
101
-
102
-
 103
103 -
 104
104 -
 105
105 -
 106
106 -
 107
107 -
 108
108 -
 109
109 -
 110
110 -
 111
111 -
 112
112 -
 113
113 -
114
-
115
-
116
-
117
-
118
-
119
-
120
-
121
-
122
-
123
-
124
-
125
-
126
-
127
-
128
-
129
-
130
-
131
-
132
-
133
-
134
-
135
-
136
-
137
-
138
-
139
-
140
-
141
-
142
-
143
-
144
-
145
-
146
-
147
-
148
-
149
-
150
-
151
-
152
-
153
-
154
-
155
-
156
-
157
-
158
-
159
-
160
-
161
-
162
-
163
-
164
-
165
-
166
-
167
-
168
-
169
-
170
-
171
-
172
-
173
-
174
-
175
-
176
-
177
-
178
-
179
-
180
-
181
-
182
-
183
-
184
-
185
-
186
-
187
-
188
-
189
 |
 |
