Poulan PR5020 Owner Manual - Page 6
Poulan PR5020 Manual
 |
View all Poulan PR5020 manuals
Add to My Manuals
Save this manual to your list of manuals |
Page 6 highlights
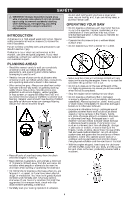
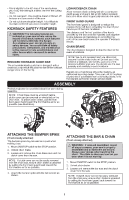
• Stand slightly to the left side of the saw to keep your body from being in a direct line with the cutting chain. • Do not overreach. You could be drawn or thrown off balance and lose control of the saw. • Do not cut above shoulder height. It is difficult to maintain control of saw above shoulder height. LOW-KICKBACK CHAIN A low-kickback chain is designed with a contoured depth gauge and guard link which deflect kickback force and allow wood to gradually ride into the cutter. FRONT HAND GUARD The front hand guard is designed to reduce the chance of your left hand contacting the chain if your hand slips off the front handlebar. The distance and "in-line" position of the hands provided by the front and rear handles work together to give balance and resistance in controlling the pivot of the saw back toward the operator if kickback occurs. KICKBACK SAFETY FEATURES aa WARNING! The following features are included on your saw to help reduce the hazard of kickback; however, such features will not totally eliminate this danger. As a chainsaw user, do not rely only on safety devices. You must follow all safety precautions, instructions, and maintenance in this manual to help avoid kickback and other forces which can result in serious injury. CHAIN BRAKE The chain brake is designed to stop the chain in the event of kickback. NOTE: We do not represent and you should not assume that the chain brake will protect you in the event of a kickback. Do not rely upon any of the devices built into your saw. You should use the saw properly and carefully to avoid kickback. Repairs on a chain brake should be made by an authorized servicing dealer. Take your unit to the place of purchase if purchased from a servicing dealer, or to the nearest authorized master service dealer. REDUCED KICKBACK GUIDE BAR The reduced-kickback guide bar is designed with a small radius tip which reduces the size of the kickback danger zone on the bar tip. ASSEMBLY Protective gloves (not provided) should be worn during assembly. NOTE: Chain brake must be unlocked before clutch cover can be removed or reinstalled on the chain saw. To unlock chain brake, pull the front hand guard back toward the front handle as far as possible (see illustration). ATTACHING THE BUMPER SPIKE (If not already attached) The bumper spike may be used as a pivot when making a cut. 1. Move ON/STOP switch to the STOP position. 2. Unlock chain brake. 3. Loosen and remove the chain brake nuts and the clutch cover from the saw. NOTE: If clutch cover can not be easily removed from the chain saw, ensure chain brake is unlocked by pulling the front hand guard back toward the front handle as far as possible. 4. Attach the bumper spike with the two screws as shown. ATTACHING THE BAR & CHAIN (If not already attached) aa WARNING: If received assembled, repeat all steps to ensure your saw is properly assembled and all fasteners are secure. Always wear gloves when handling the chain. The chain is sharp and can cut you even when it is not moving! 1. Move ON/STOP switch to the STOP position. 2. Unlock chain brake. 3. Loosen and remove the bar nuts and the clutch cover from the saw. NOTE: If clutch cover can not be easily removed from the chain saw, ensure chain brake is unlocked by pulling the front hand guard back toward the front handle as far as possible. 6
-
 1
1 -
 2
2 -
 3
3 -
 4
4 -
 5
5 -
 6
6 -
 7
7 -
 8
8 -
 9
9 -
 10
10 -
 11
11 -
 12
12 -
13
-
14
-
15
-
16
-
17
-
18
-
19
-
20
-
21
-
22
-
23
-
24
-
25
-
26
-
27
-
28
-
29
-
30
-
31
-
32
-
33
-
34
-
35
-
36
-
37
-
38
-
39
-
40
-
41
-
42
-
43
-
44
-
45
-
46
-
47
-
48
-
49
-
50
-
51
-
52
-
53
-
54
-
55
-
56
-
57
-
58
-
59
-
60
 |
 |
