Denon AVR-4306 Owners Manual - Page 82
Setting the Volume Control, Setting the Trigger Out
 |
View all Denon AVR-4306 manuals
Add to My Manuals
Save this manual to your list of manuals |
Page 82 highlights
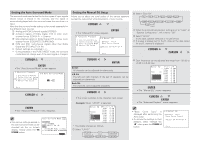
Advanced Setup - Part 1 Setting the Volume Control Set the upper limit for the volume, the volume level when the power is turned on, and the volume level when the mute mode is set for the different zones. 1 Press the CURSOR D or H button to select "Volume Control" at the "Option Setup" menu, then press the ENTER button. • The "Volume Control" screen appears. 2 Press the CURSOR D or H button to select the desired setting, then press the CURSOR F or G button to select the parameter. Volume Limit: Set the upper limit for the volume for the different zones. • -20 dB, -10 dB, 0 dB: The volume cannot be increased above the selected levels. • OFF: If you do not want to set a volume limit, select "OFF". In this case, the volume can be set to the AVR-4306's maximum volume (output) level of +18 dB, which is extremely loud. Power On Level: Set the volume that is set when the power is turned on for the different zones. You can adjust the MAIN ZONE volume level within the range of -80 dB to +18 dB and ZONE2 (or ZONE3) volume level within the range of -70 dB to +18 dB in steps of 1.0 dB. • - - - (Mute) The volume is always muted when the power is turned on. • LAST The volume set when the AVR-4306 was last used is stored in the memory and set when the power is turned on. Mute Level: Set the volume attenuation level when the mute mode is set for the different zones. • FULL The volume is fully muted. • -40 dB The volume is lowered 40 dB from the current level. • -20 dB The volume is lowered 20 dB from the current level. Volume Level: Set whether to fix the output level for the different zones or make it variable. • Variable The level can be adjusted freely using buttons on the remote control unit. • -40 dB, 0 dB The output level is fixed at the set level and the volume can no longer be adjusted. 3 Press the ENTER button to enter the setting. • The "Option Setup" menu reappears. • For ZONE2 and ZONE3, the "Volume Limit" and "Power On Level" can be set when "Variable" is selected for "Volume Level". • When the power amplifier is assigned to either of the ZONE2 and ZONE3 channels at "Power Amp Assign", "-VAR-" (only variable) is displayed and the fixed level cannot be set. Advanced Setup - Part 1 Setting the Trigger Out • Two 12 V DC Trigger Outputs on the rear panel can be used to control other devices with compatible trigger inputs, such as motorized screens, motorized screen masking, motorized drapes, and other trigger-controlled devices. • Set the DC output supplied from the trigger out terminals for the various input sources to "ON" or "OFF". 1 Press the CURSOR D or H button to select "Trigger Out" at the "Option Setup" menu, then press the ENTER button. • The "Trigger Out" screen appears. 2 Press the CURSOR D or H button to select the trigger out terminal you want to set, then press the ENTER button. • The setting screen appears. Example: When "Trigger Out 1" is selected "Aux1" is setting of "AUX/Net", and "Aux2" is setting of "AUX/iPod". 3 Press the CURSOR F or G button to select the zone (MAIN ZONE, ZONE2 and ZONE3). The power supplied from the trigger out terminal turns on and off when the power for the set zone is turned on and off. 77
-
 1
1 -
2
-
3
-
4
-
5
-
6
-
7
-
8
-
9
-
10
-
11
-
12
-
13
-
14
-
15
-
16
-
17
-
18
-
19
-
20
-
21
-
22
-
23
-
24
-
25
-
26
-
27
-
28
-
29
-
30
-
31
-
32
-
33
-
34
-
35
-
36
-
37
-
38
-
39
-
40
-
41
-
42
-
43
-
44
-
45
-
46
-
47
-
48
-
49
-
50
-
51
-
52
-
53
-
54
-
55
-
56
-
57
-
58
-
59
-
60
-
61
-
62
-
63
-
64
-
65
-
66
-
67
-
68
-
69
-
70
-
71
-
72
-
73
-
74
-
75
-
76
-
 77
77 -
 78
78 -
 79
79 -
 80
80 -
 81
81 -
 82
82 -
 83
83 -
 84
84 -
 85
85 -
 86
86 -
 87
87 -
88
-
89
-
90
-
91
-
92
-
93
-
94
-
95
-
96
-
97
-
98
-
99
-
100
-
101
-
102
-
103
-
104
-
105
-
106
-
107
-
108
-
109
-
110
-
111
-
112
-
113
-
114
-
115
-
116
-
117
-
118
-
119
-
120
-
121
-
122
-
123
-
124
-
125
-
126
-
127
-
128
-
129
-
130
-
131
-
132
-
133
-
134
-
135
-
136
-
137
-
138
-
139
-
140
-
141
-
142
-
143
-
144
-
145
-
146
 |
 |
