Denon AVR-4306 Owners Manual - Page 77
Setting the Video Convert, Setting the HDMI Out Setup - black
 |
View all Denon AVR-4306 manuals
Add to My Manuals
Save this manual to your list of manuals |
Page 77 highlights
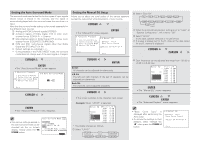
Advanced Setup - Part 1 2 Press the CURSOR D or H button to select the input source, then press the CURSOR F or G button to select the component video input terminal. Select from among 1-RCA to 3-RCA. If the same component video input terminal is selected, the setting for the input source that was previously assigned switches to "NONE". When "Yes" is selected for "Default", the settings are reset to the default values. 3 Press the ENTER button to enter the setting. • The "Video Setup" menu reappears. Setting the Video Convert Set whether or not to use the video conversion function. 1 Press the CURSOR D or H button to select "Video Convert" at the "Video Setup" menu, then press the ENTER button. • The "Video Convert" screen appears. 2 Press the CURSOR D or H button to select the input source, then press the CURSOR F or G button to select "ON" or "OFF". ON: The convert function operates. When there are multiple input signals, the input signals are detected and the input signal to be output from the video monitor output terminal is selected automatically in the following order: component video, S-Video, composite video. Advanced Setup - Part 1 OFF: The convert function does not operate. The video signal input from the video input terminal is only output to the video monitor out terminal. The S-Video signal input from the S-Video input terminal is only output to the S-Video monitor out terminal. The component input signal input from the component input terminals is only output to the component monitor output terminals. 3 Press the ENTER button to enter the setting. • The "Video Setup" menu reappears. • Down-converting from the component video signal to the SVideo and composite video signal is possible only when the resolution of a component video signal is 480i / 576i. • When a non-standard video signal from a game machine or some other source is input, the video conversion function might not operate. If this happens, please set the conversion mode to OFF. • When the video conversion function has been used, information such as that of text broadcasts which has been added to the video signal might not be output. If this happens, please set the conversion mode to OFF. Setting the HDMI Out Setup • Set whether to use the analog video signals to HDMI conversion function. • When using this conversion function, set the color format and video range of the signals output from the HDMI terminal. 1 Press the CURSOR D or H button to select "HDMI Out Setup" at the "Video Setup" menu, then press the ENTER button. • The "HDMI Out Setup" screen appears. 2 Press the CURSOR D or H button to select the setting, then press the CURSOR F or G button to select the parameter. Analog to HDMI Convert: • ON: Setting for converting analog video signals into HDMI signals. • OFF: Setting for not converting analog video signals into HDMI signals. Aspect: • FULL: The video is output while maintaining the aspect ratio of the input video. This mode is suited for playing back 16:9 video. • NORMAL: A black band is added to the left and right of the input video and the video is output. This mode is suited for playing back 4:3 video. Resolution: • 480p/576p: When the video signal being input is a video, S-Video or 480i/576i component video signal, the resolution is converted to 480p/576p and the signal is output from the HDMI MONITOR OUT terminal. • 1080i: When the video signal being input is a video, S-Video or 480i/576i/480p/576p component video signal, the resolution is converted to 1080i and the signal is output from the HDMI MONITOR OUT terminal. • 720p: When the video signal being input is a video, S-Video or 480i/576i/480p/576p component video signal, the resolution is converted to 720p and the signal is output from the HDMI MONITOR OUT terminal. • Through: The video signal being input is output as such from the HDMI MONITOR OUT terminal without being converted. 72
-
 1
1 -
2
-
3
-
4
-
5
-
6
-
7
-
8
-
9
-
10
-
11
-
12
-
13
-
14
-
15
-
16
-
17
-
18
-
19
-
20
-
21
-
22
-
23
-
24
-
25
-
26
-
27
-
28
-
29
-
30
-
31
-
32
-
33
-
34
-
35
-
36
-
37
-
38
-
39
-
40
-
41
-
42
-
43
-
44
-
45
-
46
-
47
-
48
-
49
-
50
-
51
-
52
-
53
-
54
-
55
-
56
-
57
-
58
-
59
-
60
-
61
-
62
-
63
-
64
-
65
-
66
-
67
-
68
-
69
-
70
-
71
-
 72
72 -
 73
73 -
 74
74 -
 75
75 -
 76
76 -
 77
77 -
 78
78 -
 79
79 -
 80
80 -
 81
81 -
 82
82 -
83
-
84
-
85
-
86
-
87
-
88
-
89
-
90
-
91
-
92
-
93
-
94
-
95
-
96
-
97
-
98
-
99
-
100
-
101
-
102
-
103
-
104
-
105
-
106
-
107
-
108
-
109
-
110
-
111
-
112
-
113
-
114
-
115
-
116
-
117
-
118
-
119
-
120
-
121
-
122
-
123
-
124
-
125
-
126
-
127
-
128
-
129
-
130
-
131
-
132
-
133
-
134
-
135
-
136
-
137
-
138
-
139
-
140
-
141
-
142
-
143
-
144
-
145
-
146
 |
 |
