Lantronix S3220 Series User Guide Rev J PDF 34.75 MB - Page 158
Copper Port Loopback Procedure
 |
View all Lantronix S3220 Series manuals
Add to My Manuals
Save this manual to your list of manuals |
Page 158 highlights
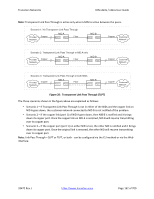
Transition Networks ION x222x / x32xx User Guide Copper Port Loopback Procedure The procedure below is for performing a copper Port Loopback via direct link between a C32330 and an S3220. In this procedure, the S3220 Port1 is connected to a switch, and a Management PC is also con‐ nected this switch so the Management PC can reach the S3220 or C3220. There are no other devices between C3220 and S3220; if you connect a device between S3220 and C3220, make sure this device can forward LOAM messages. In this example, the LOAM settings of port 1 of the C3220 and port 1 of S3220: C3220 Port 1 LOAM Mode = Active, Admin Status = Enabled S3220 Port 1 LOAM Mode = Passive, Admin Status = Enabled You can inter‐change LOAM Active/Passive modes between the C3220 and S3220 (be sure one is Active the other is Passive). This procedure has an ION chassis with a C3220 and a stand‐alone S3220 when using the web interface method: 1. Make sure the copper ports on both sides show Links Status = Up when you run the loopback test from one of the copper sides (local or remote side). See Figure 1 for this sample Loopback Configu‐ ration. 2. For all S3220 and C3220 copper and fiber ports, set LOAM Admin Mode to Enabled (at x323x > Port 1 > LOAM > Main > Admin Status = Enabled). 3. One side of copper port can be LOAM Admin Status = Active and other can be Passive; or both can be Active. 4. One of the Fiber ports LOAM Admin Status must be Active for the MAC address to display. 5. At both the C3220 and the S3220, at the Loopback Type dropdown, select Remote Peer. 6. From the Active side, click the Start button to begin the loopback test; you may have to wait a mi‐ nute or more for the loopback test to start. 7. Verify the Operational Status on both sides (Operational or Passive Wait). Click Refresh if neces‐ sary. 8. Verify the Loopback Status (Remote in Loopback on the local side, Local in Loopback on the remote side). 9. At both the C3220 and the S3220 Port 1 > LOAM > Main > Counters tab, compare the counters data (e.g., Information PDU Sent, Information PDU Received, Unique Event Notification Sent, Unique Event Notification Received, Loopback Control Sent, Loopback Control Received, etc.). See Figure 2 for sample Loopback Counters information. 10. Click the Refresh button to update the Counters data as desired. 11. When done click the Stop button on the Active side. The Loopback Status changes to No Loopback. 12. When the test results are completed as required, click the Reset LOAM Counters on both sides. (You may have to click the Reset LOAM Counters button twice, or click Reset LOAM Counters and then click Refresh to clear the counters.) The counters will begin incrementing again immediately. Each time you change the loopback configuration and run a loopback test, the Configuration Revision field increments by one on both sides. Note that there is a field in the GUI for the MAC address, but you cannot add a MAC peer address to the GUI or via the CLI. 33472 Rev. J https://www.transition.com Page 158 of 700
-
 1
1 -
2
-
3
-
4
-
5
-
6
-
7
-
8
-
9
-
10
-
11
-
12
-
13
-
14
-
15
-
16
-
17
-
18
-
19
-
20
-
21
-
22
-
23
-
24
-
25
-
26
-
27
-
28
-
29
-
30
-
31
-
32
-
33
-
34
-
35
-
36
-
37
-
38
-
39
-
40
-
41
-
42
-
43
-
44
-
45
-
46
-
47
-
48
-
49
-
50
-
51
-
52
-
53
-
54
-
55
-
56
-
57
-
58
-
59
-
60
-
61
-
62
-
63
-
64
-
65
-
66
-
67
-
68
-
69
-
70
-
71
-
72
-
73
-
74
-
75
-
76
-
77
-
78
-
79
-
80
-
81
-
82
-
83
-
84
-
85
-
86
-
87
-
88
-
89
-
90
-
91
-
92
-
93
-
94
-
95
-
96
-
97
-
98
-
99
-
100
-
101
-
102
-
103
-
104
-
105
-
106
-
107
-
108
-
109
-
110
-
111
-
112
-
113
-
114
-
115
-
116
-
117
-
118
-
119
-
120
-
121
-
122
-
123
-
124
-
125
-
126
-
127
-
128
-
129
-
130
-
131
-
132
-
133
-
134
-
135
-
136
-
137
-
138
-
139
-
140
-
141
-
142
-
143
-
144
-
145
-
146
-
147
-
148
-
149
-
150
-
151
-
152
-
 153
153 -
 154
154 -
 155
155 -
 156
156 -
 157
157 -
 158
158 -
 159
159 -
 160
160 -
 161
161 -
 162
162 -
 163
163 -
164
-
165
-
166
-
167
-
168
-
169
-
170
-
171
-
172
-
173
-
174
-
175
-
176
-
177
-
178
-
179
-
180
-
181
-
182
-
183
-
184
-
185
-
186
-
187
-
188
-
189
-
190
-
191
-
192
-
193
-
194
-
195
-
196
-
197
-
198
-
199
-
200
-
201
-
202
-
203
-
204
-
205
-
206
-
207
-
208
-
209
-
210
-
211
-
212
-
213
-
214
-
215
-
216
-
217
-
218
-
219
-
220
-
221
-
222
-
223
-
224
-
225
-
226
-
227
-
228
-
229
-
230
-
231
-
232
-
233
-
234
-
235
-
236
-
237
-
238
-
239
-
240
-
241
-
242
-
243
-
244
-
245
-
246
-
247
-
248
-
249
-
250
-
251
-
252
-
253
-
254
-
255
-
256
-
257
-
258
-
259
-
260
-
261
-
262
-
263
-
264
-
265
-
266
-
267
-
268
-
269
-
270
-
271
-
272
-
273
-
274
-
275
-
276
-
277
-
278
-
279
-
280
-
281
-
282
-
283
-
284
-
285
-
286
-
287
-
288
-
289
-
290
-
291
-
292
-
293
-
294
-
295
-
296
-
297
-
298
-
299
-
300
-
301
-
302
-
303
-
304
-
305
-
306
-
307
-
308
-
309
-
310
-
311
-
312
-
313
-
314
-
315
-
316
-
317
-
318
-
319
-
320
-
321
-
322
-
323
-
324
-
325
-
326
-
327
-
328
-
329
-
330
-
331
-
332
-
333
-
334
-
335
-
336
-
337
-
338
-
339
-
340
-
341
-
342
-
343
-
344
-
345
-
346
-
347
-
348
-
349
-
350
-
351
-
352
-
353
-
354
-
355
-
356
-
357
-
358
-
359
-
360
-
361
-
362
-
363
-
364
-
365
-
366
-
367
-
368
-
369
-
370
-
371
-
372
-
373
-
374
-
375
-
376
-
377
-
378
-
379
-
380
-
381
-
382
-
383
-
384
-
385
-
386
-
387
-
388
-
389
-
390
-
391
-
392
-
393
-
394
-
395
-
396
-
397
-
398
-
399
-
400
-
401
-
402
-
403
-
404
-
405
-
406
-
407
-
408
-
409
-
410
-
411
-
412
-
413
-
414
-
415
-
416
-
417
-
418
-
419
-
420
-
421
-
422
-
423
-
424
-
425
-
426
-
427
-
428
-
429
-
430
-
431
-
432
-
433
-
434
-
435
-
436
-
437
-
438
-
439
-
440
-
441
-
442
-
443
-
444
-
445
-
446
-
447
-
448
-
449
-
450
-
451
-
452
-
453
-
454
-
455
-
456
-
457
-
458
-
459
-
460
-
461
-
462
-
463
-
464
-
465
-
466
-
467
-
468
-
469
-
470
-
471
-
472
-
473
-
474
-
475
-
476
-
477
-
478
-
479
-
480
-
481
-
482
-
483
-
484
-
485
-
486
-
487
-
488
-
489
-
490
-
491
-
492
-
493
-
494
-
495
-
496
-
497
-
498
-
499
-
500
-
501
-
502
-
503
-
504
-
505
-
506
-
507
-
508
-
509
-
510
-
511
-
512
-
513
-
514
-
515
-
516
-
517
-
518
-
519
-
520
-
521
-
522
-
523
-
524
-
525
-
526
-
527
-
528
-
529
-
530
-
531
-
532
-
533
-
534
-
535
-
536
-
537
-
538
-
539
-
540
-
541
-
542
-
543
-
544
-
545
-
546
-
547
-
548
-
549
-
550
-
551
-
552
-
553
-
554
-
555
-
556
-
557
-
558
-
559
-
560
-
561
-
562
-
563
-
564
-
565
-
566
-
567
-
568
-
569
-
570
-
571
-
572
-
573
-
574
-
575
-
576
-
577
-
578
-
579
-
580
-
581
-
582
-
583
-
584
-
585
-
586
-
587
-
588
-
589
-
590
-
591
-
592
-
593
-
594
-
595
-
596
-
597
-
598
-
599
-
600
-
601
-
602
-
603
-
604
-
605
-
606
-
607
-
608
-
609
-
610
-
611
-
612
-
613
-
614
-
615
-
616
-
617
-
618
-
619
-
620
-
621
-
622
-
623
-
624
-
625
-
626
-
627
-
628
-
629
-
630
-
631
-
632
-
633
-
634
-
635
-
636
-
637
-
638
-
639
-
640
-
641
-
642
-
643
-
644
-
645
-
646
-
647
-
648
-
649
-
650
-
651
-
652
-
653
-
654
-
655
-
656
-
657
-
658
-
659
-
660
-
661
-
662
-
663
-
664
-
665
-
666
-
667
-
668
-
669
-
670
-
671
-
672
-
673
-
674
-
675
-
676
-
677
-
678
-
679
-
680
-
681
-
682
-
683
-
684
-
685
-
686
-
687
-
688
-
689
-
690
-
691
-
692
-
693
-
694
-
695
-
696
-
697
-
698
-
699
-
700
 |
 |
