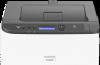
Ricoh P C301W Users Guide
Ricoh P C301W Manual
 |
View all Ricoh P C301W manuals
Add to My Manuals
Save this manual to your list of manuals |
Ricoh P C301W manual content summary:
- Ricoh P C301W | Users Guide - Page 1
User's Guide For safe and correct use, be sure to read the "Safety Information" before using the machine. - Ricoh P C301W | Users Guide - Page 2
- Ricoh P C301W | Users Guide - Page 3
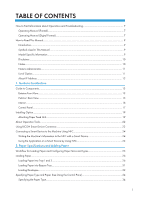
TABLE OF CONTENTS How to Find Information about Operations and Troubleshooting 7 Operating Manual (Printed)...7 Operating Manual (Digital Format)...7 How to Read This Manual...9 Introduction...9 Symbols Used in This Manual...9 Model-Specific Information...9 Disclaimer...10 Notes...10 Note to - Ricoh P C301W | Users Guide - Page 4
Web Image Monitor 37 Specifying a Custom Paper Size...37 Specifying Paper Type and Paper Size Using the Printer Driver 38 When Using Windows...38 When Using OS X/macOS...39 Supported Paper...40 Specifications of Paper Types...43 Non-Recommended Paper Types...50 Paper Storage...50 Print Area...51 - Ricoh P C301W | Users Guide - Page 5
4. Configuring the Machine Using the Control Panel Basic Operation...69 Menu Chart...70 Admin. Tools...71 Printer Settings...73 List/Test Print...73 System...73 PCL Menu...74 PS Menu...76 System Settings...77 Tray Paper Settings...81 Network Settings...84 Print - Ricoh P C301W | Users Guide - Page 6
a Component...136 Replacing the Intermediate Transfer Unit 136 Replacing the Fusing Unit and Transfer Roller 136 Cautions When Cleaning...137 Cleaning the Toner Density Sensor...138 Cleaning the Friction Pad and Paper Feed Roller 140 Cleaning the Registration Roller and Paper Tray 143 Moving and - Ricoh P C301W | Users Guide - Page 7
Removing Printing Jams...154 When You Cannot Print Test Page...162 Paper Feed Problems...163 Print Quality Problems...166 Checking the Condition of the Machine 166 Checking the Printer Driver Settings...167 Printer Problems...169 When You Cannot Print Properly...169 When You Cannot Print Clearly - Ricoh P C301W | Users Guide - Page 8
Specifications of the Machine...194 General Function Specifications...194 Printer Function Specifications...196 Paper Feed Unit TK1220...196 Consumables...198 Print Cartridge...198 Waste Toner Bottle...199 Information for This Machine...200 User Information on Electrical & Electronic - Ricoh P C301W | Users Guide - Page 9
operating manuals from https://www.ricoh.com/. Viewing from the provided CD-ROM Operating manuals can also be viewed from the provided CD-ROM. • When using Windows 1. Insert the CD-ROM into the CD-ROM drive. 2. Click [Read Manual] and follow the instructions on the screen. The PDF file manual opens - Ricoh P C301W | Users Guide - Page 10
5. Click the manual you want to refer to. The PDF file manual opens. 8 - Ricoh P C301W | Users Guide - Page 11
reference. Symbols Used in This Manual This manual uses the following symbols: Indicates points to pay attention to when using functions. This symbol indicates points that may result in the product or service becoming unusable or result in the loss of data if the instructions are not obeyed. Be sure - Ricoh P C301W | Users Guide - Page 12
the following, your machine is a region B model: • CODE XXXX -17 • 120-127 V • Dimensions in this manual are given in two units of measure: metric and inch. If your machine is a Region A model, refer to the quality, the manufacturer recommends that you use genuine toner from the manufacturer. 10 - Ricoh P C301W | Users Guide - Page 13
Wi-Fi Setup Wizard], or [Admin. Tools] menu using the control panel You can access these menus without a password by factory default. The setting for creating a password can be found in [Admin. Tools]. • Configuring the [System Settings], [Network Settings], [IPsec Settings], or [Administrator Tools - Ricoh P C301W | Users Guide - Page 14
• If Paper feed unit is attached, "Tray 2" appears on the machine's control panel. About IP Address In this manual, "IP address" covers both IPv4 and IPv6 environments. Read the instructions that are relevant to the environment you are using. 12 - Ricoh P C301W | Users Guide - Page 15
preparations for using the machine and its operating instructions. Guide to Components This section introduces the names of the machine status. Open this cover to replace the print cartridge. Use this to support sheets that come out curled after they are printed. Flip open the extension by - Ricoh P C301W | Users Guide - Page 16
1. Guide to the Machine No. Name 4 Stop Fences 5 Standard Tray 6 Top Cover Open Lever 7 Front the print side down. Open here to replace the print cartridges. Open this cover to replace the waste toner bottle or remove jammed paper. To open the front cover, pull this lever on the right side of - Ricoh P C301W | Users Guide - Page 17
1 2 3 DUE210 Exterior: Rear View 1 Guide to Components 6 5 4 3 2 No. Name 1 Front Cover Open Lever 2 Power Socket 3 Rear Cover 4 Cable Cover ECB105 Description To open the front cover, pull this lever on - Ricoh P C301W | Users Guide - Page 18
1. Guide to the Machine No. Name 5 Ethernet Port 6 USB Port Interior Description For connecting the machine on the screen when print cartridges need to be replaced, or new ones need to be prepared. Fuses toner to the paper. You might have to move this unit to check for or remove jammed paper. - Ricoh P C301W | Users Guide - Page 19
Guide to Components No. Name 3 Waste Toner Bottle 4 Transfer unit Description Collects toner that is wasted during printing. You need to remove this when you replace the waste toner bottle. • For details about the messages that appear on the screen when consumables need to be replaced, see - Ricoh P C301W | Users Guide - Page 20
1. Guide to the Machine No. 5 6 7 Name Display Scroll Keys [OK] key 8 NFC 9 Lights up in red whenever an error occurs. Check the displayed error message. Flashes in yellow when the toner has nearly run out. Flashes when the machine is receiving data from a computer. This indicator lights up - Ricoh P C301W | Users Guide - Page 21
and allow time for the main unit to fully cool. Failing to take these precautions could result in burns. • The printer weighs approximately 25 kg (56 lb.). When moving the printer, use the inset grips on both sides, and lift slowly in pairs. • Lifting the paper feed unit carelessly or dropping - Ricoh P C301W | Users Guide - Page 22
1. Guide to the Machine 2. Remove the adhesive tape from the optional paper feed on the power. • After installing the optional paper feed unit, select Tray 2 in the printer driver. For details, see the printer driver Help. • If the new device is listed in the column of configuration options, it has - Ricoh P C301W | Users Guide - Page 23
Installing Option • If the optional paper feed unit is not installed properly, try to install it again by repeating the procedure. If the problem persists, contact your sales or service representative. • For details about printing the configuration page, see page 88 "Print List/Report". 21 - Ricoh P C301W | Users Guide - Page 24
1. Guide to the Machine About Operation Tools This section explains the operation tools of this machine. Control Panel The control panel contains keys for controlling the - Ricoh P C301W | Users Guide - Page 25
site. Check the App Store or Google Play to see the functions you can use on RICOH Smart Device Connector. 1. Press the [Menu] key. ECB202 2. Press the [ ] or the smart device, and then read the QR code. Follow the instructions displayed on the application. For details about how to connect a smart - Ricoh P C301W | Users Guide - Page 26
1. Guide to the Machine Connecting a Smart Device to the Machine Using NFC This section describes how to connect your smart device to the machine using NFC. - Ricoh P C301W | Users Guide - Page 27
paper tray. Specify the paper type and size. Specify the paper type and size on the printer driver. For details about the procedures, refer to the next page. Procedure Reference See page 26 " Paper Type and Paper Size Using the Printer Driver". For details about supported paper, see page 40 - Ricoh P C301W | Users Guide - Page 28
avoid printing problems. This driver as specified on the printer. • Do not move the side fences and end fence forcefully. Doing so may damage the tray. • Do not slide the paper tray in forcefully when inserting the loaded tray into the printer. Otherwise, the side and end fences or the paper guide - Ricoh P C301W | Users Guide - Page 29
1. Pull out the paper tray carefully with both hands. Loading Paper ECC076 Place the tray on a flat surface. 2. Push the metal plate down until it clicks. ECC077 3. Align the side fences and end fence with the paper size. ECC078 27 - Ricoh P C301W | Users Guide - Page 30
2. Paper Specifications and Adding Paper 4. Fan the paper before loading it. DAC344 5. Load the paper in the tray with the print side faced up. Make sure the paper is not stacked higher than the upper limit marked inside the tray. Make sure the paper is not stacked higher than the projection on the - Ricoh P C301W | Users Guide - Page 31
Loading Paper ECC081 • The upper limit differs depending on the paper type (thin or thick paper). See the label inside the tray to check the upper limit. • The remaining paper indicator on the right front side of the paper tray shows approximately how much paper is remaining. Extending Tray 1 to - Ricoh P C301W | Users Guide - Page 32
2. Paper Specifications and Adding Paper 3. Push the metal plate down until it clicks. ECC077 4. Pinch the extender, and then pull out the extender until it clicks. ECC110 After extension, check that the arrows on the extender and tray are aligned. ECC111 5. Follow Steps 3 to 7 in "Loading Paper - Ricoh P C301W | Users Guide - Page 33
the bypass tray while the machine is in Energy Saver mode. 1. Insert the top edge of the paper into the machine. ECC112 2. Adjust the paper guides to the paper size. ECC113 31 - Ricoh P C301W | Users Guide - Page 34
2. Paper Specifications and Adding Paper 3. Support the paper with both hands, and insert it opposite direction, and then rotate the print object by 180 degrees using the printer driver before printing. For details, see the printer driver Help. • When Using Tray 1 • If the envelope flap is on - Ricoh P C301W | Users Guide - Page 35
Loading Paper ECC118 • When Using the Bypass Tray • If the envelope flap is on a short side, place the envelope with the flap side in the front part of the tray. If the envelope flap is on a long side, place the envelope with the flap side on the right. ECC119 33 - Ricoh P C301W | Users Guide - Page 36
section explains how to specify the paper size and paper type using the control panel. • Paper type and size can also be specified using the printer driver. For details, see the printer driver Help. • For prints from the bypass tray or Tray 1, you can select to print according to either the - Ricoh P C301W | Users Guide - Page 37
paper size. • Custom size paper cannot be loaded in tray 2. • When you perform printing, make sure that the paper size specified with the printer driver matches the paper size specified with the control panel. If a paper size mismatch occurs, a message appears on the display. To ignore the error - Ricoh P C301W | Users Guide - Page 38
2. Paper Specifications and Adding Paper 1. Press the [Menu] key. ECB202 2. Press the [ ] or [ ] key to select [Tray Paper Settings], and then press the [OK] key. 3. Press the [ ] or [ ] key to select the paper size setting for the desired tray, and then press the [OK] key. 4. Press the [ ] or [ ] - Ricoh P C301W | Users Guide - Page 39
Settings]. 3. Click [Tray Paper Settings] tab. 4. Select the paper type and paper size for the tray you want to use. 5. Enter the administrator password if required. 6. Click [OK]. 7. Close the web browser. Specifying a Custom Paper Size 1. Start the web browser and access the machine by entering - Ricoh P C301W | Users Guide - Page 40
on the operating system you are using. 1. Open the [Printing preferences] dialog box from the printer driver. For information of how to open the printer driver properties from [Devices and Printers], see page 57 "Displaying the Printing Preferences Dialog Box". The [Printing Preferences] dialog box - Ricoh P C301W | Users Guide - Page 41
[Paper] tab. Specifying Paper Type and Paper Size Using the Printer Driver ECB251 3. In the [Input Tray:] list, select the paper print. 2. Select [Print...] on the [File] menu. 3. In the [Printer] list, select the printer you are using. 4. In the [Paper Size] list, select the size of the document to - Ricoh P C301W | Users Guide - Page 42
2. Paper Specifications and Adding Paper Supported Paper • After loading paper in the tray, specify Tray 1 or the bypass tray, specify the width and length using the control panel and the printer driver. • When printing on custom size paper from the bypass tray, you can print without specifying the - Ricoh P C301W | Users Guide - Page 43
Supported Paper Type Plain Paper 1 Plain Paper 2 Middle Thick Paper Recycled Paper Thick Paper 1 Thick Paper 2 Thin Paper Letterhead Preprinted Paper Label Paper Prepunched Paper Bond - Ricoh P C301W | Users Guide - Page 44
2. Paper Specifications and Adding Paper Bypass tray Type Plain Paper 1 Plain Paper 2 Middle Thick Paper Recycled Paper Thick Paper 1 Thick Paper 2 Thin Paper Letterhead Envelope Label Paper Prepunched Paper Bond Paper Cardstock Color Paper Plain Paper 1 Plain Paper 2 Middle Thick Paper Recycled - Ricoh P C301W | Users Guide - Page 45
Supported Paper • PCL printer driver When [Gradation:] in [Print Quality] is set to [Fine] • PostScript 3 printer driver When [Print Quality] in [Printer Features] is set to [Best Quality] Specifications of Paper Types The following tables describe the types of paper that can be used with this - Ricoh P C301W | Users Guide - Page 46
half that of middle thick paper. Thick Paper 2 Item Description Paper thickness 106 to 163 g/m2 (28 to 43 lb.) Supported paper tray Tray 1 and bypass tray Duplex supported size None Notes The number of sheets that can be printed per minute is approximately half that of middle thick paper - Ricoh P C301W | Users Guide - Page 47
, B5 JIS, 81/2 × 14, 81/2 × 11, 71/4 × 101/2, 8 × 13, 81/2 × 13, 81/4 × 13, 16K, 81/2 × 132/5, 81/2 × 133/5 Recycled Paper Item Paper thickness Supported paper tray Duplex supported size Notes Description 75 to 90 g/m2 (20 to 24 lb.) Can be used with any of the paper trays. A4, B5 JIS, 81 - Ricoh P C301W | Users Guide - Page 48
[Thick Paper 1], or [Thick Paper 2]. Prepunched Paper Item Description Paper thickness 75 to 90 g/m2 (20 to 24 lb.) Supported paper tray Can be used with any of the paper trays. Duplex supported size Notes A4, B5 JIS, 81/2 × 14, 81/2 × 11, 71/4 × 101/2, 8 × 13, 81/2 × 13, 81/4 × 13, 16K, 81 - Ricoh P C301W | Users Guide - Page 49
the specified range, select [Thick Paper 1]. Label Paper Item Supported paper tray Duplex supported size Notes Description Tray 1 and bypass tray None • The number machine, which can cause paper feed problems, deterioration in print quality, or premature wear of the print cartridge's photo - Ricoh P C301W | Users Guide - Page 50
Item Supported paper tray Tray 1 and bypass tray Duplex supported size printer driver to rotate the print object 180 degrees. For details about changing the orientation see the printer driver sometimes have creases along their long edges and toner smear on their unprinted sides. Print images might - Ricoh P C301W | Users Guide - Page 51
Supported Paper DAC573 • When fanning envelopes, make sure they are not stuck together. If they are stuck together, separate them. • When fanning envelopes, make sure the - Ricoh P C301W | Users Guide - Page 52
[Gradation:] in [Print Quality] is set to Fine • PostScript 3 printer driver When [Print Quality] in [Printer Features] is set to [Best Quality] Non-Recommended Paper Types Do not use the following types of paper: • Ink-jet printer paper • Bent, folded, or creased paper • Curled or twisted paper - Ricoh P C301W | Users Guide - Page 53
or box supplied with the paper. Print Area The diagram below shows the area of the paper that the machine can print on. From the printer driver 2 4 4 3 Supported Paper 1 3 DAC571 1. Print area 2. Feed direction 3. Approx. 4.2 mm (0.2 inches) 4. Approx. 4.2 mm (0.2 inches) 51 - Ricoh P C301W | Users Guide - Page 54
direction 3. Approximately 10 mm (0.4 inches) 4. Approximately 15 mm (0.6 inches) • Borderless printing is not supported. • The print area may vary depending on the paper size, printer language and printer driver settings. • For better envelope printing, we recommend you set the right, left, top - Ricoh P C301W | Users Guide - Page 55
This chapter describes how to configure settings on the printer driver and print documents. What You Can Do with the Printer Function Duplex printing You can print on both sides of a sheet of paper. For details, see the printer driver Help. DSG261 Combined printing You can combine multiple pages - Ricoh P C301W | Users Guide - Page 56
support] must be selected, and [Enable printer pooling] must not be selected on the [Ports] tab with the printer driver. If Bidirectional Communication is Disabled This section describes how to set up option and setting of paper size for each tray on your computer manually. • Manage Printers - Ricoh P C301W | Users Guide - Page 57
4. Click the [Accessories] tab. Configuring Option Settings for the Printer ECB252 5. Select options installed from the [Options] area, and . 8. Click [Apply]. 9. Click [OK] to close the printer properties window. When Using OS X/macOS The following procedure is explained using macOS 10.13 as an - Ricoh P C301W | Users Guide - Page 58
3. Printing Documents 1. Start System Preferences. 2. Click [Printers & Scanners]. 3. Select the printer you are using, and then click [Options & Supplies...]. 4. Click [Options], and then configure settings as needed. 5. Click [OK]. 6. Quit System Preferences. 56 - Ricoh P C301W | Users Guide - Page 59
Printing Preferences Dialog Box Displaying the Printing Preferences Dialog Box To change the default settings of the printer driver, configure settings in the [Printing Preferences] dialog box. To change the default settings of all applications, open the [Printing Preferences] dialog box from the OS - Ricoh P C301W | Users Guide - Page 60
Preferences]. • Procedures for opening the [Printing Preferences] dialog box vary depending on the application. For details, see the printer driver Help or the manuals provided with the application. Displaying the Printing Preferences Dialog Box in an Application When Using OS X/ macOS The following - Ricoh P C301W | Users Guide - Page 61
to perform basic printing. • Duplex printing is selected as the default setting. When Using Windows The procedure in this section is an you are using. For details of printing options, see the printer driver Help. 1. Open the printer properties dialog box in your document's application. For details - Ricoh P C301W | Users Guide - Page 62
dialog box closes. 3. Click [Print]. • When printing a job (Color/B&W or B&W only) is restricted, specify the user code in the printer properties of the printer driver before printing. For details about user code, see page 103 "Restricting Machine Functions According to User". • You can specify - Ricoh P C301W | Users Guide - Page 63
machine's control panel or your computer, depending on the status of the job. Canceling a print job before printing has started • Windows 1. Double-click the printer icon on the task tray of your computer. 2. Select the print job you want to cancel, click the [Document] menu, and then click [Cancel - Ricoh P C301W | Users Guide - Page 64
3. Printing Documents 5. Click [×]. ECC272 • If you cancel a print job that has already been processed, printing may continue for a few pages before being canceled. • It may take a while to cancel a large print job. Canceling a print job while printing 1. While an error message is displayed on the - Ricoh P C301W | Users Guide - Page 65
after you enter the password using the machine's control panel. This function prevents unauthorized users from seeing sensitive documents at the machine. • This function is available for P C301W only. • This function is only available when using the PCL printer driver, and printing from a computer - Ricoh P C301W | Users Guide - Page 66
as a Locked Print file. You can print the file by entering the password using the control panel. • The Locked Print file is automatically erased Locked Print data at a time. • Even if the printer cannot store any more Locked Print files, the printer holds a new Locked Print file for the period of - Ricoh P C301W | Users Guide - Page 67
When there is a Locked Print file stored in the printer, "Locked Print Job" and "Press the Menu key." appears on the printer's control panel display. Use the following procedure to delete a Locked Print file. You do not need to enter a password to delete a Locked Print file. 1. Press the [Menu] key - Ricoh P C301W | Users Guide - Page 68
describes various print functions that you can configure with the printer driver to make printouts appropriate for your purposes. Print Quality using other colors only. Saving toner when printing (Economy Color printing) You can save toner by printing with lower toner consumption. Changing the image - Ricoh P C301W | Users Guide - Page 69
to the computer. You can find the color profile in the ICM folder stored on the provided printer driver CD-ROM. For information about adding a color profile, search Windows Help for "color profile", documents can be scaled to a size that the machine supports, so that it can then be printed out. 67 - Ricoh P C301W | Users Guide - Page 70
3. Printing Documents Not printing of blank pages (only PostScript 3 printer driver) If a print job contains blank pages, they can be prevented from being printed. Note that this setting has higher priority than [Blank Page Print] under [Printer Settings] of the control panel. Printing with a cover - Ricoh P C301W | Users Guide - Page 71
4. Configuring the Machine Using the Control Panel This chapter describes how to configure the machine using the control panel. Basic Operation 1. If you want to configure the machine's system settings, press the [Menu] key. ECB202 2. Press the [ ] or [ ] key to select the settings you want to use. - Ricoh P C301W | Users Guide - Page 72
Settings For details, see page 73 "Printer Settings". System Settings For details, see page 77 "System Settings". Tray Paper Settings For details, see page 81 "Tray Paper Settings". Wi-Fi Setup Wizard For details, see Setup Guide. Network Settings For details, see page 84 "Network Settings". Print - Ricoh P C301W | Users Guide - Page 73
Traditional Chinese, Arabic Reset Settings Be sure not to clear the settings by mistake. • Reset All Settings Resets the machine's settings to their defaults except the following: • Language settings • Network Settings Press the [OK] key to execute. Press the [Back] key to exit to the previous level - Ricoh P C301W | Users Guide - Page 74
of the menu tree without clearing the settings. Admin. Tools Lock Specifies a four-digit password for accessing the [Network Settings], [Wi-Fi Setup Wizard], and [Admin. Tools] menus. Do not forget this password. Default: [Off] • On (0000 to 9999) • Off IPsec Selects whether to enable or disable - Ricoh P C301W | Users Guide - Page 75
print the specified number of sets. This setting is disabled if the number of pages to print is specified by the printer driver. Default: "1" • 1 - 999 Sub Paper Size Sets the printer to print onto paper of another size if the specified paper is not loaded in any tray. Alternative sizes are preset - Ricoh P C301W | Users Guide - Page 76
this setting has lower priority than the printer driver's blank page setting. When cover sheet printing is enabled from the printer driver, cover sheets are inserted even if you select [Off]. Default: [On] • On • Off B&W Page Detect Sets the printer to print all monochrome pages in monochrome - Ricoh P C301W | Users Guide - Page 77
ISO L9, PC-775, PC-1004, Win Baltic, Roman-8, Roman-9, ISO L1, ISO L2, ISO L5 Default: [PC-8] Courier Font Specifies a courier-type font. Default: [Regular] • Regular • Dark Ext. A4 Width Sets the printer to extend the width of the printable area of A4 size paper, reducing side margin width - Ricoh P C301W | Users Guide - Page 78
: [Off] • Off • On Append CR to LF Sets the printer to append a CR code to each LF code to print text data clearly. Default: [Off] • On • Off Resolution Specifies the print resolution in dots per inch. Default: [600 × 600 1bit] • 600 × 600 1bit • 600 × 600 2bit • 600 × 600 4bit PS Menu PS Resolution - Ricoh P C301W | Users Guide - Page 79
seconds, in increments of 1 second • Fixed USB Port Specifies whether the same printer driver can be used for multiple machines or not under USB connection. Default: [Off] • Off You must install the printer driver separately for individual machines, because the machine other than the original will - Ricoh P C301W | Users Guide - Page 80
Machine Using the Control Panel • On The same printer driver you have installed in your computer can be used when printing restarts, it may cause a paper jam. Default: [Off] • Off • On Supplies Status Displays information about consumables. • Toner Black, Magenta, Cyan, Yellow • Other Supplies Print - Ricoh P C301W | Users Guide - Page 81
when the number of pages that can be printed with the remaining toner is approximately 100. Default: [Normal] B&W Print Priority Sets the machine to suppress the consumption of color toner when printing black-and-white pages. Default: [Off] • Off • On Color Den/Reg Adjusts color density and - Ricoh P C301W | Users Guide - Page 82
4. Configuring the Machine Using the Control Panel Default: [Normal] • Normal • Curl Prevented 80 - Ricoh P C301W | Users Guide - Page 83
from the specified tray. If that tray runs out of paper, the printer automatically switches to the other tray to continue printing. [Tray 2] appears only when the optional paper feed unit is installed. Default: [Tray 1] • Tray 1 • Tray 2 Paper Size: Tray 1 Specifies the paper size for Tray - Ricoh P C301W | Users Guide - Page 84
• A4, 81/2 × 11 Paper Size: Bypass Tray Specifies the paper size for the bypass tray. Default: 11] (mainly Europe and Asia) [A4], (mainly North America) [81/2 × • A4, A5 proceeds even if the paper size/type settings of the printer and printer driver do not match. However, if the paper is too - Ricoh P C301W | Users Guide - Page 85
how print jobs using the Tray 1 are handled. Default: [Driver/Command] • Machine Setting(s) The paper settings configured on the machine's control panel are applied to all print jobs. An error occurs when the paper settings specified by the printer driver or the print command do not match the - Ricoh P C301W | Users Guide - Page 86
Specifies the speed for Ethernet communication. Select a speed that matches your network environment. For most networks, the default setting is the optimum setting. Default: [Auto Select] • Auto Select • 100Mbps Full Duplex • 100Mbps Half Duplex • 10Mbps Full Duplex • 10Mbps Half Duplex Wireless - Ricoh P C301W | Users Guide - Page 87
with one touch using WPS (Wi-Fi Protected Setup). For details, see Setup Guide. • PBC • PIN • Wi-Fi Direct Input the SSID of the machine to configure . PWD Input SSID to set a password for Wi-Fi Direct. • Wi-Fi Direct Type Select 2.4 GHz or 5 GHz as the wireless LAN frequency. Default: [2.4 GHz] • 2.4 GHz - Ricoh P C301W | Users Guide - Page 88
• IPv6 Selects whether to enable or disable IPv6. Default: [Active] • Inactive • Active • DHCP Sets the printer to receive its IPv6 address from a DHCP server. When DHCP is used, you cannot specify the IPv6 address manually. Default: [Inactive] • Inactive • Active • IP Address (DHCP) Displays the - Ricoh P C301W | Users Guide - Page 89
Network Settings Specifies the IPv6 address of the default gateway. Can contain up to 39 characters. • Stateless Address Displays the IPv6 stateless addresses obtained from a Router Advertisement • Stateless Address 1 • Stateless Address 2 • Stateless Address 3 • Stateless - Ricoh P C301W | Users Guide - Page 90
/Report] screen appears on completion of printing. Types of Lists/Reports Configuration Page Prints general information and the current configurations of the printer. Maintenance Page Prints the maintenance page. • The lists will be printed using the tray set for [Paper Tray Priority] in paper input - Ricoh P C301W | Users Guide - Page 91
and proceed with the registration. • Registration Registers the machine to @Remote. • @Remote (At Remote) is an Internet-based support for remote management of digital multi-purpose devices and laser printers. For more information about the settings, contact your sales or service representative. 89 - Ricoh P C301W | Users Guide - Page 92
4. Configuring the Machine Using the Control Panel 90 - Ricoh P C301W | Users Guide - Page 93
• Configuring the network settings • Configuring the IPsec settings • Printing reports • Setting the administrator password • Resetting the machine's configuration to the factory default • Creating backup files of the machine's configuration • Restoring the machine's configuration from backup files - Ricoh P C301W | Users Guide - Page 94
5. Configuring the Machine Using Utilities Using Web Image Monitor • Some items might not appear, depending on the model type you are using. • Some items can also be configured using the control panel. Recommended web browsers • Internet Explorer 9 or later • Microsoft Edge • Google Chrome version - Ricoh P C301W | Users Guide - Page 95
Displaying Top Page Displaying Top Page When you access the machine using Web Image Monitor, the top page appears in your browser's window. 1. Launch the Web browser. 2. In the Web browser's address bar, enter "http://(machine's IP address)/" to access the machine. If a DNS server is used and the - Ricoh P C301W | Users Guide - Page 96
's [Refresh] button to refresh the entire browser screen. • If you use an older version of a supported Web browser or the Web browser has JavaScript and cookies disabled, display and operation problems may occur. • If you are using a proxy server, configure the Web browser settings as necessary. For - Ricoh P C301W | Users Guide - Page 97
remaining life of the waste toner bottle, as "Status OK", "Almost Full" or "Full". Shows the remaining life of the intermediate transfer unit, as "Status OK", "Replacement Required Soon" or "Replacement Required". For replacing, contact your sales or service representative. Shows the remaining life - Ricoh P C301W | Users Guide - Page 98
" or "Replacement Required". For replacing, contact your sales or service representative. Description Shows the current state and paper size/type setting the bypass tray. • If a non-genuine print cartridge is installed, toner life cannot be reliably indicated. • The information about Tray 2 appears - Ricoh P C301W | Users Guide - Page 99
function. Shows the following for pages printed in Economy Color Printing mode using the printer function: • Accumulated value of black toner A4 page coverage (in percent) • Accumulated value of black toner consumption (converted into fully- covered A4 pages) Shows the following for pages printed in - Ricoh P C301W | Users Guide - Page 100
Engine FW Version PCL Version PS Version Machine ID Total Memory Description Shows the version of firmware installed on the machine. Shows the version of firmware for the machine engine. Shows the version of the PCL interpreter. Shows the version of the PS interpreter. Shows the identification - Ricoh P C301W | Users Guide - Page 101
Configuring the System Settings Configuring the System Settings Click [System Settings] to display the page for configuring the system settings. This page contains the following tabs: [Tray Paper Settings], [B&W Print Priority] and [I/O Timeout]. Tray Paper Settings Tab Tray 1 Item Paper Size - Ricoh P C301W | Users Guide - Page 102
on the machine's control panel are applied to all print jobs. An error occurs when the paper settings specified by the printer driver or the print command do not match the machine's settings. • Driver/Command When executing a print job specifying the paper tray, the paper settings specified in the - Ricoh P C301W | Users Guide - Page 103
print command are applied regardless of the machine's settings. • Any Size/Type Printing proceeds even if the paper size/type settings of the machine and printer driver do not match, but if the paper is too small for the print job, the printed image will be cropped. • Any Custom Size/Type The - Ricoh P C301W | Users Guide - Page 104
setting is enabled, the same printer driver you have installed in your computer model. If disabled, you must install the printer driver separately for individual machines, because the machine Locked Print Timeout (seconds)] appears only for P C301W. Black-and-White Print Priority Tab B&W Print - Ricoh P C301W | Users Guide - Page 105
authentication you can use only the PCL printer driver. Printing such jobs from the PostScript 3 printer driver is not possible. • For details about address. 2. Click [Restrict Available Functions]. 3. Enter the administrator password if required. 4. Click [Apply]. 5. Under "Available Functions", - Ricoh P C301W | Users Guide - Page 106
5. Configuring the Machine Using Utilities Select [Do not Restrict] for the functions you do not want to restrict. The user restriction setting is enabled for the selected function. Proceed to the following steps to register users. 6. Click [Available Functions per User]. A list of currently - Ricoh P C301W | Users Guide - Page 107
Start the Web browser, and access the machine by entering its IP address. 2. Click [Restrict Available Functions]. 3. Enter the administrator password if required. 4. Click [Apply]. 5. Click [Available Functions per User]. A list of currently registered user entries appears. 6. Select the entry to - Ricoh P C301W | Users Guide - Page 108
and black-and-white) • Color printing Authentication method The user must enter a valid user code in the printer driver before executing a print command. Authentication using the printer driver 1. Open the file you want to print on your computer. 2. On the [File] menu, click [Print...]. 3. In - Ricoh P C301W | Users Guide - Page 109
Ethernet Speed Shows the type and speed of the network connection. IPP Printer Name Shows the name used to identify the machine on the network. the version of the machine's network module (a part of the machine firmware). Ethernet MAC Address Shows the Ethernet MAC address of the machine. Active - Ricoh P C301W | Users Guide - Page 110
disable [IPv6] under network settings. When disabled, [DHCP], [Manual Configuration Address], [Prefix Length], and [Gateway Address] below cannot Active]. Displays up to four stateless auto addresses. Displays the machine's default gateway address. Displays the link local address of the machine. The - Ricoh P C301W | Users Guide - Page 111
Setting Item mDNS Printer Name Description Select to valid range is 1024 to 65535, except 53550 and 49999 (default is 9100). Select to enable network printing using LPR/LPD DNS Method Select whether to specify the domain server manually or have the machine obtain its DNS information automatically. - Ricoh P C301W | Users Guide - Page 112
jam occurs. Out of Paper Select to send an alert e-mail to the specified address if paper runs out. Toner Almost Empty Select to send an alert e-mail to the specified address if toner becomes low. Call Service Select to send an alert e-mail to the specified address if the machine requires - Ricoh P C301W | Users Guide - Page 113
Configuring the Network Settings SNMP Tab SNMP Item SNMP Description Select whether to enable the machine to use SNMP services. Trap Item Target Trap SNMP Management Host 1 SNMP Management Host 2 Description Select whether to enable the machine to send traps to the management host (NMS). - Ricoh P C301W | Users Guide - Page 114
SMTP (1 to 65535). Authentication Method Select an authentication method from the following: [Anonymous]: The user name and password are not necessary. [SMTP]: The machine supports NTLM and LOGIN authentication. [POP before SMTP]: The POP3 server is used for authentication. When sending e-mails - Ricoh P C301W | Users Guide - Page 115
from the following: [None]: Password will not be encrypted. [APOP Authentication]: Password will be encrypted. [Auto]: Password will be encrypted or not SSID from the list. Communication Mode [Infrastructure] is selected by default. Therefore, connect the machine to a wireless router or access - Ricoh P C301W | Users Guide - Page 116
WEP key length: [128bit], Format: [ASCII] WEP key max length: 13 characters (0x20-0x7e) • If you are configuring the connection settings manually, check the SSID, authentication method, or encryption key of the access point or wireless router in advance. Wi-Fi Direct Settings Item Description Wi - Ricoh P C301W | Users Guide - Page 117
certificate on the machine is deleted. Follow the procedure below to set items: 1. Check the item you want to set. 2. Enter the password if required. 3. Click [Next]. Certificate Item Description Create New SelfSigned Certificate Select this item to create a new self-signed certificate. Create - Ricoh P C301W | Users Guide - Page 118
only when an administrator password is specified. IPsec Global Settings Tab Item IPsec Function Default Policy Broadcast and Multicast Bypass enable or disable IPsec. Select whether to allow for the default IPsec policy. Select the services that you do not want to apply IPsec from the following - Ricoh P C301W | Users Guide - Page 119
Type Select IPv4 or IPv6 as the type of IP address to be used in IPsec communication. Local Address Displays the IP address of this printer. Remote Address Enter the IPv4 or IPv6 address of the device with which to communicate. Can contain up to 39 characters. Prefix Length Enter the - Ricoh P C301W | Users Guide - Page 120
(such as VPN devices). Select the security protocol from the following: • [AH]: Establishes secure communication that supports authentication only. • [ESP]: Establishes secure communication that supports both authentication and data encryption. • [ESP&AH]: Establishes secure communication that - Ricoh P C301W | Users Guide - Page 121
Configuring the IPsec Settings Item Key Perfect Forward Secrecy Description Select whether to enable or disable PFS (Perfect Forward Secrecy). IKE Settings Item IKE Version Encryption Algorithm Authentication Algorithm IKE Life Time IKE Diffie-Hellman Group Pre-Shared Key Key Perfect Forward - Ricoh P C301W | Users Guide - Page 122
5. Configuring the Machine Using Utilities Printing Lists/Reports Click [Print List/Report] to display the page for printing reports. Then, select an item and click [Print] to print out information for that item. Print List/Report Item Description Configuration Page Prints general information - Ricoh P C301W | Users Guide - Page 123
restore settings that are not related to the network to their defaults. Reset Settings of Available Functions Select to clear the user IPsec settings. • [Reset IPsec Settings] appears only when the administrator password is specified. Backup Setting Tab • When sending the machine for repair - Ricoh P C301W | Users Guide - Page 124
for the type of data you wish to back up. 2. Enter the administrator password if required. 3. Click [OK]. 4. Click [Save] in the confirmation dialog from the backup files. The machine's settings are returned to the default after repair. Restore Setting Item Description File to Restore Enter the - Ricoh P C301W | Users Guide - Page 125
Configuring the Administrator Settings 4. Enter the administrator password if required. 5. Click [OK]. • If it takes longer to recover from Energy Saver mode 2 than from Energy Saver mode 1. • The printer recovers from Energy Saver mode when it receives a print job or when any key on the machine - Ricoh P C301W | Users Guide - Page 126
5. Configuring the Machine Using Utilities 124 - Ricoh P C301W | Users Guide - Page 127
good print quality, the manufacturer recommends that you use genuine toner from the manufacturer. • The manufacturer shall not be responsible for other than genuine parts from the manufacturer with your office products. • When the toner runs out, pressing the [Stop/Start] key allows you to print a - Ricoh P C301W | Users Guide - Page 128
runs out, you can print in black and white using just the black toner. Change the color mode setting to Black and White using the machine's driver. • If black toner runs out, you cannot print in black and white or color until the black print cartridge is replaced. Messages on the screen • Replace - Ricoh P C301W | Users Guide - Page 129
the old print cartridge on paper or similar material to avoid dirtying your workspace. • The toner color is indicated by the label on each print cartridge. 3. Take the new print cartridge side to side five or six times. ECC130 Even distribution of toner within the bottle improves print quality. 127 - Ricoh P C301W | Users Guide - Page 130
6. Maintaining the Machine 5. Remove the protective cover from the print cartridge. ECC131 6. Check the toner color and corresponding location, and then carefully insert the print cartridge vertically. ECC132 7. Using both hands, hold the center of the top cover and close - Ricoh P C301W | Users Guide - Page 131
print cartridge with the protective cover for recycling and environmental purposes. • (mainly Europe and Asia) If you want to discard your used toner container, please contact your local sales office. If you discard it by yourself, treat it as general plastic waste material. • (mainly North - Ricoh P C301W | Users Guide - Page 132
transfer unit is not installed, install it before turning on the power. • Before removing the waste toner bottle from the machine, spread paper or similar material around the area to keep toner from dirtying your workspace. 1. Pull the front cover open lever and then carefully lower the front cover - Ricoh P C301W | Users Guide - Page 133
the transfer unit, tilt it backwards and lift it up. 2 1 ECC136 4. Holding the handle at the center of the waste toner bottle, carefully pull it partially out without tilting it. ECC137 5. Pull the waste toner bottle halfway out, hold the bottle firmly, and then pull it straight out. ECC138 131 - Ricoh P C301W | Users Guide - Page 134
6. Maintaining the Machine ECC139 To prevent the waste toner bottle from coming into contact with the intermediate transfer unit (the position shown by the arrow in the illustration below), do not lift the bottle while pulling it out. ECC140 6. Close the bottle cap. ECC141 132 - Ricoh P C301W | Users Guide - Page 135
bottle, carefully insert it halfway into the machine body. Leave the bottle cap open. ECC143 To prevent the waste toner bottle from coming into contact with the intermediate transfer unit (the position shown by the arrow in the illustration below), do not lift the bottle - Ricoh P C301W | Users Guide - Page 136
6. Maintaining the Machine ECC145 9. Place the transfer unit on the front cover. Slide the transfer unit along the guide rails into the machine. Do not manually operate the pressure lever, because pressuring and depressing are interlocked with the front cover's position. ECC146 10. When it stops, - Ricoh P C301W | Users Guide - Page 137
the front cover, push the upper area of the cover firmly. • For easy replacement, we recommend you purchase and store extra waste toner bottles. • Comply with the waste toner bottle recycling program, whereby used waste toner bottles are collected for processing. For details, ask your sales or - Ricoh P C301W | Users Guide - Page 138
on the control panel lights up and the "Replacement Required: Intermediate Transfer Unit" message appears on the display, contact your sales or service representative. Replacing the Fusing Unit and Transfer Roller If the Alert indicator on the control panel lights up and the "Replace Fusing Unit - Ricoh P C301W | Users Guide - Page 139
Cautions When Cleaning Cautions When Cleaning Clean the machine periodically to maintain high print quality. Dry wipe the exterior with a soft cloth. If dry wiping is not sufficient, wipe with a soft, damp cloth that has been wrung out thoroughly. If you still cannot remove the stain or grime, use a - Ricoh P C301W | Users Guide - Page 140
6. Maintaining the Machine Cleaning the Toner Density Sensor Clean the toner density sensor when the following message appears on the control panel. "Density the top cover. ECB107 2. Remove the rearmost print cartridge. ECC167 3. Slide the toner density sensor lever once to the left. 138 ECC148 - Ricoh P C301W | Users Guide - Page 141
Cleaning the Toner Density Sensor 4. Carefully insert the print cartridge removed in Step 2 vertically. ECC132 5. Using both hands, hold the center of the top cover and close the cover carefully. Be careful not to trap your fingers. ECC133 139 - Ricoh P C301W | Users Guide - Page 142
6. Maintaining the Machine Cleaning the Friction Pad and Paper Feed Roller If the friction pad or paper feed roller is dirty, a multi-feed or misfeed might occur. In this case, clean the friction pad and paper feed roller as follows: • Do not use chemical cleaning fluids or organic solvents such as - Ricoh P C301W | Users Guide - Page 143
Cleaning the Friction Pad and Paper Feed Roller 5. Wipe the rubber part of the roller with a soft damp cloth. After that, wipe it with a dry cloth to remove the moisture. ECC150 6. Push the metal plate down until it clicks. DUE215 7. Reload the removed paper into the tray, and then push the tray - Ricoh P C301W | Users Guide - Page 144
6. Maintaining the Machine • If jams or multi-sheet feeds occur after cleaning the friction pad, contact your sales or service representative. • If the optional Tray 2 is installed, clean its friction pad and paper feed roller in the same way as you did for Tray 1. 142 - Ricoh P C301W | Users Guide - Page 145
Cleaning the Registration Roller and Paper Tray Cleaning the Registration Roller and Paper Tray The registration roller and paper tray can become dirty with paper dust if you print to non-standard paper. Clean the registration roller if white dots appear on prints. • Do not use chemical cleaning - Ricoh P C301W | Users Guide - Page 146
6. Maintaining the Machine 4. Wipe the inside of the paper tray with a cloth. ECC152 5. Push the metal plate down until it clicks. DUE215 6. Reload the removed paper into the tray, and then push the tray carefully into the machine until it clicks. 144 DUE220 - Ricoh P C301W | Users Guide - Page 147
Cleaning the Registration Roller and Paper Tray 7. Pull the front cover open lever and then carefully lower the front cover. 2 1 ECB108 Be sure to set the registration roller in the position shown by the arrow in the illustration below. ECC153 Clean the registration roller if prints are smeared - Ricoh P C301W | Users Guide - Page 148
move them separately. • Do not remove the print cartridge when moving the machine. • Be sure to hold the machine level while carrying it. To prevent toner from spilling, move the machine carefully. • Keep the machine away from salt-bearing air and corrosive gases. Also, do not install the machine in - Ricoh P C301W | Users Guide - Page 149
tip or tilt the machine during transit. • Toner might spill inside the machine if the machine service representative for information about correct disposal of this machine. Where to Inquire Contact your sales or service representative for further information about the topics included in this manual - Ricoh P C301W | Users Guide - Page 150
6. Maintaining the Machine 148 - Ricoh P C301W | Users Guide - Page 151
Troubleshooting This chapter provides solutions for error messages and other problems is printing. Wait a while. Ready This is the default ready message. The machine is ready for use. No . Wait a while. Warming up... The printer is warming up or toner is being supplied. Wait until "Ready" - Ricoh P C301W | Users Guide - Page 152
7. Troubleshooting Message Check Paper Type Cover Open Please download Incorrect Toner: # Out of Paper: # Memory Overflow fails again, contact your sales or service representative. Irregular toner # (Black, Magenta, Cyan or Yellow) is set. Replace the toner to an appropriate one. See page - Ricoh P C301W | Users Guide - Page 153
the bypass tray. Remove paper from the bypass tray. Replace Toner: # The printer is out of toner # (Black, Magenta, Cyan or Yellow). Replace the print sales or service roller. representative. Replace Required Soon: Print Cartridge The waste toner bottle needs to Prepare a new waste toner be - Ricoh P C301W | Users Guide - Page 154
7. Troubleshooting Message Toner Set Error: # Fusing Unit Set Error Print Cartridge: Not Set the waste toner bottle correctly. If the error message appears even though the waste toner bottle is attached correctly, contact your service representative. There is a problem with the printer's controller. - Ricoh P C301W | Users Guide - Page 155
In indicator is flashing. The Data In indicator is lit. The Power indicator is lit. Cause The printer cannot be used normally. Check the error on the control panel. Toner has nearly run out. The printer is receiving print data from a computer. There is data to be printed. The power is on. 153 - Ricoh P C301W | Users Guide - Page 156
7. Troubleshooting Removing Paper Jams If a paper jam occurs, one of the following messages do not touch the sensors, connectors, LEDs, or other fragile parts that are shown in this manual. Doing so may cause malfunctions. For the location of the sensors in the machine and extended options, - Ricoh P C301W | Users Guide - Page 157
Main unit Removing Paper Jams 1 23 1. DUE288 2. DUE289 DUE319 155 - Ricoh P C301W | Users Guide - Page 158
7. Troubleshooting 3. DUE290 Waste toner bottle Paper feed unit ECC168 1 156 DUE320 - Ricoh P C301W | Users Guide - Page 159
• Jammed paper may be covered in toner. Be careful not to get toner on your hands or clothes. • Toner on prints made immediately after clearing a , follow the procedure below to remove it. • Since the temperature around the guide is high, wait for it to cool down before checking for jammed paper. - Ricoh P C301W | Users Guide - Page 160
7. Troubleshooting 2. Pull the paper downward to remove it. Do not pull it upward. ECC158 Do not touch the fusing unit. ECC157 If you cannot find the jammed paper, check for it by pulling down the guide. 158 ECC159 - Ricoh P C301W | Users Guide - Page 161
3. Using both hands, carefully push up the front cover until it closes. Removing Paper Jams ECC117 When closing the front cover, push the upper area of the cover firmly. After closing the cover, check that the error is cleared. If paper jams inside a tray If paper jams in Tray 1 or 2, follow the - Ricoh P C301W | Users Guide - Page 162
7. Troubleshooting ECC157 If paper has jammed inside the transfer unit, holding both sides of the paper, pull the paper carefully forward and out. ECC161 3. Using both - Ricoh P C301W | Users Guide - Page 163
Removing Paper Jams If paper jams inside the transfer unit If paper jams inside the transfer unit, follow the procedure below to remove it. 1. Pull the front cover open lever and then carefully lower the front cover. 2 1 ECB108 2. Carefully remove any paper that is jammed under the transfer unit. - Ricoh P C301W | Users Guide - Page 164
7. Troubleshooting When You Cannot Print Test Page Possible cause The power cord, a they are not damaged. 1. On the [Start] menu, click [Devices and Printers]. 2. Right-click the icon of the machine, and then click [Printer properties]. 3. Click the [Ports] tab, and then make sure that the port - Ricoh P C301W | Users Guide - Page 165
fences of the paper tray, or the paper guides of the bypass tray to remove the gaps. • Avoid printing on both sides of paper when printing images that contain large solid areas, which consume a lot of toner. • Use supported types of paper. See page 40 "Supported Paper". • Load paper only as high as - Ricoh P C301W | Users Guide - Page 166
7. Troubleshooting Problem Multiple sheets of paper are fed at one time. Paper gets Supported Paper". • If there are gaps between the paper and the side or end fences of the paper tray, or the paper guides of the bypass tray, adjust the side or end fences of the paper tray, or the paper guides - Ricoh P C301W | Users Guide - Page 167
Paper Feed Problems Problem Images are not printed in the right position Solution Adjust the front end fence and both side are gaps between the paper and the side or end fences of the paper tray, or the paper guides of the bypass tray, adjust the side or end fences of the paper tray, or the paper - Ricoh P C301W | Users Guide - Page 168
types of paper is used. Make sure that the paper being used is supported by the machine. See page 40 "Supported Paper". The paper type setting is incorrect. Make sure that the paper type setting of the printer driver matches the type of paper loaded. See page 38 "Specifying Paper Type and - Ricoh P C301W | Users Guide - Page 169
"Media" list, select a proper paper type. Images smudge when rubbed. (Toner is not fixed.) PCL 5c/6 On the printer driver's [Paper] tab, select a proper paper type in the "Paper Type:" list. PostScript 3 On the printer driver's [Paper/Quality] tab, select a proper paper type in the "Media" list - Ricoh P C301W | Users Guide - Page 170
7. Troubleshooting Problem Fine lines are fuzzy, of inconsistent thickness, or do not appear. Solution Change the dithering settings on the printer driver. For details about the dithering settings, see the printer driver Help. If the problem persists, specify the settings of the application in - Ricoh P C301W | Users Guide - Page 171
other applications are operating. Close any other applications, as they may be interfering with printing. If the problem is not resolved, close unneeded processes too. • Check that the latest printer driver is being used. • The machine already has 5 jobs or 5 MB of Locked Print data. Print or delete - Ricoh P C301W | Users Guide - Page 172
7. Troubleshooting Problem Solution There is a considerable delay between the print processed so simply wait when printing such data. • Changing the settings with printer driver may help to speed up printing. See the printer driver Help. • The data is so large or complex that it takes a long - Ricoh P C301W | Users Guide - Page 173
the printer driver Help. The color of the printout is different from the color on the computer's display. • The colors made using color toner may to resolve the problem, contact your sales or service representative. Color changes extremely when adjusted with the printer driver. Only when using - Ricoh P C301W | Users Guide - Page 174
7. Troubleshooting When You Cannot Print Clearly Problem The whole printout is blurred. Toner smears appear on the print side of the page. Solution • The paper being used may be damp. Use paper that has been stored properly. See page 40 "Supported Paper". • Select [Curl Prevented] in [Curl - Ricoh P C301W | Users Guide - Page 175
again. If this procedure does not resolve the problem, contact your sales or service representative. Horizontal lines appear on the printed paper. • Impact can cause lines to appear on printed paper and other malfunctions. Protect the printer from impact at all times, especially while it - Ricoh P C301W | Users Guide - Page 176
Troubleshooting Problem Solution ]. See page 26 "Loading Paper". White streaks or color streaks appear. Toner is almost empty. If an error message appears on the control panel, lit, the data is not being sent to the printer. If the printer is connected to the computer using the interface cable. - Ricoh P C301W | Users Guide - Page 177
Printer Problems Problem Solution Black gradation is not natural. Only when using PostScript 3 Select [CMY + K] for [Gray Reproduction] in the printer driver's dialog box. See the printer driver Help. Solid lines are printed as broken lines. Only when using PostScript 3 Change the [Dithering] - Ricoh P C301W | Users Guide - Page 178
Troubleshooting When Paper Is Not Fed or Ejected Properly Problem Guide to Components". • The paper being used may be damp. Use paper that has been stored properly. See page 40 "Supported Other Printing Problems Problem The toner has run out and printing has stopped. Solution When the toner runs - Ricoh P C301W | Users Guide - Page 179
This section describes how to troubleshoot common problems that may occur while operating the machine. Problem The machine does not turn on. Possible cause The power until the cleaning has finished. This is not a malfunction. If the problem persists, contact your service representative. 177 - Ricoh P C301W | Users Guide - Page 180
7. Troubleshooting Problem Possible cause You cannot print after rebooting The printer may be offline. the computer. Solution The procedure in this section is an example based on Windows 10. The actual procedure may vary depending on - Ricoh P C301W | Users Guide - Page 181
[Network Settings], and then press the [OK] key. 3. Enter the administrator password if required. 4. Press the [ ] or [ ] key to select [IPv4 ] to automatically obtain the IP address or [Inactive] to specify the IP address manually. If you have selected [Active], proceed to Step 13. 7. Press the - Ricoh P C301W | Users Guide - Page 182
select [Network Settings], and then press the [OK] key. 3. Enter the administrator password if required. 4. Press the [ ] or [ ] key to select [IPv6 Configuration key to select [Manual Config. Address], and then press the [OK] key. 8. Press the [ ] or [ ] key to select [Manual Config. Address], and - Ricoh P C301W | Users Guide - Page 183
• Using the Wi-Fi Direct See Wi-Fi Direct Guide. Using the Wi-Fi Setup Wizard A router (access , refer to the router (access point) manual. Configuring settings using the control panel Make then press the [OK] key. 4. Enter the administrator password if required. 5. Press the [ ] or [ ] key to select - Ricoh P C301W | Users Guide - Page 184
. Press the [Menu] key. 11. Press the [ ] or [ ] key to select [Wi-Fi Setup Wizard], and then press the [OK] key. 12. Enter the administrator password if required. 13. Press the [ ] or [ ] key to select SSID of the router (access point) from the searched SSID list, and then press the [OK - Ricoh P C301W | Users Guide - Page 185
on. 10. Press the [Menu] key. 11. Press the [ ] or [ ] key to select [Network Settings], and then press the [OK] key. 12. Enter the administrator password if required. 13. Press the [ ] or [ ] key to select [Wireless (Wi-Fi)], and then press the [OK] key. 14. Press the [ ] or [ ] key to select - Ricoh P C301W | Users Guide - Page 186
the WPS button on the router (access point) within two minutes. WPS CHV607 For details about how to use the WPS button, refer to the manuals for the router (access point). 18. Check the result. • Connection has succeeded: Press the [OK] key, and then press the [Menu] key to return to - Ricoh P C301W | Users Guide - Page 187
on. 11. Press the [Menu] key. 12. Press the [ ] or [ ] key to select [Network Settings], and then press the [OK] key. 13. Enter the administrator password if required. 14. Press the [ ] or [ ] key to select [Wireless (Wi-Fi)], and then press the [OK] key. 15. Press the [ ] or [ ] key to select - Ricoh P C301W | Users Guide - Page 188
8. Configuring Network Settings 186 - Ricoh P C301W | Users Guide - Page 189
6.9, 6.10, 7.4, 7.5, and 7.6. However, some setting items are not supported depending on the operating system. Make sure the IPsec settings you specify are • If you cannot access Web Image Monitor due to IPsec configuration problems, disable IPsec under [Admin. Tools] on the control panel, - Ricoh P C301W | Users Guide - Page 190
. Also, for further security, the SA can be periodically auto updated by applying a validity period (time limit) for its settings. This machine only supports IKEv1 for encryption key exchange. Multiple settings can be configured in the SA. Settings 1-10 You can configure ten separate sets of SA - Ricoh P C301W | Users Guide - Page 191
If you cannot access Web Image Monitor due to IPsec configuration problems, disable IPsec under [Admin. Tools] on the control panel, Default Policy], [Broadcast and Multicast Bypass], and [All ICMP Bypass] also. 9. Enter the administrator password, and then click [Apply]. • An administrator password - Ricoh P C301W | Users Guide - Page 192
The IP Security Policy Wizard appears. 4. Click [Next]. 5. Enter a security policy name in "Name", and then click [Next]. 6. Clear the "Activate the default response rule" check box, and then click [Next]. 7. Select "Edit properties", and then click [Finish]. 8. In the "General" tab, click [Settings - Ricoh P C301W | Users Guide - Page 193
Transmission Using IPsec 20. Select "My IP Address" in "Source address", and then click [Next]. 21. Select "A specific IP Address or Subnet" in "Destination address", enter the machine's IP address, and then click [Next]. 22. For the IPsec protocol type, select "Any", and then click [Next]. 23. - Ricoh P C301W | Users Guide - Page 194
is specified. 1. Press the [Menu] key. 2. Press the [ ] or [ ] key to select [Admin. Tools], and then press the [OK] key. 3. Enter the administrator password if required. 4. Press the [ ] or [ ] key to select [IPsec], and then press the [OK] key. 5. Press the [ ] or [ ] key to select [Active] or - Ricoh P C301W | Users Guide - Page 195
guaranteed if any third-party toner is used. • Depending on printing conditions, there are cases where the printer cannot print the number of initially used, the following problems may occur: • "Replace Required Soon:" "Print Cartridge (XX)" will be displayed before the toner runs out. • "Replacement - Ricoh P C301W | Users Guide - Page 196
the copyright information for these software applications, see "OSS.pdf" on the CD-ROM supplied with the machine. General /2 × 14 inches) 20 seconds or less For details, see page 40 "Supported Paper". For details, see page 40 "Supported Paper". 150 sheets • Tray 1 250 sheets • Tray 2 500 sheets - Ricoh P C301W | Users Guide - Page 197
Specifications of the Machine Item Description Power consumption The power level when the main switch is turned off and the power cord is plugged into an outlet: 1 W or less • Maximum 1300 W or less • Ready 32.8 W • During printing Color: 450 W B&W: 412 W Power consumption The power level when - Ricoh P C301W | Users Guide - Page 198
the bystander. Printer Function Specifications Item Printing speed Resolution First print speed Interface Printer language Fonts Paper Feed Unit TK1220 Paper capacity 500 sheets Paper size For details, see page 40 "Supported Paper". Dimensions (Width × Depth × Height) 400 × 450 × 127 mm (15.8 × - Ricoh P C301W | Users Guide - Page 199
Weight Less than 4 kg (8.9 lb.) Specifications of the Machine 197 - Ricoh P C301W | Users Guide - Page 200
C301W: 6,300 pages P C300W: 2,300 pages P C301W: 6,300 pages P C300W: 2,300 pages P C301W: 6,300 pages *1 The printable number of pages is based on pages that are compliant with ISO/IEC 19798 and the image density set as the factory default , if there is a problem, contact the store where they - Ricoh P C301W | Users Guide - Page 201
to maintain quality. • To prevent a cleaning malfunction, you may need to replace a print cartridge even if it is not empty. Waste Toner Bottle Name Waste Toner Bottle SP C220 Average printable number of pages per cartridge *1 25,000 pages *1 A4/Letter 5% test chart, 3 pages per job, printing - Ricoh P C301W | Users Guide - Page 202
via the appropriate return and collection systems available. By following these instructions you ensure that this product is treated correctly and help to reduce the shop where you purchased it, your local dealer or sales/service representatives. All Other Users If you wish to discard this product, - Ricoh P C301W | Users Guide - Page 203
centre. Environmental Advice for Users (mainly Europe) Users in the EU, Switzerland and Norway Consumables yield Please refer to either the User's Manual for this information or the packaging of the consumable. Recycled paper The machine can use recycled paper which is produced in accordance with - Ricoh P C301W | Users Guide - Page 204
from an energy saving mode than from Ready mode. For maximum energy savings, we recommend that the default setting for power management is used. Note to Users EU Countries Model Name: P C300W, P C301W Manufacturer: Ricoh Co., Ltd. 3-6 Nakamagome 1-chome, Ohta-ku, Tokyo. 143-8555, Japan Importer - Ricoh P C301W | Users Guide - Page 205
installation. This equipment generates, uses and can radiate radio frequency energy and, if not installed and used in accordance with the instructions, may cause harmful interference to radio communications. However, there is no guarantee that interference will not occur in a particular installation - Ricoh P C301W | Users Guide - Page 206
, including interference that may cause undesired operation. Responsible party: Ricoh USA, Inc. Address: 70 Valley Stream Parkway Malvern, Pennsylvania 19355 Telephone number: 610-296-8000 Product Name: Printer Model Number: P C301W Notes to Canadian Users of Wireless Devices This device complies - Ricoh P C301W | Users Guide - Page 207
Information for This Machine Federal Communication Commission (FCC) Radiation Exposure Statement This EUT is compliance with SAR for general population/uncontrolled exposure limits in ANSI/IEEE C95.1-1999 and had been tested in accordance with the measurement methods and procedures specified in OET - Ricoh P C301W | Users Guide - Page 208
energy saving functions. It is an open program in which manufacturers participate voluntarily. Targeted products are computers, monitors, printers, facsimiles, copiers, scanners, and multifunction devices. Energy Star standards and logos are internationally uniform. Saving Energy This machine - Ricoh P C301W | Users Guide - Page 209
Information for This Machine Specifications Energy Saver mode 1 Power Consumption*1 25.2 W Energy Saver mode 2 Duplex Function*2 Default Time Recovery Time*1 Power Consumption*1 Default Time Recovery Time*1 24.7 W 30 seconds 10 seconds or less 0.66 W 0.64 W 1 minute 12 seconds Standard *1 - Ricoh P C301W | Users Guide - Page 210
9. Appendix Trademarks Adobe and Acrobat are either registered trademarks or trademarks of Adobe Systems Incorporated in the United States and/or other countries. Android, Google Chrome, and Google Play are trademarks or registered trademarks of Google LLC. OS X, macOS, TrueType, App Store, and - Ricoh P C301W | Users Guide - Page 211
Trademarks Microsoft® Windows® 10 Home Premium Microsoft® Windows® 10 Pro Microsoft® Windows® 10 Enterprise Microsoft® Windows® 10 Education • The product names of Windows Server 2008 are as follows: Microsoft® Windows Server® 2008 Standard Microsoft® Windows Server® 2008 Enterprise • The product - Ricoh P C301W | Users Guide - Page 212
9. Appendix 210 - Ricoh P C301W | Users Guide - Page 213
INDEX @Remote 89 A Admin. Tools 71 Administrator password 11, 71, 121 Administrator settings 121 Attaching Paper the control panel 69 Confirming information Printer driver settings 57 Consumables 198 Control panel 17 Counter information 96 D Default settings 121 Disclaimer 10 DNS setting - Ricoh P C301W | Users Guide - Page 214
66 Printer settings Supported paper 40 System 111 System information 95 System settings 99 System Settings 77 T TCP/IP status 107 Toner 95 Top page 93 Trademarks 208 Transfer Rollor 136 Trap 111 Tray 1 26 Tray 1 priority 100 Tray 2 99 Tray paper settings 81, 99 Troubleshooting - Ricoh P C301W | Users Guide - Page 215
Other problems 162, 163, 166, 169, 177 U User code 106 User restriction 11 W Waste toner bottle 130, 199 Web Image Monitor 92 What you can do with this machine Printer function 53 Wireless LAN settings 113 Wireless settings 113 213 - Ricoh P C301W | Users Guide - Page 216
MEMO 214 - Ricoh P C301W | Users Guide - Page 217
MEMO 215 - Ricoh P C301W | Users Guide - Page 218
MEMO 216 EN GB EN US EN AU M0CW-8604A - Ricoh P C301W | Users Guide - Page 219
- Ricoh P C301W | Users Guide - Page 220
EN GB EN US EN AU M0CW-8604A © 2019
-
 1
1 -
 2
2 -
 3
3 -
 4
4 -
 5
5 -
 6
6 -
 7
7 -
8
-
9
-
10
-
11
-
12
-
13
-
14
-
15
-
16
-
17
-
18
-
19
-
20
-
21
-
22
-
23
-
24
-
25
-
26
-
27
-
28
-
29
-
30
-
31
-
32
-
33
-
34
-
35
-
36
-
37
-
38
-
39
-
40
-
41
-
42
-
43
-
44
-
45
-
46
-
47
-
48
-
49
-
50
-
51
-
52
-
53
-
54
-
55
-
56
-
57
-
58
-
59
-
60
-
61
-
62
-
63
-
64
-
65
-
66
-
67
-
68
-
69
-
70
-
71
-
72
-
73
-
74
-
75
-
76
-
77
-
78
-
79
-
80
-
81
-
82
-
83
-
84
-
85
-
86
-
87
-
88
-
89
-
90
-
91
-
92
-
93
-
94
-
95
-
96
-
97
-
98
-
99
-
100
-
101
-
102
-
103
-
104
-
105
-
106
-
107
-
108
-
109
-
110
-
111
-
112
-
113
-
114
-
115
-
116
-
117
-
118
-
119
-
120
-
121
-
122
-
123
-
124
-
125
-
126
-
127
-
128
-
129
-
130
-
131
-
132
-
133
-
134
-
135
-
136
-
137
-
138
-
139
-
140
-
141
-
142
-
143
-
144
-
145
-
146
-
147
-
148
-
149
-
150
-
151
-
152
-
153
-
154
-
155
-
156
-
157
-
158
-
159
-
160
-
161
-
162
-
163
-
164
-
165
-
166
-
167
-
168
-
169
-
170
-
171
-
172
-
173
-
174
-
175
-
176
-
177
-
178
-
179
-
180
-
181
-
182
-
183
-
184
-
185
-
186
-
187
-
188
-
189
-
190
-
191
-
192
-
193
-
194
-
195
-
196
-
197
-
198
-
199
-
200
-
201
-
202
-
203
-
204
-
205
-
206
-
207
-
208
-
209
-
210
-
211
-
212
-
213
-
214
-
215
-
216
-
217
-
218
-
219
-
220
 |
 |

User's Guide
For safe and correct use, be sure to read the "Safety Information" before
using the machine.