Epson SureLab D3000 Administrator Guide
Epson SureLab D3000 Manual
 |
View all Epson SureLab D3000 manuals
Add to My Manuals
Save this manual to your list of manuals |
Epson SureLab D3000 manual content summary:
- Epson SureLab D3000 | Administrator Guide - Page 1
SL-D3000 Administrator's Guide - Epson SureLab D3000 | Administrator Guide - Page 2
on the operation of this product. Operating System Versions In this manual, the following abbreviations are used. Windows refers to Windows 7, Vista Seiko Epson Corporation's operating and maintenance instructions. Seiko Epson Corporation shall not be liable for any damages or problems arising - Epson SureLab D3000 | Administrator Guide - Page 3
68 System Language Settings 68 Help 69 Appendix Ejected Paper Path and Supported Paper Sizes . . . . .74 Paper Feed Path Diagram 75 System Application 85 OPEN SOURCE SOFTWARE LICENSE TERMS. . .86 SEIKO EPSON CORPORATION SOFTWARE LICENSE AGREEMENT 94 Error History Acquire Log Add/Delete - Epson SureLab D3000 | Administrator Guide - Page 4
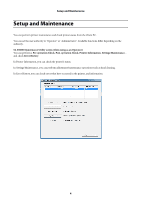
from the Client PC. You can set the user authority to "Operator" or "Administrator". Available functions differ depending on the authority. SL-D3000 Maintenance Utility screen (when using as an Operator): You can perform a Pre-operation Check, Post-operation Check, Printer Information, Settings - Epson SureLab D3000 | Administrator Guide - Page 5
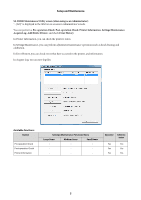
Setup and Maintenance SL-D3000 Maintenance Utility screen (when using as an Administrator): "...[AD]" is displayed in the title bar on screens in Administrator's mode. You can perform a Pre-operation - Epson SureLab D3000 | Administrator Guide - Page 6
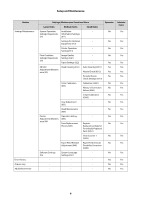
Setup and Maintenance Button Settings/Maintenance Error History Acquire Log Add/Delete Printer Settings/Maintenance Functions Menu Operator Large Items Medium Items Small Items System Operation Installation - No Settings/Inspections Information Settings (01) (011) Settings for Optional - Epson SureLab D3000 | Administrator Guide - Page 7
Setup and Maintenance Tip: See the "SL-D3000 Operation Guide" for more information on items that are available to operators. U "SL-D3000 Operation Guide" - "Setup and Maintenance" 7 - Epson SureLab D3000 | Administrator Guide - Page 8
. In Pre-operation Check, the printer starts after the items that need to be checked manually have been displayed. Furthermore, when Printer PC is connected to the printer, Printer PC starts automatically. Tip: See the "SL-D3000 Operation Guide" for more information on the Pre-operation Check. U "SL - Epson SureLab D3000 | Administrator Guide - Page 9
the printer is shut down in Post-operation Check, and Printer PC is connected to the printer, Printer PC closes automatically. Tip: See the "SL-D3000 Operation Guide" for more information on the Post-operation Check. U "SL - Epson SureLab D3000 | Administrator Guide - Page 10
Printer Information Printer Information You can confirm various types of printer information. Checking Printer Information On the Printer Information screen, you can check the printer's settings, remaining amount of consumables, and so on. A Select the printer you want to use from the Registered - Epson SureLab D3000 | Administrator Guide - Page 11
Printer Information B On the Printer Information screen, you can check the printer's settings, remaining amount of consumables, and so on. Item Printer Name Printer Status Image Quality Settings Paper Information (Front/Rear) Explanation Displays the printer name. Displays the printer status. - Epson SureLab D3000 | Administrator Guide - Page 12
ink remaining has fallen below the minimum limit. The ink cartridge is grayed out when the ink cartridge is not installed, or if there is a problem with the ink be faint or the amount of ink remaining may not be detected correctly. Tip: Only the Dual Roll Model supports front roll paper. For the - Epson SureLab D3000 | Administrator Guide - Page 13
Changing User Levels Changing User Levels You can change the user level from Operator mode to Administrator mode. A Display the SL-D3000 Maintenance Utility or the Printer Information screen. B While holding down the Ctrl and Alt keys on the keyboard, press S (or s). The Enter Password screen is - Epson SureLab D3000 | Administrator Guide - Page 14
Changing User Levels C Enter the password, and then click OK. The user level is changed to Administrator mode. Tip: O The administrator password is "0000". O Restart this SL-D3000 Maintenance Utility when switching from Administrator mode to Operator mode. 14 - Epson SureLab D3000 | Administrator Guide - Page 15
Settings/Maintenance Settings/Maintenance You can perform maintenance operations such as Print Head Unit cleaning and calibration, as well as manage settings. Performing Maintenance You can select each maintenance function on the Settings/Maintenance screen. When performing maintenance in Settings/ - Epson SureLab D3000 | Administrator Guide - Page 16
Settings/Maintenance B Select the function you want to use. You can make settings by selecting a function from the menu on the left. C Click Back to close the Settings/Maintenance screen. 16 - Epson SureLab D3000 | Administrator Guide - Page 17
Settings/Maintenance D When the Printer Information screen is displayed, click Back to close the screen. This completes this section. 17 - Epson SureLab D3000 | Administrator Guide - Page 18
automatically. U "Auto Cleaning" on page 29 Check for clogged nozzles and clean the Print Head Unit manually. U "Nozzle Check" on page 30 Set whether or not to perform auto nozzle check. U " Kit (C12C890991). For more details, see the User's Guide supplied with the Print Head Maintenance Kit. 18 - Epson SureLab D3000 | Administrator Guide - Page 19
Settings/Maintenance Large Items Printer Adjustment/Maint enance (04) Software Settings (05) Medium Items Operation History (044) Parts Replacement History (045) Paper Feed-Related Adjustment (048) System Language Settings (051) Small Items - Register Replacement Date for Periodically Replaced - Epson SureLab D3000 | Administrator Guide - Page 20
Printer Name Installation Date Model Name Serial Number Back Help Explanation Displays the printer name. Set by service personnel. Displays the installation date. Set by service personnel. Displays the model name. Displays the printer's serial number. Click to close the Settings/Maintenance screen - Epson SureLab D3000 | Administrator Guide - Page 21
when the back printing unit is Attached and the roll paper feeder is selected. This cannot be performed when the Paper Surface Type does not support back printing. 21 - Epson SureLab D3000 | Administrator Guide - Page 22
the installation status for the humidity control unit. Set by service personnel. Click to close the Settings/Maintenance screen. Click to Click to apply any changed settings. Tip: O Only the Dual Roll Model supports front roll paper. For the Single Roll Model, information is not displayed under - Epson SureLab D3000 | Administrator Guide - Page 23
Settings/Maintenance Printer Operation Settings Click Printer Operation Settings (013) from System Operation Settings/Inspections (01) to display the screen. Make settings for the power saving, the warning buzzer and the completion confirmation for long length sheet printing. After changing settings - Epson SureLab D3000 | Administrator Guide - Page 24
Settings/Maintenance Print Condition Settings/Inspections In Print Condition Settings/Inspections (02) on the Settings/Maintenance screen, you can set Image Quality Settings (021), and check Paper Information (022). Image Quality Settings Click Image Quality Settings (021) from Print Condition - Epson SureLab D3000 | Administrator Guide - Page 25
in the front roll paper feeder or the rear roll paper feeder, and change the remaining amount of paper. Tip: Only the Dual Roll Model supports front roll paper. For the Single Roll Model, information is not displayed under the front paper item. See the information for rear roll paper. Front - Epson SureLab D3000 | Administrator Guide - Page 26
Back Help Apply Item Settings/Maintenance Explanation Click to close the Settings/Maintenance screen. Click to display the Help. Click to apply any changed settings. 26 - Epson SureLab D3000 | Administrator Guide - Page 27
nozzles are clogged, there may be streaks in the prints or there may be a difference in color. If you notice any of these problems, follow the instructions on the next page to perform Head Cleaning (031). The following two menus are available in Head Cleaning (031). Auto Cleaning (0311) A sensor - Epson SureLab D3000 | Administrator Guide - Page 28
on the screen are "Good", and If the Result on the screen are "Good", but there are no problems in the prints there are still problems in the prints -> Operations are complete. -> Contact Service Support. Notes: When the Result of Auto Cleaning (0311) are "Good", but nozzles still appear to be - Epson SureLab D3000 | Administrator Guide - Page 29
Settings/Maintenance Auto Cleaning From the CR Unit Adjustment/Maintenance (03) menu, click Auto Cleaning (0311) from Head Cleaning (031) to display the screen. A Click Auto Cleaning. Nozzle check begins, and cleaning is performed as necessary. This may take some time depending on the status of the - Epson SureLab D3000 | Administrator Guide - Page 30
Settings/Maintenance Nozzle Check From the CR Unit Adjustment/Maintenance (03) menu, click Nozzle Check (0312) from Head Cleaning (031) to display the screen. This function allows you to check for clogged nozzles in the Print Head Unit. The printer automatically detects clogging and displays the - Epson SureLab D3000 | Administrator Guide - Page 31
are still red or nozzles are clogged after repeating head cleaning several times. Because Powerful consumes more ink compared to Normal, prepare new ink cartridges before performing cleaning if ink levels are low. C Check the results after cleaning. Go back to step , and then use Detect Clogging - Epson SureLab D3000 | Administrator Guide - Page 32
Settings/Maintenance Printing the check pattern Print a check pattern, and then check for clogged nozzles. Perform Print Head Unit cleaning according to the check results. A Select the roll paper feeder you want to use for printing. This can be selected when paper is loaded. B Click Print Check - Epson SureLab D3000 | Administrator Guide - Page 33
Select if nozzles are still clogged after performing Normal head cleaning several times. Because Powerful consumes more ink compared to Normal, prepare new ink cartridges before performing cleaning if ink levels are low. E After cleaning, check the results using nozzle check. Go back to step , and - Epson SureLab D3000 | Administrator Guide - Page 34
not to perform auto nozzle check. We recommend that this is set to ON, because if it is set to OFF the user needs to manually check for clogging. After changing settings, click Apply to apply the changes. Item ON Perform [Auto Cleaning] during Pre-operation Check. OFF Back Help Apply - Epson SureLab D3000 | Administrator Guide - Page 35
" - "Shutting down the Printer in an Emergency" 2. Restart the Client PC and the Printer PC. 3. Turn on the printer. U "SL-D3000 Operation Guide" - "What to do after an Emergency Stop" Colors on different printers may differ depending on environmental changes and time-dependent changes. When using - Epson SureLab D3000 | Administrator Guide - Page 36
7. Note: O You need a color measurement device to perform calibration. The following models are supported. O The "i1Pro" from X-Rite (with or without a UV filter) O The " the color measurement results. O Consult service personnel for more information on preparing and setting up the color measurement - Epson SureLab D3000 | Administrator Guide - Page 37
Settings/Maintenance Calibration Click Calibration (0341) from Color Calibration (034) to display the screen. You can perform calibration by using the following work flow. Create Correction Value Print Measure Color Create Correction Value Print a correction chart: Prints a chart for adjustment - Epson SureLab D3000 | Administrator Guide - Page 38
check the relations between the paper used for creating a correction value and the paper applied the created correction value. O Only the Dual Roll Model supports front roll paper. For the Single Roll Model, see the information for rear roll paper. B Select the color measurement device. C Select the - Epson SureLab D3000 | Administrator Guide - Page 39
Settings/Maintenance F The following screen is displayed after printing the first sheet. Follow the on-screen instructions, and then click OK. The charts the second sheet and after are printed. U "Correction chart color measurement (for the "i1Pro")" on page 40 U "Correction chart - Epson SureLab D3000 | Administrator Guide - Page 40
Settings/Maintenance Correction chart color measurement (for the "i1Pro") A Check that the color measurement device you want to use is connected. Tip: For more information on color measurement device, see the document supplied with the device. B Click Measure Color from Correction Value Creation - Epson SureLab D3000 | Administrator Guide - Page 41
, hold down the button on the side, and slowly move over the patch to scan. When performing color measurement with Spot Scan, adjust the measurement guide so that it is over the target patch, place the color measurement device, and then press the button on the side. Tip: O The color measurement - Epson SureLab D3000 | Administrator Guide - Page 42
and preset ID are printed at the bottom of the correction chart. O If the paper width of the correction chart is wider than the maximum supported width of the color measurement device, cut off the margin along the cutoff line on the chart. D When color measurement is complete, click OK. C When - Epson SureLab D3000 | Administrator Guide - Page 43
Value Creation Phase. The correction value is created. C The following screen is displayed after printing the first sheet. Follow the on-screen instructions, and then click OK. The charts the second sheet and after are printed. B Click Print from Correction Value Verification Phase. For Use - Epson SureLab D3000 | Administrator Guide - Page 44
Settings/Maintenance E Click Measure Color from Correction Value Verification Phase. G Click Write from Correction Value Verification Phase. The screen where you can enter the name of the correction value is displayed. F Perform color measurement in the color measurement device in the same way as - Epson SureLab D3000 | Administrator Guide - Page 45
Settings/Maintenance History of Correction Values Click History of Correction Values (0342) from Color Calibration (034) to display the screen. Select the correction values created previously from the list, and write to the Printer PC. A Select the correction values to write to the Printer PC from - Epson SureLab D3000 | Administrator Guide - Page 46
Client PC (the PC that will perform the calibration). O Consult service personnel for more information on preparing and setting up the color measurement feeder used for printing in Paper. Tip: Only the Dual Roll Model supports front roll paper. For the Single Roll Model, see the information for rear - Epson SureLab D3000 | Administrator Guide - Page 47
printed varies depending on the settings and the paper. F The following screen is displayed after printing the first sheet. Follow the on-screen instructions, and then click OK. The charts the second sheet and after are printed. When the drying time reaches 0, Drying complete. is displayed, and - Epson SureLab D3000 | Administrator Guide - Page 48
Settings/Maintenance Problems with Color Calibration Symptom Cannot print a correction chart. Print is not enabled. A color measurement error occurs. The maintenance utility closes during color measuring due to - Epson SureLab D3000 | Administrator Guide - Page 49
Value Creation Phase and Correction Value Verification Phase again while referring to the solutions in "A Color Measurement Error Occurred" from Troubleshooting. Were the correction charts overlapping during the drying process? The color tone for the overlapping sections may change while drying - Epson SureLab D3000 | Administrator Guide - Page 50
Settings/Maintenance Gray Adjustment You can adjust each value for Color Balance, Density, and Gradation to correct the tone of the prints. Adjustment values can be saved for each Standard or High Image Quality of the Image Quality Settings. Print an adjustment pattern, and then select the optimal - Epson SureLab D3000 | Administrator Guide - Page 51
last adjusted. You can check the changed date settings for each Paper Surface Type and the Image Quality Settings. O Only the Dual Roll Model supports front roll paper. For the Single Roll Model, see the information for rear roll paper. O After performing Color Calibration, you need to make settings - Epson SureLab D3000 | Administrator Guide - Page 52
Settings/Maintenance Click Gray Adjustment (035) from the CR Unit Adjustment/Maintenance (03) menu to display the settings. Color Balance A From Paper, select the roll paper feeder that will be used to print the adjustment pattern. B From Image Quality Settings, select the image quality adjustment - Epson SureLab D3000 | Administrator Guide - Page 53
Settings/Maintenance C Click Adjust. The settings screen is displayed. D Click Print from Print Adjustment Pattern on the Color Balance tab. E Select Adjustment Pattern Shift Value, and then click Print. Select the larger value to print the adjustment pattern which indicates large differences - Epson SureLab D3000 | Administrator Guide - Page 54
Settings/Maintenance F Select the best pattern from the adjustment pattern, and check the adjustment values. The adjustment value is printed in letters and numbers at the bottom left of each pattern. (Example: RY-2) The letter indicates the direction of the adjustment color. "N" means no correction. - Epson SureLab D3000 | Administrator Guide - Page 55
down, and the image lightens (the colors become paler) when moved up. O You can manually adjust the color by using Manual Adjustment on the right of the screen. If you make manual adjustments, the Pattern Adjustment value becomes unavailable. O When you click Clear, the Color Balance adjustment - Epson SureLab D3000 | Administrator Guide - Page 56
Settings/Maintenance Density Correction A From Paper, select the roll paper feeder that will be used to print the adjustment pattern. B From Image Quality Settings, select the image quality adjustment method. C Click Adjust. The settings screen is displayed. D Click Print from Print Adjustment - Epson SureLab D3000 | Administrator Guide - Page 57
Settings/Maintenance E Select the best pattern from the adjustment pattern, and check the adjustment values. The adjustment value is printed in letters and numbers at the bottom left of each pattern. (Example: D-2) "N" means no correction. The number shows the amount changed. F Select the Direction - Epson SureLab D3000 | Administrator Guide - Page 58
down, and the image lightens (the colors become paler) when moved up. O You can manually adjust the density by using Manual Adjustment on the right of the screen. If you make manual adjustments, the Pattern Adjustment value becomes unavailable. O When you click Clear, the Density adjustment values - Epson SureLab D3000 | Administrator Guide - Page 59
Settings/Maintenance Gradation Correction A From Paper, select the roll paper feeder that will be used to print the adjustment pattern. B From Image Quality Settings, select the image quality adjustment method. C Click Adjust. The settings screen is displayed. D On the Gradation tab, specify the - Epson SureLab D3000 | Administrator Guide - Page 60
Settings/Maintenance E Click Print from Print Adjustment Pattern. Displays the screen setting the amount of change in the printed adjustment pattern. F Select Adjustment Pattern Shift Value, and then click Print. Select the larger value to print the adjustment pattern which indicates large - Epson SureLab D3000 | Administrator Guide - Page 61
Direction and Shift Value. Specify the adjustment value selected from the adjustment pattern. When a setting is changed, the settings are reflected in the values for Manual Adjustment on the right of the screen and the graph (tone curve) at the bottom of the screen. Note: O The tone curve shows the - Epson SureLab D3000 | Administrator Guide - Page 62
Settings/Maintenance Problems with Gray Adjustment Symptom The print quality for the adjustment pattern is too low. An error occurred while applying the parameters. Errors in the adjustments - Epson SureLab D3000 | Administrator Guide - Page 63
the following situations. O When streaks or smears caused by drops of ink appear on the surface of the prints O When you want to avoid streaks or smears caused by drops (03) menu. For more information on performing head maintenance, see the User's Guide supplied with the Print Head Maintenance Kit. 63 - Epson SureLab D3000 | Administrator Guide - Page 64
up to 100 errors that have occurred in the printer, and information. Error ID indicates the error number. Error History may be cleared by service personnel as it is used for management information when performing maintenance. Displays the total number of copies. Displays the number of copies. This - Epson SureLab D3000 | Administrator Guide - Page 65
0451) from Parts Replacement History (045) to display the screen. You can check the date that parts that need periodic replacement were replaced. Service personnel can set the date. Clear Counter 1 From the Printer Adjustment/Maintenance (04) menu, click Clear Counter 1 (0452) from Parts Replacement - Epson SureLab D3000 | Administrator Guide - Page 66
Settings/Maintenance Paper Feed-Related Adjustment Paper Feed Amount Durability Correction From the Printer Adjustment/Maintenance (04) menu, click Paper Feed Amount Durability Correction (0483) from Paper Feed-Related Adjustment (048) to display the screen. The paper feed amount may change due to - Epson SureLab D3000 | Administrator Guide - Page 67
Settings/Maintenance B Click Print Adjustment Pattern. The adjustment pattern is printed. C Select the optimal number from the adjustment patterns, and then click Apply. Tip: O See the following and select the print pattern that has no black or white lines. O If there are no "good" patterns in the - Epson SureLab D3000 | Administrator Guide - Page 68
units that are displayed on the screen. After changing settings, click Apply to restart SL-D3000 Maintenance Utility to apply the language settings. Item Date and Time Language Unit Back Help Apply to apply any changed settings. A message is displayed instructing you to restart the utility. 68 - Epson SureLab D3000 | Administrator Guide - Page 69
Settings/Maintenance Help Click Help on any screen to display the Help. Help screen example 69 - Epson SureLab D3000 | Administrator Guide - Page 70
100 errors that have occurred in the printer, and information are displayed. The error ID indicates the error number. This number may be cleared by service personnel as it is used for management information when performing maintenance. 70 - Epson SureLab D3000 | Administrator Guide - Page 71
Acquire Log Acquire Log You can save log files for up to 14 days inclusive. These files contain operating information for the printer and the system. A Click Acquire Log. The Save As dialog box is displayed. B Check the file name, and then click Save. Change the file name if necessary. Note: It may - Epson SureLab D3000 | Administrator Guide - Page 72
Add/Delete Printer Add/Delete Printer A Click Add/Delete Printer. The Registered Printer List and Target Printer List screens are displayed. B Add or delete printers. When adding a printer, select the printer from Target Printer List, and then click When deleting a printer, select the printer from - Epson SureLab D3000 | Administrator Guide - Page 73
, an error message is displayed. The error code, the contents of the error, and the solutions are displayed on the screen. Tip: See the "SL-D3000 Operation Guide" for more information on error messages and their solutions. U "SL - Epson SureLab D3000 | Administrator Guide - Page 74
Appendix Appendix Ejected Paper Path and Supported Paper Sizes Print Size Ejected Paper Path Size Name Width x Length Sorter Top tray Side tray Tray 3R 5 x 3.5 inches Yes No No Yes (127 x 89 - Epson SureLab D3000 | Administrator Guide - Page 75
Appendix Print Size Ejected Paper Path Size Name Width x Length Sorter Top tray Side tray Tray Custom (203 x L) 8 x 3.5 to 12 inches Yes No No Yes (203 x 89 to 305 mm) 8 x 12 to 48 inches No Yes No Yes (203 x 306 to 1219 mm) Custom (210 x L) 8.3 x 3.5 to 12 inches Yes No No - Epson SureLab D3000 | Administrator Guide - Page 76
Appendix Tip: Only the Dual Roll Model supports front roll paper. For the Single Roll Model, information is not displayed under the front paper item. See the information for rear roll paper. 76 - Epson SureLab D3000 | Administrator Guide - Page 77
Appendix Extending the Client PC When a Printer PC is connected to this printer and is being used, you can extend the Client PC and share the printer. * This system guarantees simultaneous connections for two Client PCs. More than two simultaneous connections cannot be guaranteed. : Printer / : - Epson SureLab D3000 | Administrator Guide - Page 78
Appendix Preparing to extend the Client PC A Connect the Client PC to the same network environment as the printer, and make network settings. Check with your network system administrator for more information on making network settings. B Click Start - Control Panel - Date and Time. For Windows 7: - Epson SureLab D3000 | Administrator Guide - Page 79
D Click Next. Appendix E Select Client PC from Configure with Printer PC, and then click Next. Tip: If anything except for Client PC is accidentally selected, remove the system application, and then reinstall. F Click Next to display the hard drive selection screen. Select the hard drive you want - Epson SureLab D3000 | Administrator Guide - Page 80
- EPSON SL-D3000 System Application - Maintenance Utility. C Change the user level to "Administrator's mode". U "Changing User Levels" on page 13 D Register the printer. U "Add/Delete Printer" on page 72 Tip: Install the printer driver if necessary. U SL-D3000 Printer Driver Operation Guide This - Epson SureLab D3000 | Administrator Guide - Page 81
the Pre-Operation Check. Upgrading or Downgrading 1) Prepare the System Application CD for upgrading or downgrading. 2) Restart your computer. 3) Start SL-D3000 Maintenance Utility. 4) Select the printer you want to use, and then start the Pre-operation Check. The following steps are performed - Epson SureLab D3000 | Administrator Guide - Page 82
Checking the System Application Version You can check the current version of the system application in Printer Information from the SL-D3000 Maintenance Utility. Check the version information before and after upgrading or downgrading the system application. Changing the System Application Version - Epson SureLab D3000 | Administrator Guide - Page 83
the on-screen instructions to upgrade or downgrade the system application. Upgrade Downgrade F When the upgrade or downgrade is complete, the following screen is displayed on the Client PC. Click Yes to restart the Client PC. G After the Client PC has restarted, start SL-D3000 Maintenance Utility - Epson SureLab D3000 | Administrator Guide - Page 84
Appendix H Select the printer from the Registered Printer List, and then click Pre-operation Check. I While the Pre-operation Check is running, the Printer PC (if connected) and the printer's firmware are upgraded or downgraded. The Pre-operation Check for upgrading or downgrading may take - Epson SureLab D3000 | Administrator Guide - Page 85
or confirmation message is displayed, enter the password to continue. A Start the Client PC. B On the Control Panel, click Uninstall a program from Programs. C Select SL-D3000 System Application, and then click Uninstall/Change (or Change/Remove/Add/Remove). 85 - Epson SureLab D3000 | Administrator Guide - Page 86
product. If you desire to receive the source code of the LGPL Programs, please see the "Contacting Customer Support" in Appendix or Printing Guide of this User's Guide, and contact the customer support of your region. These LGPL Programs are WITHOUT ANY WARRANTY; without even the implied warranty of - Epson SureLab D3000 | Administrator Guide - Page 87
we are referring to freedom of use, not price. Our General Public Licenses are designed to make of free software (and charge for this service if you wish); that you receive source the original author's reputation will not be affected by problems that might be introduced by others. Finally, software - Epson SureLab D3000 | Administrator Guide - Page 88
Appendix In other cases, permission to use a particular library in non-free programs enables a greater number of people to use a large body of free software. For example, permission to use the GNU C Library in non-free programs enables many more people to use the whole GNU operating system, as well - Epson SureLab D3000 | Administrator Guide - Page 89
Appendix c) You must cause the whole of the work to be licensed at no charge to all third parties under the terms of this License. d) If a facility in the modified Library refers to a function or a table of data to be supplied by an application program that uses the facility, other than as an - Epson SureLab D3000 | Administrator Guide - Page 90
Appendix Whether this is true is especially significant if the work can be linked without the Library, or if the work is itself a library. The threshold for this to be true is not precisely defined by law. If such an object file uses only numerical parameters, data structure layouts and accessors, - Epson SureLab D3000 | Administrator Guide - Page 91
License from time to time. Such new versions will be similar in spirit to the present version, but may differ in detail to address new problems or concerns. Each version is given a distinguishing version number. If the Library specifies a version number of this License which applies to it and "any - Epson SureLab D3000 | Administrator Guide - Page 92
Foundation; we sometimes make exceptions for this. Our decision will be guided by the two goals of preserving the free status of all derivatives SHOULD THE LIBRARY PROVE DEFECTIVE, YOU ASSUME THE COST OF ALL NECESSARY SERVICING, REPAIR OR CORRECTION. 16. IN NO EVENT UNLESS REQUIRED BY APPLICABLE LAW - Epson SureLab D3000 | Administrator Guide - Page 93
Appendix Yoyodyne, Inc., hereby disclaims all copyright interest in the library `Frob' (a library for tweaking knobs) written by James Random Hacker. , 1 April 1990 Ty Coon, President of Vice That's all there is to it! 7-Zip Command line version License for use and - Epson SureLab D3000 | Administrator Guide - Page 94
-D3000 (this "product") should only be installed or used by the Licensee ("you") on the condition you agree with SEIKO EPSON CORPORATION ("EPSON ownership of the Software and this License shall not be construed as a sale of any rights in the Software. The Software is protected by Japanese Copyright - Epson SureLab D3000 | Administrator Guide - Page 95
SOFTWARE IS PROVIDED "AS IS" AND WITHOUT ANY WARRANTY OF ANY KIND. EPSON AND ITS SUPPLIERS DO NOT AND CANNOT WARRANT THE PERFORMANCE OR RESULTS YOU export the Software and any data or information which you obtained from EPSON or use the Software without a proper license under Japanese law, - Epson SureLab D3000 | Administrator Guide - Page 96
for statistical purposes to improve the level of service we provide to our users If you agree to install the Software, any transmissions to or from the Internet will be in accordance with EPSON's then-current Privacy Policy provided in EPSON Internet site. 11.Updating Software Version. The Software
-
 1
1 -
 2
2 -
 3
3 -
 4
4 -
 5
5 -
 6
6 -
 7
7 -
8
-
9
-
10
-
11
-
12
-
13
-
14
-
15
-
16
-
17
-
18
-
19
-
20
-
21
-
22
-
23
-
24
-
25
-
26
-
27
-
28
-
29
-
30
-
31
-
32
-
33
-
34
-
35
-
36
-
37
-
38
-
39
-
40
-
41
-
42
-
43
-
44
-
45
-
46
-
47
-
48
-
49
-
50
-
51
-
52
-
53
-
54
-
55
-
56
-
57
-
58
-
59
-
60
-
61
-
62
-
63
-
64
-
65
-
66
-
67
-
68
-
69
-
70
-
71
-
72
-
73
-
74
-
75
-
76
-
77
-
78
-
79
-
80
-
81
-
82
-
83
-
84
-
85
-
86
-
87
-
88
-
89
-
90
-
91
-
92
-
93
-
94
-
95
-
96
 |
 |

SL-D3000
Administrator's Guide