Epson ColorWorks C7500 Technical Reference Guide - Page 147
EpsonNetConfig (Web version), How to startup EpsonNetConfig
 |
View all Epson ColorWorks C7500 manuals
Add to My Manuals
Save this manual to your list of manuals |
Page 147 highlights
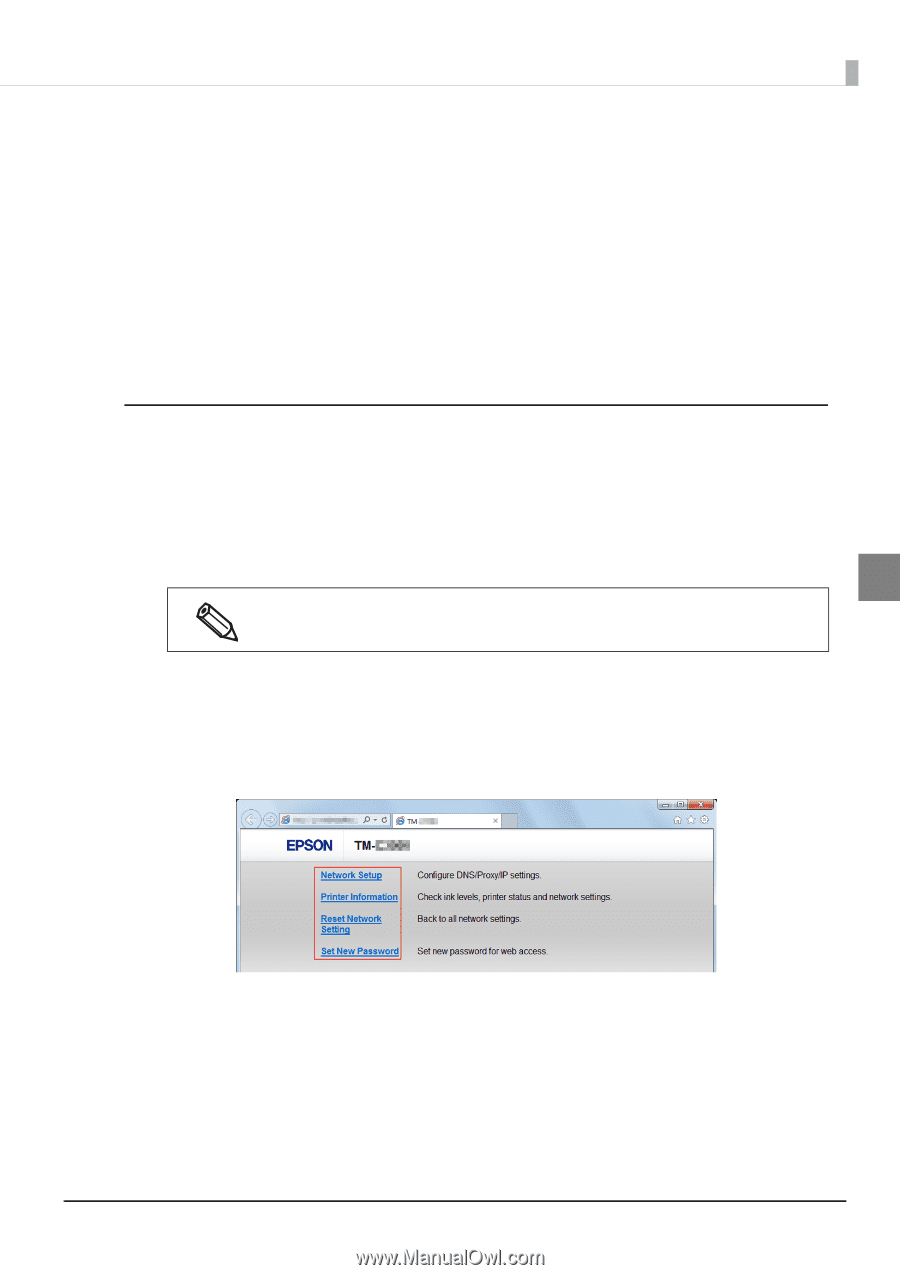
Chapter 3 Handling EpsonNetConfig (Web version) This section describes the functions and instructions for use of EpsonNetConfig (Web version). You can obtain this product information or configure settings via a network from the browser on your computer or tablet. Please connect your computer or tablet to the same network as this product. The following functions are available. Network settings Confirmation of network settings Initialization of network settings Confirmation of ink quantity How to startup EpsonNetConfig The EpsonNetConfig startup method is as follows: 1 Print out the printer status sheet and confirm the IP address. 2 Make sure that your computer or tablet are connected to the same network as the printer. If they are not on the same network, change the computer network settings. 3 If the printer IP address is at the initial setting (A), configure the computer setting to IP address: 192.168.192.168, Subnet mask: 255.255.255.0 and so on. 3 Startup the computer or tablet browser. 4 Enter the printer IP address into the browser address bar. 5 The "Main" window appears. Click the items you want to set or confirm. 6 The Password input window appears. Enter the password. Password: epson (Initial setting) 7 The selected window appears. 147
-
 1
1 -
2
-
3
-
4
-
5
-
6
-
7
-
8
-
9
-
10
-
11
-
12
-
13
-
14
-
15
-
16
-
17
-
18
-
19
-
20
-
21
-
22
-
23
-
24
-
25
-
26
-
27
-
28
-
29
-
30
-
31
-
32
-
33
-
34
-
35
-
36
-
37
-
38
-
39
-
40
-
41
-
42
-
43
-
44
-
45
-
46
-
47
-
48
-
49
-
50
-
51
-
52
-
53
-
54
-
55
-
56
-
57
-
58
-
59
-
60
-
61
-
62
-
63
-
64
-
65
-
66
-
67
-
68
-
69
-
70
-
71
-
72
-
73
-
74
-
75
-
76
-
77
-
78
-
79
-
80
-
81
-
82
-
83
-
84
-
85
-
86
-
87
-
88
-
89
-
90
-
91
-
92
-
93
-
94
-
95
-
96
-
97
-
98
-
99
-
100
-
101
-
102
-
103
-
104
-
105
-
106
-
107
-
108
-
109
-
110
-
111
-
112
-
113
-
114
-
115
-
116
-
117
-
118
-
119
-
120
-
121
-
122
-
123
-
124
-
125
-
126
-
127
-
128
-
129
-
130
-
131
-
132
-
133
-
134
-
135
-
136
-
137
-
138
-
139
-
140
-
141
-
 142
142 -
 143
143 -
 144
144 -
 145
145 -
 146
146 -
 147
147 -
 148
148 -
 149
149 -
 150
150 -
 151
151 -
 152
152 -
153
-
154
-
155
-
156
-
157
-
158
-
159
-
160
-
161
-
162
-
163
-
164
-
165
-
166
-
167
-
168
-
169
-
170
-
171
-
172
-
173
-
174
-
175
-
176
-
177
-
178
-
179
-
180
-
181
-
182
-
183
-
184
-
185
-
186
-
187
-
188
-
189
-
190
-
191
-
192
-
193
-
194
-
195
-
196
-
197
-
198
-
199
-
200
-
201
-
202
-
203
-
204
-
205
-
206
-
207
-
208
-
209
-
210
-
211
-
212
-
213
-
214
-
215
-
216
-
217
-
218
-
219
-
220
-
221
-
222
-
223
-
224
-
225
-
226
-
227
-
228
-
229
-
230
-
231
-
232
-
233
-
234
-
235
-
236
-
237
-
238
-
239
-
240
-
241
-
242
 |
 |