LiftMaster JHDC Installation Manual - English French Spanish - Page 11
TDC Trolley Assembly, Assemble the Operator
 |
View all LiftMaster JHDC manuals
Add to My Manuals
Save this manual to your list of manuals |
Page 11 highlights
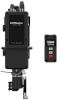
TDC Trolley Assembly Assemble the Operator 1. Install the track spacers evenly over the length of the track. Fasten the spacers to the track with bolt (A) and flange hex nuts (B). HARDWARE A Bolt 3/8"-16 x 3/4" Spacers Provided 2 3 Track Length 8-14 foot 16-20 foot B Flange Hex Nut 3/8"-16 C Take Up Bolt 4 22-24 foot 2. Install the front idler to the track with bolts (F) and washers (D). 3. Assemble the trolley with the take up bolt (C), hex nuts (E), and lock washer (D). 4. Slide the trolley onto the track. 5. Insert bolts (A) into the end of the track and loosely thread the nuts (B) onto the ends of the bolts. D Lock Washer 3/8" E Hex Nut 3/8"-16 F Bolt 3/8"-16 x 1" 6. Slide bolts (A) on the end of the track assembly into the "L" slot in the operator and tighten nuts (B). Insert bolts (A) into the holes on the end of the track and the operator. Secure the track with nuts (B). A A B B F D A B C E D 11
-
 1
1 -
2
-
3
-
4
-
5
-
 6
6 -
 7
7 -
 8
8 -
 9
9 -
 10
10 -
 11
11 -
 12
12 -
 13
13 -
 14
14 -
 15
15 -
 16
16 -
17
-
18
-
19
-
20
-
21
-
22
-
23
-
24
-
25
-
26
-
27
-
28
-
29
-
30
-
31
-
32
-
33
-
34
-
35
-
36
-
37
-
38
-
39
-
40
-
41
-
42
-
43
-
44
-
45
-
46
-
47
-
48
-
49
-
50
-
51
-
52
-
53
-
54
-
55
-
56
-
57
-
58
-
59
-
60
-
61
-
62
-
63
-
64
-
65
-
66
-
67
-
68
-
69
-
70
-
71
-
72
-
73
-
74
-
75
-
76
-
77
-
78
-
79
-
80
-
81
-
82
-
83
-
84
-
85
-
86
-
87
-
88
-
89
-
90
-
91
-
92
-
93
-
94
-
95
-
96
-
97
-
98
-
99
-
100
-
101
-
102
-
103
-
104
-
105
-
106
-
107
-
108
-
109
-
110
-
111
-
112
-
113
-
114
-
115
-
116
-
117
-
118
-
119
-
120
-
121
-
122
-
123
-
124
-
125
-
126
-
127
-
128
-
129
-
130
-
131
-
132
-
133
-
134
-
135
-
136
-
137
-
138
-
139
-
140
-
141
-
142
-
143
-
144
-
145
-
146
-
147
-
148
-
149
-
150
-
151
-
152
-
153
-
154
-
155
-
156
-
157
-
158
-
159
-
160
-
161
-
162
-
163
-
164
-
165
-
166
-
167
-
168
-
169
-
170
-
171
-
172
-
173
-
174
-
175
-
176
-
177
-
178
-
179
-
180
-
181
-
182
-
183
-
184
-
185
-
186
-
187
-
188
-
189
-
190
-
191
-
192
-
193
-
194
-
195
-
196
-
197
-
198
-
199
-
200
-
201
-
202
-
203
-
204
-
205
-
206
-
207
-
208
-
209
-
210
-
211
-
212
-
213
-
214
-
215
-
216
 |
 |
