Kenwood TS-570D User Manual - Page 64
Vs-3 Voice Synthesizer Unit, Yk-88c-1/ Yk-88cn-1/ Yk-88sn-1, Filters
 |
View all Kenwood TS-570D manuals
Add to My Manuals
Save this manual to your list of manuals |
Page 64 highlights
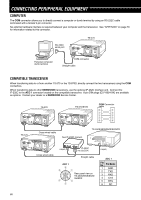
14 INSTALLING OPTIONS VS-3 VOICE SYNTHESIZER UNIT CAUTION: SWITCH OFF THE POWER AND UNPLUG THE DC POWER CABLE BEFORE BEGINNING INSTALLATION. 1 Remove the bottom case (8 screws). 2 Hold the VS-3 unit with the component side facing inward, and insert the VS-3 connector into the transceiver CN16 connector. Component side VS-3 3 Remove the 2 screws from the OPTION FILTER section of the transceiver PC board. CN16 3 Replace the bottom case (8 screws). Note: The VR8 allows you to adjust the volume for voice announcement. Use only when the volume level is too low or too high. VR8 4 Align the pins of the transceiver CN8 and CN9 connectors with the two connectors on the filter. • Take care to properly align the pins. Filter CN8 CN9 5 While holding the filter, carefully push down until the filter snaps into place. YK-88C-1/ YK-88CN-1/ YK-88SN-1 FILTERS CAUTION: SWITCH OFF THE POWER AND UNPLUG THE DC POWER CABLE BEFORE BEGINNING INSTALLATION. 1 Remove the 2 screws from the bottom cover of the transceiver. Bottom cover 6 Re-install the 2 screws that you removed in step 3. 7 Replace the bottom cover (2 screws). Note: After installing the filter, be sure to select the appropriate setting in Menu No. 46; otherwise the filter will not function. 2 Remove the bottom cover. 58
-
 1
1 -
2
-
3
-
4
-
5
-
6
-
7
-
8
-
9
-
10
-
11
-
12
-
13
-
14
-
15
-
16
-
17
-
18
-
19
-
20
-
21
-
22
-
23
-
24
-
25
-
26
-
27
-
28
-
29
-
30
-
31
-
32
-
33
-
34
-
35
-
36
-
37
-
38
-
39
-
40
-
41
-
42
-
43
-
44
-
45
-
46
-
47
-
48
-
49
-
50
-
51
-
52
-
53
-
54
-
55
-
56
-
57
-
58
-
 59
59 -
 60
60 -
 61
61 -
 62
62 -
 63
63 -
 64
64 -
 65
65 -
 66
66 -
 67
67 -
 68
68 -
 69
69 -
70
-
71
-
72
-
73
-
74
-
75
-
76
-
77
-
78
-
79
-
80
-
81
-
82
-
83
-
84
-
85
-
86
-
87
-
88
-
89
 |
 |
