Kenwood TS-570D User Manual - Page 27
Cw Transmission
 |
View all Kenwood TS-570D manuals
Add to My Manuals
Save this manual to your list of manuals |
Page 27 highlights
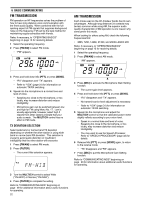
CW TRANSMISSION CW operators know that this mode is a reliable method of communicating under the worst conditions. Although it's true that newer digital modes rival CW as being equally as useful in poor conditions, these modes do not have the long history of service yet nor the simplicity that CW can have. This transceiver has a built-in electronic keyer that supports a variety of functions. For details on using these functions, refer to "ELECTRONIC KEYER" {page 34}. Refer, if necessary, to "OPERATING BASICS" beginning on page 13 for receiving details. 1 Select the operating frequency. 2 Press [CW/FSK] to select CW mode. • "CW" appears. • To tune in another station so your transceiver is precisely on their frequency, use Auto Zero-beat. Refer to "AUTO ZERO-BEAT". • If you wish, you can press [REV] to switch receive from the default upper sideband to the lower sideband. "R" will appear. 3 Press [SEND]. • "RX" disappears and "TX" appears. • No transmit carrier level adjustment is necessary. • Refer to "CW BREAK-IN" {page 34} for information on automatic TX/RX switching. 4 Begin sending. • As you transmit, you should be hearing a sidetone that lets you monitor your own sending. Refer to "TX SIDETONE/ RX PITCH FREQUENCY". 5 Press [SEND] again to return to the receive mode. • "TX" disappears and "RX" appears. Note: Auto Zero-beating may fail if there are other interfering signals on frequency. Refer to "COMMUNICATING AIDS" beginning on page 29 for information about additional useful functions for operating. 6 BASIC COMMUNICATING AUTO ZERO-BEAT Use Auto Zero-beat before transmitting whenever you need to tune in a CW station. Auto Zero-beat automatically and exactly matches your transmit frequency with the station that you are receiving. Neglecting to do this will reduce your chances for being heard by the other station. 1 Press [CW TUNE] to start Auto Zero-beat. • "CW TUNE" appears. • Your transmit frequency is automatically changed so that the pitch of the received signal exactly matches the TX sidetone/ RX pitch frequency that you have set in your transceiver Menu configuration. Refer to "TX SIDETONE/ RX PITCH FREQUENCY" below for further information on that frequency. • When matching is completed, "CW TUNE" disappears. • If matching is unsuccessful, the previous frequency is restored. 2 To interrupt Auto Zero-beat, press [CW TUNE] or [CLR]. Note: ◆ If using RIT {page 30}, you may access Menu No. 48 and switch the function ON. Auto Zero-beat then will match the RIT-offset frequency with the station that you are receiving. When this function is OFF, Auto Zero-beat changes the transmit frequency. ◆ You cannot start Auto Zero-beat if you have selected 1.0 kHz or 2.0 kHz for the DSP filter bandwidth. ◆ When using Auto Zero-beat, the matching error is within ±50 Hz in most cases. ◆ Auto Zero-beat may fail if the keying speed of the target station is too slow. TX SIDETONE/ RX PITCH FREQUENCY The transmit sidetone is the monitor tone you hear from your transceiver as you send CW. It is necessary so you can hear what you are transmitting. It is also useful for checking that your key contacts are closing, the keyer is functioning, or for sending practice without putting a signal on the air. Receive pitch refers to the frequency of the CW note that you hear after tuning your receiver for maximum receive signal strength. On this transceiver, the frequency of the sidetone and receive pitch are equal and selectable. Use Menu No. 20 to select the frequency that is most comfortable for you. To change the volume of the TX sidetone, use Menu No. 21. The selections include OFF and 1 to 9. The default is 4. Note: The position of the AF control does not affect the volume of the TX sidetone. 21
-
 1
1 -
2
-
3
-
4
-
5
-
6
-
7
-
8
-
9
-
10
-
11
-
12
-
13
-
14
-
15
-
16
-
17
-
18
-
19
-
20
-
21
-
 22
22 -
 23
23 -
 24
24 -
 25
25 -
 26
26 -
 27
27 -
 28
28 -
 29
29 -
 30
30 -
 31
31 -
 32
32 -
33
-
34
-
35
-
36
-
37
-
38
-
39
-
40
-
41
-
42
-
43
-
44
-
45
-
46
-
47
-
48
-
49
-
50
-
51
-
52
-
53
-
54
-
55
-
56
-
57
-
58
-
59
-
60
-
61
-
62
-
63
-
64
-
65
-
66
-
67
-
68
-
69
-
70
-
71
-
72
-
73
-
74
-
75
-
76
-
77
-
78
-
79
-
80
-
81
-
82
-
83
-
84
-
85
-
86
-
87
-
88
-
89
 |
 |
