Invacare XLT Owners Manual - Page 32
Riding Position
 |
View all Invacare XLT manuals
Add to My Manuals
Save this manual to your list of manuals |
Page 32 highlights
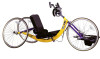
SECTION 6-RIDING POSITION SECTION 6-RIDING POSITION ƽ WARNING After any adjustments, repair or service and before use, make sure all attaching hardware is tightened securely - otherwise injury or damage may result. Replacing/Adjusting the Footrest and Leg Guard NOTE: For this procedure, refer to FIGURE 6.1. NOTE: If replacing footrest or leg guard, take note of current position. Replacing/Adjusting Footrest Footrest Replacement/Adjustment 1. Remove the hex bolt and locknut that secure the footrest to the fork. 2. If replacing footrest perform the following: A. Remove existing footrest from Fork clamp. Footrest B. Insert new footrest into clamp. 3. Slide footrest to desired position. 4. Reinstall hex bolt and locknut. Tighten securely. Clamp, Hex, Bolt and Locknut Leg Guard Replacement/Adjustment 5. Repeat STEPS 1‐5 for the opposite footrest, if necessary. Rear of Fork Replacing/Adjusting Leg Guard Front Tire NOTE: This procedure is for Top End XLT, XLT Jr., and XLT Pro ONLY. 1. Loosen the two allen screws on each mounting clamp. Brake Cable Allen Screws 2. If replacing leg guard, preform the following: 3. Remove existing leg guard from clamps. 4. Insert new leg guard into clamps. Leg Guard Mounting Clamp FIGURE 6.1 Replacing/Adjusting the Footrest and Leg Guard 5. Position each mounting clamp onto the fork under the brake cable. NOTE: The leg guard should surround, but not touch, the rear of the front tire. 6. Adjust leg guard to desired position. 7. Tighten the two allen screws on each mounting clamp securely. Recumbent Handcycle Series 32 Part No 1114850
-
 1
1 -
2
-
3
-
4
-
5
-
6
-
7
-
8
-
9
-
10
-
11
-
12
-
13
-
14
-
15
-
16
-
17
-
18
-
19
-
20
-
21
-
22
-
23
-
24
-
25
-
26
-
 27
27 -
 28
28 -
 29
29 -
 30
30 -
 31
31 -
 32
32 -
 33
33 -
 34
34 -
 35
35 -
 36
36 -
 37
37 -
38
-
39
-
40
-
41
-
42
-
43
-
44
-
45
-
46
-
47
-
48
-
49
-
50
-
51
-
52
-
53
-
54
-
55
-
56
-
57
-
58
-
59
-
60
-
61
-
62
-
63
-
64
-
65
-
66
-
67
-
68
-
69
-
70
-
71
-
72
-
73
-
74
-
75
-
76
 |
 |
