Invacare XLT Owners Manual - Page 17
If installed, parking brake, MUST be secured., Wheel locks MUST be, engaged if installed
 |
View all Invacare XLT manuals
Add to My Manuals
Save this manual to your list of manuals |
Page 17 highlights
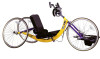
SECTION 2-SAFETY AND HANDLING NOTE: During independent transfer, little or no seat platform will be beneath you. Although it may be difficult to wedge the transfer board between the handcycle seat and the handcycle seat, use a transfer board if necessary. NOTE: Refer to STEPS A‐F in FIGURE 2.1 for details regarding transfer to/from a handcycle. 6. Shift body weight onto object while transferring. 7. Lift and place left leg past front frame across seat and over center tube. ƽ WARNING If installed, parking brake MUST be secured. STEP F: Place both legs onto handcycle footrests and secure safety straps. Handcycle Pedals (positioned toward the front of the handcycle). Footrest Seat Frame STEP A: Shift body weight to the edge of the wheelchair upholstery closest to the handcycle. ƽ WARNING Wheel locks MUST be engaged if installed. Handcycle Wheelchair STEP B: Lift and place LEFT leg past front frame across seat and over center tube. STEP E: Lift and shift weight down into handcycle seat. STEP D: Place RIGHT hand on the wheelchair frame. STEP C: Place LEFT hand on the left side of handcycle seat frame, NOT on hand crank. *NOTE: The steps in FIGURE 1 are specifically for transfer to/from a wheelchair and DO NOT correspond to the steps in the procedure on the previous page. Follow a similar procedure to transfer to/from an object other than a wheelchair. Refer to the steps on the previous page for more information. NOTE: Handcycle shown for clarity. FIGURE 2.1 Transferring Into/Out of the Handcycle Part No 1114850 17 Recumbent Handcycle Series
-
 1
1 -
2
-
3
-
4
-
5
-
6
-
7
-
8
-
9
-
10
-
11
-
 12
12 -
 13
13 -
 14
14 -
 15
15 -
 16
16 -
 17
17 -
 18
18 -
 19
19 -
 20
20 -
 21
21 -
 22
22 -
23
-
24
-
25
-
26
-
27
-
28
-
29
-
30
-
31
-
32
-
33
-
34
-
35
-
36
-
37
-
38
-
39
-
40
-
41
-
42
-
43
-
44
-
45
-
46
-
47
-
48
-
49
-
50
-
51
-
52
-
53
-
54
-
55
-
56
-
57
-
58
-
59
-
60
-
61
-
62
-
63
-
64
-
65
-
66
-
67
-
68
-
69
-
70
-
71
-
72
-
73
-
74
-
75
-
76
 |
 |
