Invacare JASMINE Owners Manual - Page 13
Charging the Battery
 |
View all Invacare JASMINE manuals
Add to My Manuals
Save this manual to your list of manuals |
Page 13 highlights
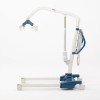
SECTION 3-OPERATION Activating a Mechanical Emergency Release Primary Emergency Release NOTE: For this procedure, refer to FIGURE 3.2. NOTE: This procedure will bring the boom down or lift it up if the hand control is not functioning properly. To activate the primary emergency release, insert a pen into the hole labeled Emergency Up or Emergency Down on the control box. Secondary Emergency Release NOTE: For this procedure, refer to FIGURE 3.3. NOTE: All patient lift actuators are equipped with a mechanical emergency release. The mechanical release will enable the actuator to retract without power. NOTE: Use the primary emergency release first before using the secondary emergency release procedure. This procedure should only be used if the primary emergency release procedure is not functioning or is unreachable. NOTE: The lift MUST be under a load for the mechanical release to function. To activate the secondary emergency release, pull up on the RED emergency grip and pull down on the boom at the same time. Charging the Battery NOTE: For this procedure, refer to FIGURE 3.4. NOTE: Invacare recommends the battery be recharged daily to prolong battery life. NOTE: An audible alarm will sound when battery is low. 1. Lift up on the handle on the back of the battery. 2. Lift the battery up and away from the control box. Control Box Emergency Up Hole Emergency Down Hole FIGURE 3.2 Primary Emergency Release RED Emergency Grip CAUTION Make sure there is an audible click when mounting battery on the battery charger to ensure proper mounting. Otherwise, injury or damage may occur. 3. Place the battery on the battery charger. Push the top of the battery against the mounting bracket until there is an audible click. NOTE: The charge LED will illuminate. When charged, the LED will stop illuminating. NOTE: It will take approximately four hours to charge a battery that requires a full charge. 4. Lift up on the handle on the back of the battery. 5. Lift the battery up and away from the battery charger. FIGURE 3.3 Secondary Emergency Release Battery Handle (STEPS 1, 2, 4 and 5) Battery Charger (STEP 3) Control Box (STEP 6) CAUTION Make sure there is an audible click when mounting battery onto the control box to ensure proper mounting. Otherwise, injury or damage may occur. 6. Place the battery on the control box. Push the top of the battery against the mounting bracket until there is an audible click. An audible "click" will be heard when properly installed (STEPS 3 and 6) FIGURE 3.4 Charging the Battery Part No 1150704 13 Jasmine™ Patient Lift
-
 1
1 -
2
-
3
-
4
-
5
-
6
-
7
-
 8
8 -
 9
9 -
 10
10 -
 11
11 -
 12
12 -
 13
13 -
 14
14 -
 15
15 -
 16
16 -
 17
17 -
 18
18 -
19
-
20
-
21
-
22
-
23
-
24
-
25
-
26
-
27
-
28
-
29
-
30
-
31
-
32
-
33
-
34
-
35
-
36
-
37
-
38
-
39
-
40
-
41
-
42
-
43
-
44
-
45
-
46
-
47
-
48
-
49
-
50
-
51
-
52
-
53
-
54
-
55
-
56
-
57
-
58
-
59
-
60
-
61
-
62
-
63
-
64
-
65
-
66
-
67
-
68
 |
 |
