Invacare JASMINE Owners Manual - Page 11
Attaching the Battery Charger Mounting Bracket to the Wall, Attaching the Battery Charger to the,
 |
View all Invacare JASMINE manuals
Add to My Manuals
Save this manual to your list of manuals |
Page 11 highlights
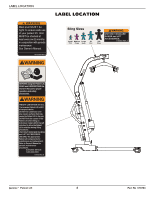
SECTION 2-ASSEMBLY Attaching the Battery Charger Mounting Bracket to the Wall NOTE: For this procedure, refer to FIGURE 2.2. 1. Place the battery charger mounting bracket on the wall at the desired position. 2. With a pencil, mark the middle hole position. 3. Measure down 6½ inches from the pencil mark and drill one mounting hole. 4. Install the bottom mounting screw until there is a 1/8‐inch gap between the screw head and the wall. 5. Put the battery charger mounting bracket onto the bottom mounting screw. 6. Drill the other two mounting holes. 7. Screw the mounting screws through the battery charger mounting bracket and into the wall. Tighten securely. Mounting Bracket CAUTION Make sure there is an audible click when mounting battery on the battery charger to confirm proper mounting. Otherwise, injury or damage may occur. Mounting Screws Bottom Mounting Screw 8. Put the battery charger in place on the mounting bracket. 9. Plug the battery charger into an electrical outlet. NOTE: An LED will illuminate when power is applied to battery charger. Attaching the Battery Charger to the Mast Assembly FIGURE 2.2 Attaching the Battery Charger Mounting Bracket to the Wall ƽ WARNING If the battery charger is attached to the mast assembly and is plugged into a wall outlet, make sure to unplug the battery charger from the wall outlet BEFORE using the patient lift. Failure to unplug the battery charger may result in injury or damage. NOTE: For this procedure, refer to FIGURE 2.3. 1. Lock the rear casters to secure the lift in place while performing this procedure. 2. Remove the two mylar pieces covering the battery charger mounting holes on the back of the mast assembly. 3. Insert the hook screws into mounting holes. 4. Tighten the hook screws. 5. Mount the battery charger mounting bracket on the hook screws. 6. Charge the battery. Refer to Charging the Battery on page 13. Battery and Battery Charger shown in place FIGURE 2.3 Attaching the Battery Charger to the Mast Assembly Part No 1150704 11 Jasmine™ Patient Lift
-
 1
1 -
2
-
3
-
4
-
5
-
 6
6 -
 7
7 -
 8
8 -
 9
9 -
 10
10 -
 11
11 -
 12
12 -
 13
13 -
 14
14 -
 15
15 -
 16
16 -
17
-
18
-
19
-
20
-
21
-
22
-
23
-
24
-
25
-
26
-
27
-
28
-
29
-
30
-
31
-
32
-
33
-
34
-
35
-
36
-
37
-
38
-
39
-
40
-
41
-
42
-
43
-
44
-
45
-
46
-
47
-
48
-
49
-
50
-
51
-
52
-
53
-
54
-
55
-
56
-
57
-
58
-
59
-
60
-
61
-
62
-
63
-
64
-
65
-
66
-
67
-
68
 |
 |
