Celestron PowerSeeker 60AZ Telescope PowerSeeker 50, 60,70, 76 AZ Manual (Engl - Page 8
Moving the Telescope Manually, Installing the Diagonal & Eyepiece Refractor - 60AZ & 70AZ, - how to use
 |
View all Celestron PowerSeeker 60AZ Telescope manuals
Add to My Manuals
Save this manual to your list of manuals |
Page 8 highlights
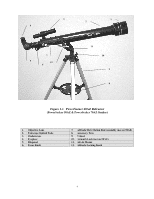
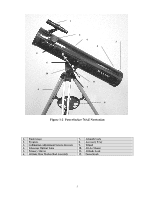
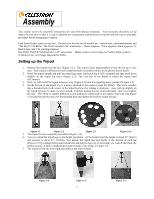
Moving the Telescope Manually The PowerSeeker Alt-Az mount is easy to move wherever you want to point it. For the 60AZ, 70AZ, and 76AZ the up and down (altitude) is controlled by the altitude locking knob (Figure 2-12). The side-to-side (azimuth) is controlled by the azimuth lock (Figure 2-12). When both knobs are loose you can find your objects easily (through the finderscope) and then lock the controls. For fine adjustments in altitude, you turn the knurled ring of the altitude slow motion rod (when the altitude lock is tight) in either direction - see Figure 2-9. For the 50AZ model, loosen the altitude locking knob - Figure 2-9 and then move the telescope in the desired location you want and once there tighten the altitude locking knob. Note: Before tightening the altitude locking knob, the location you are seeking should be located in the finderscope. Figure 2-12 Installing the Diagonal & Eyepiece (Refractor) - 60AZ & 70AZ The diagonal is a prism that diverts the light at a right angle to the light path of the refractor. This allows you to observe in a position that is more comfortable than if you had to look straight through. This diagonal is an erect image model that corrects the image to be right side up and oriented correctly left-to-right which is much easier to use for terrestrial observing. Also, the diagonal can be rotated to any position which is most favorable for you. To install the diagonal and eyepiece: 1. Insert the small barrel of the diagonal into the 1.25" eyepiece adapter of the focus tube on the refractor - Figure 2-13. Make sure the two thumbscrews on the eyepiece adapter do not protrude into the focuser tube before installation and the plug up cap is removed from the eyepiece adapter. 2. Put the chrome barrel end of one of the eyepieces into the diagonal and tighten the thumb screw. Again, when doing this make sure the Figure 2-13 thumbscrew is not protruding into the diagonal before inserting the eyepiece. 3. The eyepieces can be changed to other focal lengths by reversing the procedure in step 2 above. Installing the Diagonal & Eyepiece (Refractor) - 50AZ The diagonal for the 50AZ is called a star diagonal where the prism corrects the image to be right side up (erect image) but the image is reversed left-to-right. The diagonal and eyepieces are .96" diameter sizes. All steps above are the same with the 50AZ. Figure 2-14 8
-
 1
1 -
2
-
 3
3 -
 4
4 -
 5
5 -
 6
6 -
 7
7 -
 8
8 -
 9
9 -
 10
10 -
 11
11 -
 12
12 -
 13
13 -
14
-
15
-
16
-
17
-
18
-
19
-
20
-
21
-
22
-
23
-
24
-
25
-
26
-
27
-
28
-
29
-
30
-
31
-
32
-
33
-
34
-
35
-
36
-
37
-
38
-
39
-
40
-
41
-
42
-
43
-
44
-
45
-
46
-
47
-
48
-
49
-
50
-
51
-
52
-
53
-
54
-
55
-
56
-
57
-
58
-
59
-
60
-
61
-
62
-
63
-
64
-
65
-
66
-
67
-
68
-
69
-
70
-
71
-
72
-
73
-
74
-
75
-
76
-
77
-
78
-
79
-
80
-
81
-
82
-
83
-
84
-
85
-
86
-
87
-
88
-
89
-
90
-
91
-
92
-
93
-
94
-
95
-
96
-
97
-
98
-
99
-
100
-
101
-
102
-
103
-
104
-
105
-
106
-
107
-
108
-
109
-
110
-
111
-
112
-
113
-
114
-
115
-
116
-
117
-
118
-
119
-
120
-
121
-
122
-
123
-
124
-
125
-
126
 |
 |
