Campbell Scientific AVW200 AVW200-series Vibrating Wire Interfaces - Page 24
Radio/Modem manual., Connecting to DevConfig, Communications
 |
View all Campbell Scientific AVW200 manuals
Add to My Manuals
Save this manual to your list of manuals |
Page 24 highlights
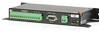
AVW200-series 2-Channel Vibrating Wire Spectrum Analyzer Modules NOTE NOTE At the AVW206 site, do the following steps: 1. Use DevConfig to configure the AVW206 for RF communications (Section 5.1, Connecting to DevConfig, and Section 5.2.1, Communications). 2. If you are not using the default multiplexer, go to the Deployment/Measurement tab in DevConfig and select the multiplexer you are using (Section 5.1, Connecting to DevConfig, and Section 5.2.1, Communications). The default multiplexer for the AVW206 is the AM16/32A. 3. Attach the multiplexers to the AVW206 as shown in FIGURE 4-4. 4. Connect the sensors to the multiplexers. Read more! Information about connecting the vibrating wire sensors to the multiplexer is provided in the AM16/32B manual. 5. Connect an antenna (or antenna cable with Yagi or omnidirectional antenna attached) to the Antenna Connector on the side of the AVW206. Read more! Description of our antenna options is provided in Appendix C. 6. Use the power cable to connect the 12V and G terminals on the AVW206 to the 12V and G terminals on the PS100 or another power supply. At the datalogger/RF401 site, do the following steps: 1. Configure the RF401 radio so that its parameters match the AVW206. The protocol setting for the RF401 must be PB Aware or PB Node. 2. Attach an antenna (or antenna cable with Yagi or omnidirectional antenna attached) to the Antenna Connector on the RF401. 3. Use the SC12 serial cable to attach the datalogger's CS I/O port to the RF401's CS I/O port. The datalogger's CS I/O port applies power to the RF401. Read more! More information about using spread spectrum radios is provided in the RF401/RF411/RF416 Spread Spectrum Data Radio/Modem manual. 4. Create a CRBasic program that includes the AVW200() instruction for each of the multiplexers that the AVW200 will control. Check the manufacturer's specification for the sensors frequency and excitation range before picking the begin/end frequencies and excitation voltage. 16
-
 1
1 -
2
-
3
-
4
-
5
-
6
-
7
-
8
-
9
-
10
-
11
-
12
-
13
-
14
-
15
-
16
-
17
-
18
-
 19
19 -
 20
20 -
 21
21 -
 22
22 -
 23
23 -
 24
24 -
 25
25 -
 26
26 -
 27
27 -
 28
28 -
 29
29 -
30
-
31
-
32
-
33
-
34
-
35
-
36
-
37
-
38
-
39
-
40
-
41
-
42
-
43
-
44
-
45
-
46
-
47
-
48
-
49
-
50
-
51
-
52
-
53
-
54
-
55
-
56
-
57
-
58
-
59
-
60
-
61
-
62
-
63
-
64
-
65
-
66
-
67
-
68
-
69
-
70
-
71
-
72
-
73
-
74
-
75
-
76
-
77
-
78
-
79
-
80
-
81
-
82
-
83
-
84
-
85
-
86
-
87
-
88
-
89
-
90
-
91
-
92
-
93
-
94
-
95
-
96
-
97
-
98
-
99
-
100
-
101
-
102
-
103
-
104
-
105
-
106
-
107
-
108
-
109
-
110
-
111
-
112
 |
 |
