URC MX-350 Owners Manual - Page 5
The MX-350, Universal Remote Control, Inc. - remote codes
 |
View all URC MX-350 manuals
Add to My Manuals
Save this manual to your list of manuals |
Page 5 highlights
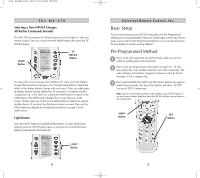
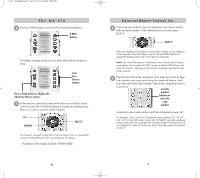
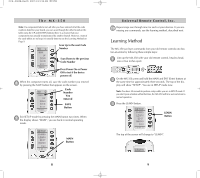
The MX-350 4 Press the P-PRO button to select the Pre-Programmed Method. P-PRO Button The display changes so that you can select which Device button to setup. First Five Device Names Press a Page button to display the other five Device names. 5 In this step you choose the name of the device you'd like to setup. Use the cursor UP or DOWN buttons to change the flashing name. When it is correct, press the SELECT button. UP DOWN SELECT For Example: I wanted to setup the TV Device button first, so I pressed the cursor UP or DOWN until "TV" was flashing in the display. The bottom of the display will flash "FROM TABLE". 6 Universal Remote Control, Inc. 6 In this step you verify the type of component you plan to operate with this device button. If the flashing name is correct, press SELECT. SELECT If the name flashing in the display is incorrect (for example, you are setting up AUX to operate a Laser Disc Player), use the UP and DOWN buttons to change the flashing name to the correct type of component. Note: Each name that appears in the display may include several types of components. For example, the DVD category includes DVD players and Laser Disc Players. See page 37 for a list of component types each Code Table contains. 7 Point the MX-350 at the component, then enter the first three digit code number from your notes using the numbered buttons. After you enter each three digit number, look at the component to see if it turned off. Use the number buttons to enter the code number. Continue to enter code numbers until the component powers off. For Example: I have a Sony TV. I found the code numbers 070, 139,147, 126, 185, 194 and 085 under Sony in the TV TABLE. Using the numbered buttons on the MX-350, I entered 070 and looked at the TV. It didn't turn off, so I entered 139, then 147 and so on, until I found the code that powered off the TV. 7
-
 1
1 -
 2
2 -
 3
3 -
 4
4 -
 5
5 -
 6
6 -
 7
7 -
 8
8 -
 9
9 -
 10
10 -
 11
11 -
12
-
13
-
14
-
15
-
16
-
17
-
18
-
19
-
20
-
21
-
22
-
23
-
24
-
25
-
26
-
27
-
28
-
29
-
30
-
31
-
32
-
33
 |
 |
