URC MX-350 Owners Manual - Page 10
Advanced Setup
 |
View all URC MX-350 manuals
Add to My Manuals
Save this manual to your list of manuals |
Page 10 highlights
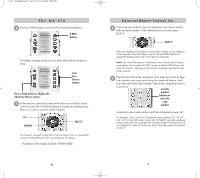
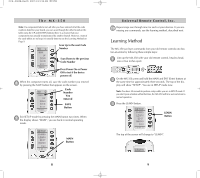
The MX-350 Advanced Setup After you've finished all your basic setup, you can choose to make operation easier by customizing the MX-350 just the way you want, using the Advanced Setup features described in this section. Editing Button Labels You can change the name of any of the display buttons (including Favorite Channels) by following these steps: 1 Press and hold both the MAIN and ENT (Enter) buttons for approximately three seconds. The top of the display will show "SETUP". You are in SETUP mode now. Note: You have 30 seconds to perform a step while you are in SETUP mode. If you don't press a button within that time, the MX-350 will time out and return to normal operation. 2 Press the EDIT button. EDIT Button 3 The display changes to the EDIT menu. Press the TEXT button. TEXT Button 4 The screen displays the list of devices and "EDIT" will appear at the top of the screen. Navigate to the device and page where there is a button label you want to EDIT, selecting between the FAV, MAIN, DEVICE, then using the PAGE button. 16 Universal Remote Control, Inc. 5 Press the button you wish to edit. The first character of your button label blinks. Blinking Character EDIT flashes at the bottom of the screen. 6 Change the character by using any of the number keys. Each press of the same number button selects the next character of that number's group, as shown here. Once the character you want appears, move to the next space by pressing the RIGHT cursor button. A,B,C,1 D,E,F,2 G,H,I,3 J,K,L,4 M,N,O,5 P,Q,R,6 S,T,U,7 V,W,X,8 Y,Z,9 UP Cursor button deletes ALL text. LEFT Cursor button moves blinking character left. RIGHT Cursor button moves blinking character right. DOWN Cursor button deletes the currently blinking character. 17
-
 1
1 -
2
-
3
-
4
-
 5
5 -
 6
6 -
 7
7 -
 8
8 -
 9
9 -
 10
10 -
 11
11 -
 12
12 -
 13
13 -
 14
14 -
 15
15 -
16
-
17
-
18
-
19
-
20
-
21
-
22
-
23
-
24
-
25
-
26
-
27
-
28
-
29
-
30
-
31
-
32
-
33
 |
 |
