URC MX-350 Owners Manual - Page 11
Macro Button Setup
 |
View all URC MX-350 manuals
Add to My Manuals
Save this manual to your list of manuals |
Page 11 highlights
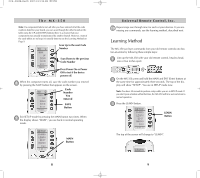
The MX-350 7 When you are finished editing the button, press the button you edited and "SAVED" will flash at the bottom of the display. 8 To change any other button labels on the same device, press the next button, then repeat steps 6-8. If you wish to edit a button on another device, press the MAIN button once, then repeat Steps 4-8. 9 Once you've finished editing buttons, press the MAIN button four times to return to normal operation. Edit the MAIN Menu Title or a MAIN Menu Device Label You can change the title of the MAIN Menu or a MAIN Menu device label by following these steps after you've entered TEXT Edit mode (described in the steps one through four in the preceding pages). 1 Once you've entered TEXT Edit mode, the top of the screen displays EDIT and the first five devices of the MAIN Menu. There are five pages you can access via the Page UP or DOWN buttons. When the top of the screen says EDIT, pressing a device button jumps to the pages for that device so that you can edit a device's LCD buttons normally. However, if you continue to tap the Page button, the top of the screen will change from EDIT to MAIN. While it says MAIN, there are three pages of LCD buttons. The first two list the Devices of the MAIN Menu and enable you to change the device names when pressed. The third page titled MAIN has only one entry for the LCD buttons; "MAIN". When you press the corresponding hard button, you can relable the MAIN title itself. 2 Select the title to edit by pressing the adjacent hard button. 3 Edit the text (described on steps 5 and 6 on page 17). 4 Press the button you edited to save the changes. Here's an example: The MAIN Menu title has been changed to PATIO, so whenever the MAIN button is pressed, the user is reminded that this is the Patio remote. Each of the MAIN menu device buttons has been custom labeled for the activities the user likes to use out on the Patio. 18 Universal Remote Control, Inc. Macro Button Setup Imagine turning on your TV, your DVD player and your surround sound receiver by pressing a single button on your MX-350! What would normally take three remotes and three button pushes, the MX-350 can accomplish with the press of one button. We call that a "Macro". Any of the Display buttons, the Power On or the Power Off buttons (on any Device or Page) can be set to be Macro buttons! To setup a macro button, follow these easy steps: 1 Enter the SETUP mode by pressing and holding both MAIN and ENT for three seconds. Note: You have 30 seconds for each step, otherwise the MX-350 will time out automatically. 2 Press the MACRO button. The top of the display will show "MACRO". The bottom of the display will flash "SELECT". 3 Navigate to the Device and Page where there is a button you would like to set as a Macro button using the MAIN, DEVICE, and PAGE buttons. Advanced Options: If you wish to set one of the DEVICE buttons as a macro, on step 3, press the Page Up button twice. The top of the display changes to MAIN, and you can navigate to MAIN page 1 or page 2 before going on to Step 4. Another option for DEVICE button macros is to only send the macro if the button is pressed and held. This is setup by entering a delay as the first step of the macro. The amount of delay determines how long the user must press the button before the macro is sent. The advantage of this option is that a normal press of the DEVICE button will simply switch devices without issuing the macro. 4 Press the button you want to set as a Macro button. The top of the screen will display the label of the button you selected. At the bottom of the screen it displays "STEP0", indicating that no macro steps have been entered yet. 19
-
 1
1 -
2
-
3
-
4
-
5
-
 6
6 -
 7
7 -
 8
8 -
 9
9 -
 10
10 -
 11
11 -
 12
12 -
 13
13 -
 14
14 -
 15
15 -
 16
16 -
17
-
18
-
19
-
20
-
21
-
22
-
23
-
24
-
25
-
26
-
27
-
28
-
29
-
30
-
31
-
32
-
33
 |
 |
