Panasonic AJ-PX800G Basic Operating Instructions - Page 67
One-shot recording, Loop recording, SYSTEM MODE].
 |
View all Panasonic AJ-PX800G manuals
Add to My Manuals
Save this manual to your list of manuals |
Page 67 highlights
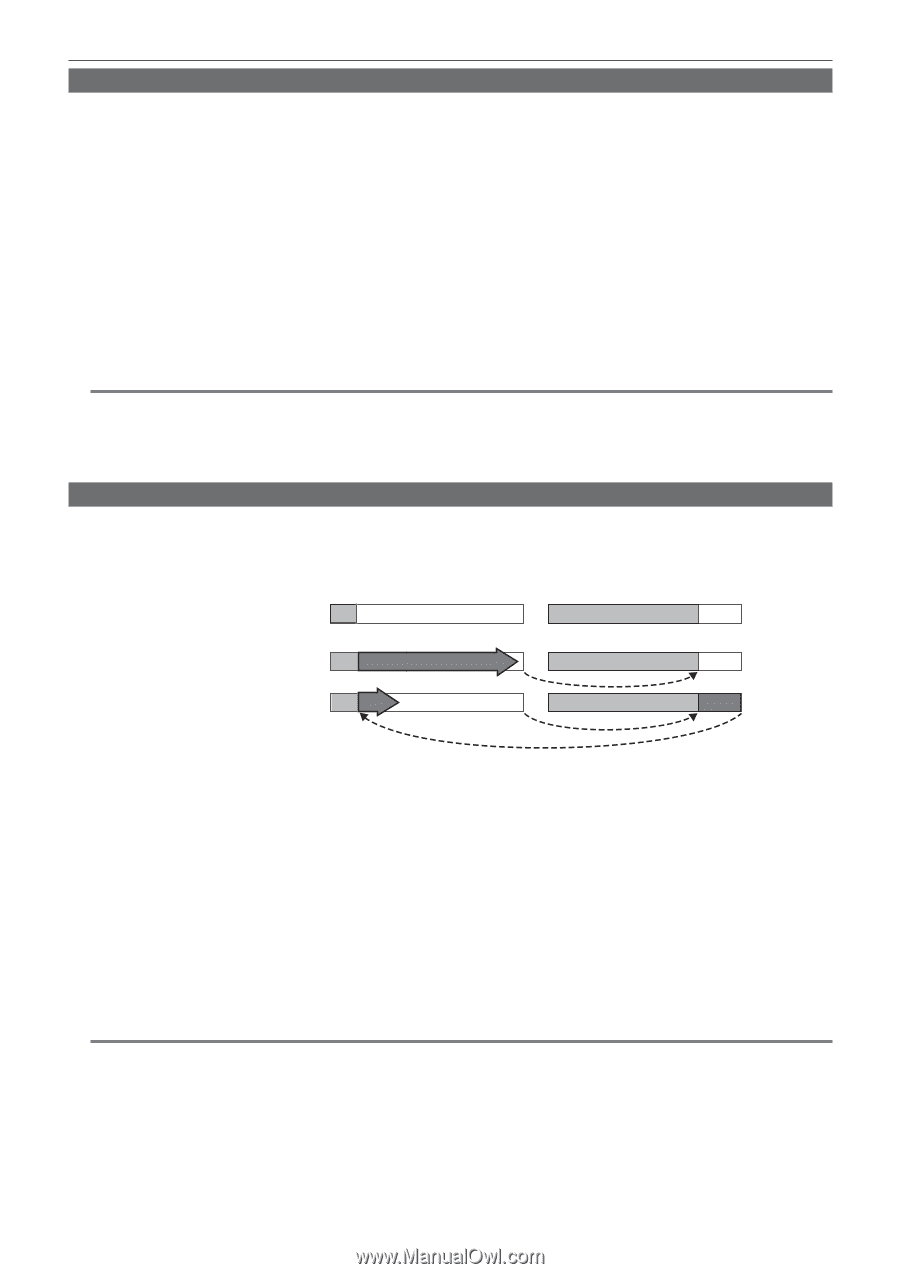
Chapter 4 Shooting - Special recording functions One-shot recording Recording takes place once for the set amount of time. 1 Set all items in the main menu → [SYSTEM MODE]. 2 Select [ONE SHOT] in the main menu → [RECORDING SETUP] → [RECORDING]. 3 Set the time with [ONE SHOT TIME] in the main menu → [RECORDING SETUP] → [RECORDING SETTING]. 4 Press the button. ffOnce recording has taken place for the set amount of time, recording will pause. ffTo stop recording, press the button to display the [HOME] screen of SmartUI, and press the button. Recording cannot be stopped on screens other than [HOME], because the function other than stop function is assigned to the button. ffTo clear settings, set [NORMAL] in the main menu → [RECORDING SETUP] → [RECORDING]. ffWhen [OFF] is set in the main menu → [RECORDING SETUP] → [RECORDING SETTING] → [RECORDING HOLD], one-shot recording settings are cleared by turning off the camera. ff[I‑REC] is displayed while recording, and [I‑] is displayed while paused. ffWhen recording is stopped, [I‑] flashes. @@NOTE tt While in operation, other operations are unavailable. tt Pre-recording and one-clip recording will not operate. tt Audio is not recorded. tt Recorded data (data recorded until the camera was stopped) is included in one clip. tt When one-shot recording is continuously performed, the recording operation may be slower. Loop recording ffThis function successively records to two P2 cards inserted in the P2 card slots. ffWhen there is no more free space on the card, recording returns to the first card, and recording is continued while erasing existing data already saved on that card. For details, refer to "Dividing clips recorded on P2 cards" (page 44). Before loop recording starts 1st card No recorded content 2nd card Content recorded Start recording Recording cycle 1 A B Recording cycle 2 C B 1 Check the settings of each item in the main menu → [SYSTEM MODE]. For details on system modes in which the loop recording function can be used, refer to the table in "System modes and recording functions" (page 71). For details on menu operations, refer to "Setting menu basic operations" (page 119). 2 Set [LOOP] in the main menu → [RECORDING SETUP] → [RECORDING]. 3 Press the button. ffRecording is started. ffTo stop recording, press the button again. ffTo clear settings, set [NORMAL] in the main menu → [RECORDING SETUP] → [RECORDING]. ffWhen [OFF] is set in the main menu → [RECORDING SETUP] → [RECORDING SETTING] → [RECORDING HOLD], loop recording settings are cleared by turning off the camera. ff[L‑REC] is displayed while recording, and [L‑] is displayed while paused. When loop recording cannot be performed due to memory shortage, etc., [LOOP] flashes. @@NOTE tt When this function is used, each of the two P2 cards must have at least one minute of free space. tt The remaining free space of the P2 card displayed in the mode check screen indicates the standard recording time in accordance with the recording format. When loop recording is stopped immediately after an old recording is erased, the time recorded on the card is sometimes less than the indicated time. tt Pre-recording and one-clip recording will not operate. tt It may take time for recording to stop. The subsequent operation is not accepted until the P2 memory card access LED status changes from blinking to illuminating. tt During loop recording P2 memory card access LEDs of all P2 cards used for recording are illuminated or flash orange. Loop recording stops when these P2 cards are removed. Be careful. tt Loop recording may stop when the input reference signal of the generator lock is disrupted during loop recording. - 67 -
-
 1
1 -
2
-
3
-
4
-
5
-
6
-
7
-
8
-
9
-
10
-
11
-
12
-
13
-
14
-
15
-
16
-
17
-
18
-
19
-
20
-
21
-
22
-
23
-
24
-
25
-
26
-
27
-
28
-
29
-
30
-
31
-
32
-
33
-
34
-
35
-
36
-
37
-
38
-
39
-
40
-
41
-
42
-
43
-
44
-
45
-
46
-
47
-
48
-
49
-
50
-
51
-
52
-
53
-
54
-
55
-
56
-
57
-
58
-
59
-
60
-
61
-
 62
62 -
 63
63 -
 64
64 -
 65
65 -
 66
66 -
 67
67 -
 68
68 -
 69
69 -
 70
70 -
 71
71 -
 72
72 -
73
-
74
-
75
-
76
-
77
-
78
-
79
-
80
-
81
-
82
-
83
-
84
-
85
-
86
-
87
-
88
-
89
-
90
-
91
-
92
-
93
-
94
-
95
-
96
-
97
-
98
-
99
-
100
-
101
-
102
-
103
-
104
-
105
-
106
-
107
-
108
-
109
-
110
-
111
-
112
-
113
-
114
-
115
-
116
-
117
-
118
-
119
-
120
-
121
-
122
-
123
-
124
-
125
-
126
-
127
-
128
-
129
-
130
-
131
-
132
-
133
-
134
-
135
-
136
-
137
-
138
-
139
-
140
-
141
-
142
-
143
-
144
-
145
-
146
-
147
-
148
-
149
-
150
-
151
-
152
-
153
-
154
-
155
-
156
-
157
-
158
-
159
-
160
-
161
-
162
-
163
-
164
-
165
-
166
-
167
-
168
-
169
-
170
-
171
-
172
-
173
-
174
-
175
-
176
-
177
-
178
-
179
-
180
-
181
-
182
-
183
-
184
-
185
-
186
-
187
-
188
-
189
-
190
-
191
-
192
-
193
-
194
-
195
-
196
-
197
-
198
-
199
-
200
-
201
-
202
-
203
-
204
-
205
-
206
-
207
-
208
-
209
-
210
-
211
-
212
-
213
-
214
-
215
-
216
-
217
-
218
-
219
-
220
 |
 |