Panasonic AJ-PX800G Basic Operating Instructions - Page 173
Connecting to the extension control unit (AG‑EC4G), Switch functionality in remote control mode
 |
View all Panasonic AJ-PX800G manuals
Add to My Manuals
Save this manual to your list of manuals |
Page 173 highlights
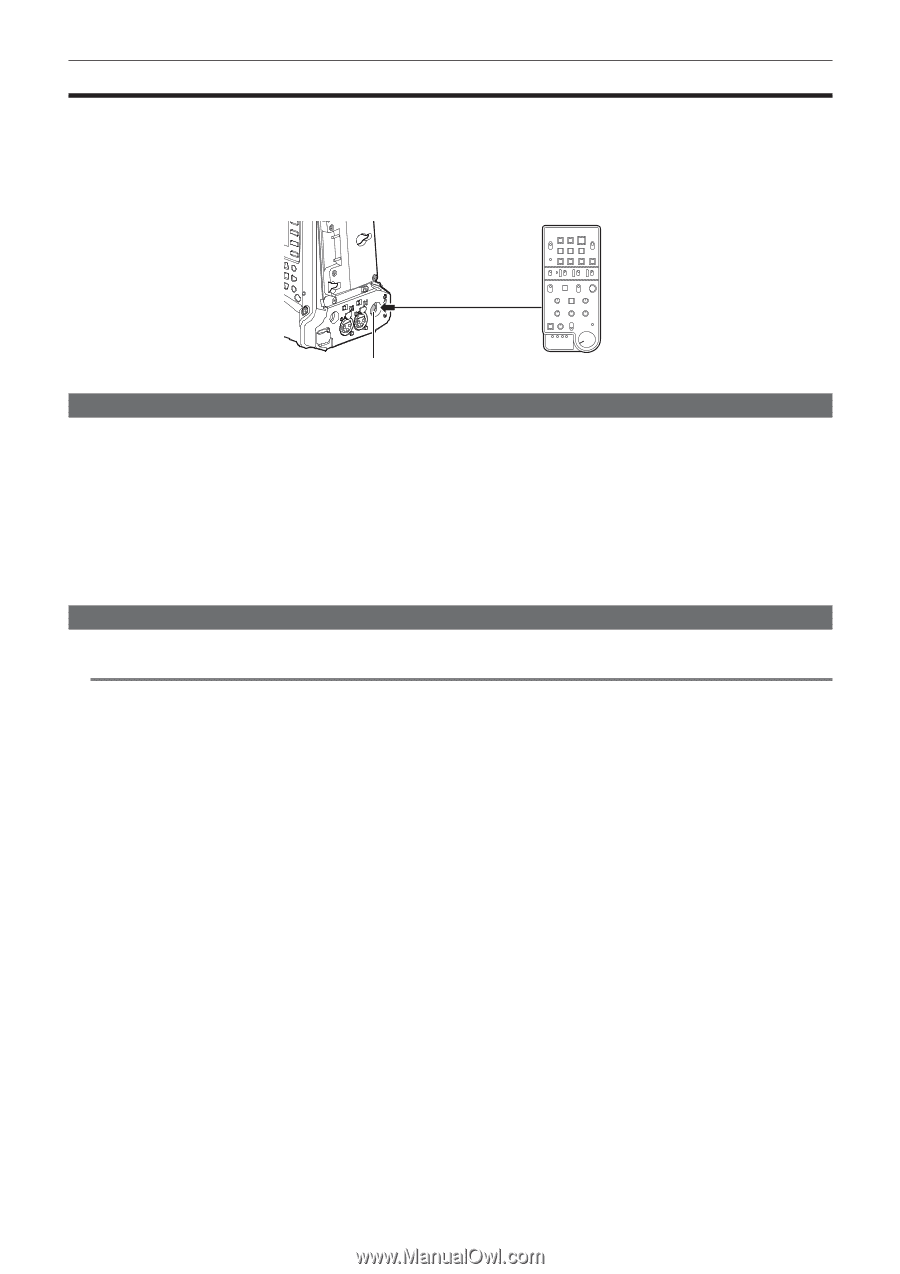
Chapter 9 Connecting to External Devices - Connecting to the extension control unit (AG‑EC4G) Connecting to the extension control unit (AG‑EC4G) ffConnect the extension control unit AG‑EC4G (optional) to remote-control some functions. ffWhen you connect AG‑EC4G and set the switches of the camera and AG‑EC4G to , the camera automatically enters the remote control mode. ffRemove AG‑EC4G, or ensure the AG‑EC4G switch is to release remote control mode. ffYou cannot go to the AG‑EC4G remote control mode when remote control in an IP connection is enabled. Remote control in an IP connection is enabled when [IP REMOTE] is illuminated or flashing on the [STATUS] screen of the mode check displayed when you turn the switch to the side. Set the camera's main menu → [NETWORK SETUP] → [NETWORK FUNC] → [IP REMOTE] to [DISABLE]. terminal AG-EC4G Switch functionality in remote control mode The following switches and buttons on the camera do not function in remote control mode. ff switch ff button ffJog dial button ff switch ff/ selector switch ff switch ff button ff button ff button Recording and playback operations in remote control mode Recording/playback operations can be performed both on the camera and AG‑EC4G when the remote control unit is connected. @@NOTE tt The status adjusted with AG‑EC4G connected will always be recorded on the camera. The setting of the switch for AG‑EC4G is currently disabled. tt When connecting or removing a dedicated cable, be sure to set the switch of the camera and AG‑EC4G to . tt Use a cable or optional cable that is dedicated for AG‑EC4G. Otherwise, a malfunction may result. tt For details on the current from the terminal, refer to "Details of the connector signals" (page 215). tt For details, refer to the Operating Instructions of AG‑EC4G. - 173 -
-
 1
1 -
2
-
3
-
4
-
5
-
6
-
7
-
8
-
9
-
10
-
11
-
12
-
13
-
14
-
15
-
16
-
17
-
18
-
19
-
20
-
21
-
22
-
23
-
24
-
25
-
26
-
27
-
28
-
29
-
30
-
31
-
32
-
33
-
34
-
35
-
36
-
37
-
38
-
39
-
40
-
41
-
42
-
43
-
44
-
45
-
46
-
47
-
48
-
49
-
50
-
51
-
52
-
53
-
54
-
55
-
56
-
57
-
58
-
59
-
60
-
61
-
62
-
63
-
64
-
65
-
66
-
67
-
68
-
69
-
70
-
71
-
72
-
73
-
74
-
75
-
76
-
77
-
78
-
79
-
80
-
81
-
82
-
83
-
84
-
85
-
86
-
87
-
88
-
89
-
90
-
91
-
92
-
93
-
94
-
95
-
96
-
97
-
98
-
99
-
100
-
101
-
102
-
103
-
104
-
105
-
106
-
107
-
108
-
109
-
110
-
111
-
112
-
113
-
114
-
115
-
116
-
117
-
118
-
119
-
120
-
121
-
122
-
123
-
124
-
125
-
126
-
127
-
128
-
129
-
130
-
131
-
132
-
133
-
134
-
135
-
136
-
137
-
138
-
139
-
140
-
141
-
142
-
143
-
144
-
145
-
146
-
147
-
148
-
149
-
150
-
151
-
152
-
153
-
154
-
155
-
156
-
157
-
158
-
159
-
160
-
161
-
162
-
163
-
164
-
165
-
166
-
167
-
 168
168 -
 169
169 -
 170
170 -
 171
171 -
 172
172 -
 173
173 -
 174
174 -
 175
175 -
 176
176 -
 177
177 -
 178
178 -
179
-
180
-
181
-
182
-
183
-
184
-
185
-
186
-
187
-
188
-
189
-
190
-
191
-
192
-
193
-
194
-
195
-
196
-
197
-
198
-
199
-
200
-
201
-
202
-
203
-
204
-
205
-
206
-
207
-
208
-
209
-
210
-
211
-
212
-
213
-
214
-
215
-
216
-
217
-
218
-
219
-
220
 |
 |