Panasonic AJ-PX800G Basic Operating Instructions - Page 195
Rec during upload function, Transferring recorded clips automatically (automatic transfer mode)
 |
View all Panasonic AJ-PX800G manuals
Add to My Manuals
Save this manual to your list of manuals |
Page 195 highlights
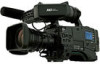
Chapter 10 Network Connection - Rec during upload function Rec during upload function Clips recorded in the P2 card can be automatically transferred to a server device on the network during recording/playback with the camera. The rec during upload function has the following two modes: ffAutomatic transfer mode: After the rec during upload function is enabled, uploads recorded clips automatically in order. ffManual selection mode: Uploads clips selected beforehand. To use the rec during upload function, network settings and FTP client settings need to be configured beforehand. Transferring recorded clips automatically (automatic transfer mode) 1 Establish the network connection between the camera and a server device. Perform the setting referring to "FTP client function setting" (page 190). 2 Set the camera's main menu → [NETWORK SETUP] → [FTP CLIENT SERVICE] → [REC DURING UPLOAD] to [ENABLE]. 3 Select the type of the clip to upload in the camera's main menu → [NETWORK SETUP] → [FTP CLIENT SERVICE] → [AUTO COPY]. [REC CLIP(PROXY)]: Upload target is proxy data of recorded clips. [REC CLIP]: Upload target is recorded clips (main recording data and proxy data). [DISABLE]: Recorded clips are not upload targets. 4 Shoot. Clips are registered in the upload list immediately after recording is stopped, and then recorded clips are automatically transferred. The viewfinder or LCD monitor shows the operation status of the rec during upload function. In addition, the thumbnail screen shows the operation status of the rec during upload function and the transfer status of clips. @@NOTE tt Uploading of the clip will start after the rec during upload function is enabled. To prevent the upload error, do not remove the card from the P2 memory card slot and the microP2 memory card slot until the upload is completed. tt Up to 100 clips can be registered in the upload list for the upload of clips. Clips exceeding 100, excluding the uploaded clips and clips failed to upload cannot be registered. tt While recording is stopped, you can add recorded clips to transfer. Select the clips to transfer by selecting the main menu → [CLIP] → [COPY] → [FTP] or [FTP(PROXY)] from the thumbnail screen. The selected clips are registered in the upload list. tt Clips are also automatically transferred during recording, playback, and thumbnail display. tt If the network is disconnected during transfer, or the power of the camera is turned off and on again, transfer resumes in clip units. tt Only the recorded clip in the slot 1 is automatically transferred during the simultaneous recording. tt Clips of interval recording, loop recording, one-clip recording, and one-shot recording are not automatically transferred. tt While the rec during upload function is enabled, the last clip delete function is disabled. tt While the rec during upload function is enabled, the streaming function is disabled. tt The directory on the FTP server is not listed in the FTP explorer screen during the transmission or waiting to transmit the clips registered in the upload list. tt The setting value in the main menu → [NETWORK SETUP] cannot be changed or initialized while the rec during upload function is set enabled. tt The copying between the P2 cards will not operate during the transmission or waiting to transmit the clips registered in the upload list. tt The clip delete function will not operate during the transmission or waiting to transmit the clips registered in the upload list. tt The format function of the P2 card will not operate during the transmission or waiting to transmit the clips registered in the upload list. Transferring selected clips automatically (manual selection mode) Fig. 1 1 Establish the network connection between the camera and a server device. Perform the setting referring to "FTP client function setting" (page 190). 2 Set the camera's main menu → [NETWORK SETUP] → [FTP CLIENT SERVICE] → [REC DURING UPLOAD] to [ENABLE]. 3 Select [DISABLE] in the camera's main menu → [NETWORK SETUP] → [FTP CLIENT SERVICE] → [AUTO COPY]. 4 Select the clips to transfer by selecting the main menu → [CLIP] → [COPY] → [FTP] or [FTP(PROXY)] from the thumbnail screen. (Fig. 1) Selected clips are registered in the upload list, and transferred automatically. - 195 -
-
 1
1 -
2
-
3
-
4
-
5
-
6
-
7
-
8
-
9
-
10
-
11
-
12
-
13
-
14
-
15
-
16
-
17
-
18
-
19
-
20
-
21
-
22
-
23
-
24
-
25
-
26
-
27
-
28
-
29
-
30
-
31
-
32
-
33
-
34
-
35
-
36
-
37
-
38
-
39
-
40
-
41
-
42
-
43
-
44
-
45
-
46
-
47
-
48
-
49
-
50
-
51
-
52
-
53
-
54
-
55
-
56
-
57
-
58
-
59
-
60
-
61
-
62
-
63
-
64
-
65
-
66
-
67
-
68
-
69
-
70
-
71
-
72
-
73
-
74
-
75
-
76
-
77
-
78
-
79
-
80
-
81
-
82
-
83
-
84
-
85
-
86
-
87
-
88
-
89
-
90
-
91
-
92
-
93
-
94
-
95
-
96
-
97
-
98
-
99
-
100
-
101
-
102
-
103
-
104
-
105
-
106
-
107
-
108
-
109
-
110
-
111
-
112
-
113
-
114
-
115
-
116
-
117
-
118
-
119
-
120
-
121
-
122
-
123
-
124
-
125
-
126
-
127
-
128
-
129
-
130
-
131
-
132
-
133
-
134
-
135
-
136
-
137
-
138
-
139
-
140
-
141
-
142
-
143
-
144
-
145
-
146
-
147
-
148
-
149
-
150
-
151
-
152
-
153
-
154
-
155
-
156
-
157
-
158
-
159
-
160
-
161
-
162
-
163
-
164
-
165
-
166
-
167
-
168
-
169
-
170
-
171
-
172
-
173
-
174
-
175
-
176
-
177
-
178
-
179
-
180
-
181
-
182
-
183
-
184
-
185
-
186
-
187
-
188
-
189
-
 190
190 -
 191
191 -
 192
192 -
 193
193 -
 194
194 -
 195
195 -
 196
196 -
 197
197 -
 198
198 -
 199
199 -
 200
200 -
201
-
202
-
203
-
204
-
205
-
206
-
207
-
208
-
209
-
210
-
211
-
212
-
213
-
214
-
215
-
216
-
217
-
218
-
219
-
220
 |
 |