2010 Yamaha Motorsports Apex LTX GT Owners Manual - Page 53
2010 Yamaha Motorsports Apex LTX GT Manual

Page 53 highlights
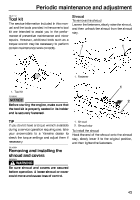
Periodic maintenance and adjustment 7. Install the headlight unit bolts, and then tighten them to the specified torque. Headlight unit bolt tightening torque: 3 Nm (0.3 m·kgf, 2.2 ft·lbf) 1. Quick fastener screw 4. 8. Install the top cover, the left and right side covers, and the shroud. 5. 6. ESU11833 Disconnect the speedometer coupler and headlight couplers, and then remove the headlight unit. Loosen the locknut. Turn the adjusting bolt in or out until the specified throttle cable free play is obtained. Adjusting the throttle cable free play 1. 2. 3. Place the snowmobile on a level surface and apply the parking brake. Remove the shroud. (See page 43 for removal procedures.) Remove the headlight unit bolt on each side of the snowmobile and loosen the quick fastener screws shown on the top cover. 2 3 1 1. Locknut 2. Throttle cable free play adjusting bolt 3. Throttle cable free play Throttle cable free play: 2.0-3.0 mm (0.08-0.12 in) 7. 8. Tighten the locknut. Connect the speedometer coupler and headlight couplers, and then install the headlight unit, making sure to insert the projections on the headlight unit stay into the slots on the bottom of the headlight unit. 1. Headlight unit bolt 47
-
 1
1 -
2
-
3
-
4
-
5
-
6
-
7
-
8
-
9
-
10
-
11
-
12
-
13
-
14
-
15
-
16
-
17
-
18
-
19
-
20
-
21
-
22
-
23
-
24
-
25
-
26
-
27
-
28
-
29
-
30
-
31
-
32
-
33
-
34
-
35
-
36
-
37
-
38
-
39
-
40
-
41
-
42
-
43
-
44
-
45
-
46
-
47
-
 48
48 -
 49
49 -
 50
50 -
 51
51 -
 52
52 -
 53
53 -
 54
54 -
 55
55 -
 56
56 -
 57
57 -
 58
58 -
59
-
60
-
61
-
62
-
63
-
64
-
65
-
66
-
67
-
68
-
69
-
70
-
71
-
72
-
73
-
74
-
75
-
76
-
77
-
78
-
79
-
80
-
81
-
82
-
83
-
84
-
85
-
86
-
87
-
88
-
89
-
90
-
91
-
92
-
93
-
94
-
95
-
96
-
97
-
98
 |
 |
