2010 Yamaha Motorsports Apex LTX GT Owners Manual - Page 18
2010 Yamaha Motorsports Apex LTX GT Manual

Page 18 highlights
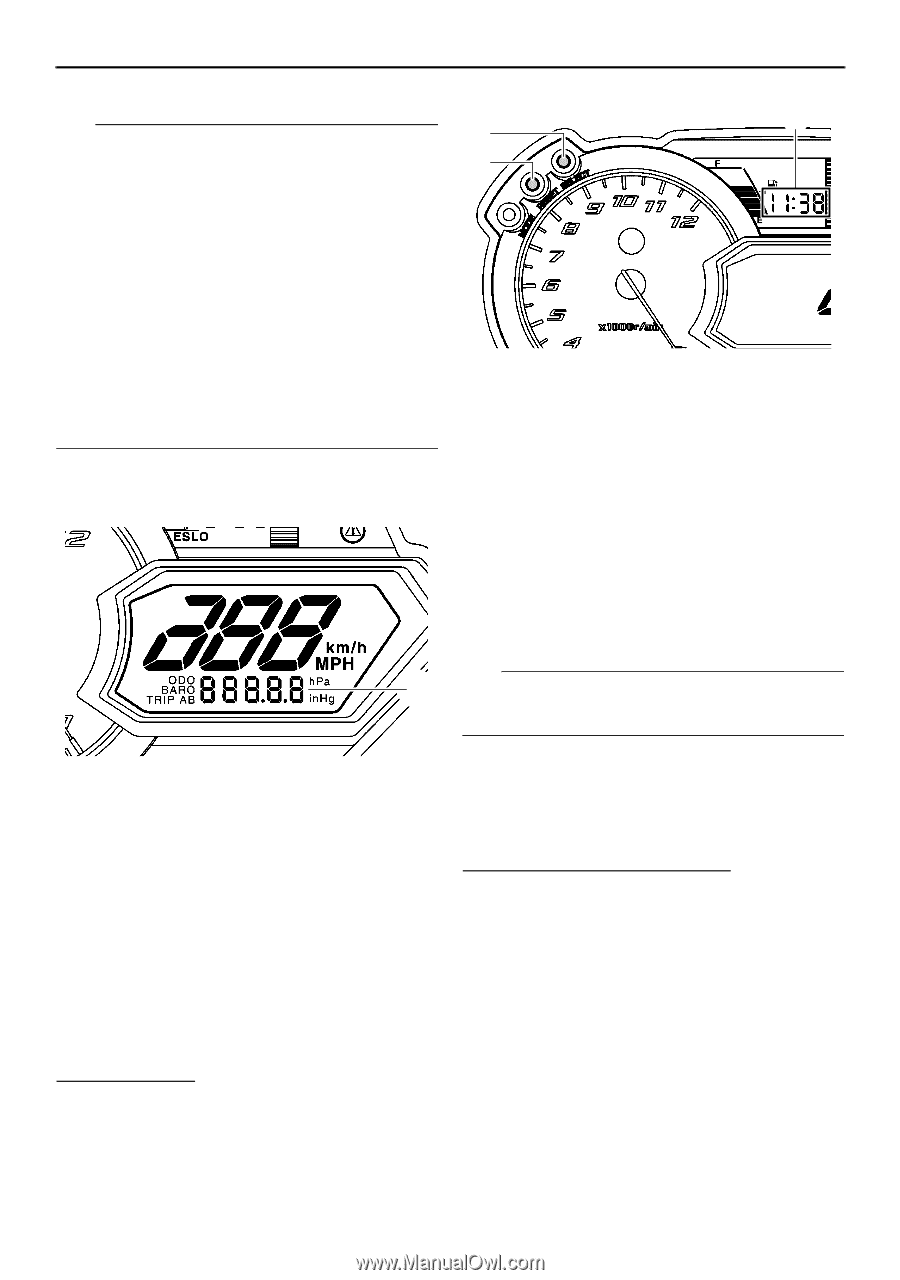
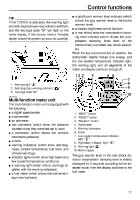
Control functions TIP G G To switch the speedometer, odometer, and tripmeter displays between kilometers and miles, select the odometer mode "ODO", and then push the "SELECT" button for at least 10 seconds while the snowmobile is stopped. To switch the barometer display between hectopascal "hPa" and inches of mercury "inHg", select the barometer mode "BARO", and then push the "SELECT" button for at least 3 seconds while the snowmobile is stopped. 1 2 3 1. "SELECT" button 2. "RESET" button 3. Clock 2. Odometer, tripmeter, and barometer modes 3. Push the "RESET" button to change the hour setting, and then push the "SELECT" button. The minute digits will start flashing. Push the "RESET" button to change the minute setting, and then push the "SELECT" button. The clock starts when the "SELECT" button is released. TIP 1 The clock must be set again when the battery is disconnected. Display brightness control 1. Odometer/tripmeter/barometer Pushing the "SELECT" button switches the display between the odometer mode "ODO", tripmeter modes "TRIP A" and "TRIP B", and barometer mode "BARO" in the following order: ODO → TRIP A → TRIP B → BARO → ODO To reset a tripmeter, push the "RESET" button for at least 1 second while the tripmeter is displayed. This function allows you to adjust the brightness of the meter display to suit the outdoor lighting conditions. To adjust the display brightness 1. Turn the main switch to the off position. 2. Push and hold down the "SELECT" button. Clock To set the clock: 1. Push the "SELECT" button and "RESET" button simultaneously until the hour digits start flashing. 12
-
 1
1 -
2
-
3
-
4
-
5
-
6
-
7
-
8
-
9
-
10
-
11
-
12
-
 13
13 -
 14
14 -
 15
15 -
 16
16 -
 17
17 -
 18
18 -
 19
19 -
 20
20 -
 21
21 -
 22
22 -
 23
23 -
24
-
25
-
26
-
27
-
28
-
29
-
30
-
31
-
32
-
33
-
34
-
35
-
36
-
37
-
38
-
39
-
40
-
41
-
42
-
43
-
44
-
45
-
46
-
47
-
48
-
49
-
50
-
51
-
52
-
53
-
54
-
55
-
56
-
57
-
58
-
59
-
60
-
61
-
62
-
63
-
64
-
65
-
66
-
67
-
68
-
69
-
70
-
71
-
72
-
73
-
74
-
75
-
76
-
77
-
78
-
79
-
80
-
81
-
82
-
83
-
84
-
85
-
86
-
87
-
88
-
89
-
90
-
91
-
92
-
93
-
94
-
95
-
96
-
97
-
98
 |
 |