1994 Oldsmobile Achieva Owner's Manual - Page 186
1994 Oldsmobile Achieva Manual

Page 186 highlights
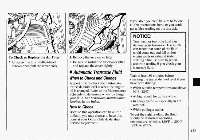
Service & Appearance Care Get the vehicle warmedup by driving r) about 15 miles (24 kn when outside temperatures are above 50°F (10°C).If it's colderthan 50°F (lO°C), you may have to drive longer. To check thefluid level Park your vehicle a level place. on With the parking brake applied, place the shift lever in P (Park). With your footon thebrake pedal, move the shift leverthrough each gear range, pausing for about three seconds in each range. Then, position the shift lever inP (Park). Let the engine run atidle forthree to five minutes. Then, without shuttingoff the engine, follow these steps: 1. Pull out the dipstick and wipe it with a clean rag paper towel. or 2. Push it back in all the way, waitthree seconds and then pull it back out again. 3 Check both sides of the dipstick, and . read the lower level.The fluid level must bein the cross-hatched area. 4. If the fluid level is the acceptable in range, pushthe dipstick backin all the way. How to Add Fluid Refer to theMaintenance Scheduleto determine what kind of transaxle fluid to use. SeeRecommended Fluids and Lubricants in theIndex. If the fluid level is low, add only enough of the proper fluidto bring the level into the cross-hatched area on dipstick. the 1. Pull out the dipstick. 2. Using a long-neck funnel, add enough fluid at the dipstick holeto bring it to the proper level. It doesn't take much fluid, generally less than a pint (0.5L). Don't overfill.We recommend you use onEy fluid labeled DEXRONa-I11 or DEXRONB-IIE, because fluids with label are made that especially for your automatic transaxle.
-
 1
1 -
2
-
3
-
4
-
5
-
6
-
7
-
8
-
9
-
10
-
11
-
12
-
13
-
14
-
15
-
16
-
17
-
18
-
19
-
20
-
21
-
22
-
23
-
24
-
25
-
26
-
27
-
28
-
29
-
30
-
31
-
32
-
33
-
34
-
35
-
36
-
37
-
38
-
39
-
40
-
41
-
42
-
43
-
44
-
45
-
46
-
47
-
48
-
49
-
50
-
51
-
52
-
53
-
54
-
55
-
56
-
57
-
58
-
59
-
60
-
61
-
62
-
63
-
64
-
65
-
66
-
67
-
68
-
69
-
70
-
71
-
72
-
73
-
74
-
75
-
76
-
77
-
78
-
79
-
80
-
81
-
82
-
83
-
84
-
85
-
86
-
87
-
88
-
89
-
90
-
91
-
92
-
93
-
94
-
95
-
96
-
97
-
98
-
99
-
100
-
101
-
102
-
103
-
104
-
105
-
106
-
107
-
108
-
109
-
110
-
111
-
112
-
113
-
114
-
115
-
116
-
117
-
118
-
119
-
120
-
121
-
122
-
123
-
124
-
125
-
126
-
127
-
128
-
129
-
130
-
131
-
132
-
133
-
134
-
135
-
136
-
137
-
138
-
139
-
140
-
141
-
142
-
143
-
144
-
145
-
146
-
147
-
148
-
149
-
150
-
151
-
152
-
153
-
154
-
155
-
156
-
157
-
158
-
159
-
160
-
161
-
162
-
163
-
164
-
165
-
166
-
167
-
168
-
169
-
170
-
171
-
172
-
173
-
174
-
175
-
176
-
177
-
178
-
179
-
180
-
 181
181 -
 182
182 -
 183
183 -
 184
184 -
 185
185 -
 186
186 -
 187
187 -
 188
188 -
 189
189 -
 190
190 -
 191
191 -
192
-
193
-
194
-
195
-
196
-
197
-
198
-
199
-
200
-
201
-
202
-
203
-
204
-
205
-
206
-
207
-
208
-
209
-
210
-
211
-
212
-
213
-
214
-
215
-
216
-
217
-
218
-
219
-
220
-
221
-
222
-
223
-
224
-
225
-
226
-
227
-
228
-
229
-
230
-
231
-
232
-
233
-
234
-
235
-
236
-
237
-
238
-
239
-
240
-
241
-
242
-
243
-
244
-
245
-
246
-
247
-
248
-
249
-
250
-
251
-
252
-
253
-
254
-
255
-
256
-
257
-
258
-
259
-
260
 |
 |
