Ricoh MP 3555 User Guide - Page 39
When loading paper in the bypass tray, align the paper guides flush against the paper.
 |
View all Ricoh MP 3555 manuals
Add to My Manuals
Save this manual to your list of manuals |
Page 39 highlights
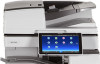
Guide to Names and Functions of Components 8. Paper trays (Trays 1-2) Load paper here. For details, see page 151 "Loading Paper". 9. Lower paper trays Load paper here. For details, see page 151 "Loading Paper". Front and right view 1 2 3 4 5 6 7 DRY202 1. ADF's extender Pull this extender to support large paper. 2. Bypass tray Use to copy or print on OHP transparencies, adhesive labels, and paper that cannot be loaded in the paper trays. For details, see page 152 "Loading Paper into the Bypass Tray". 3. Paper guides When loading paper in the bypass tray, align the paper guides flush against the paper. 37
-
 1
1 -
2
-
3
-
4
-
5
-
6
-
7
-
8
-
9
-
10
-
11
-
12
-
13
-
14
-
15
-
16
-
17
-
18
-
19
-
20
-
21
-
22
-
23
-
24
-
25
-
26
-
27
-
28
-
29
-
30
-
31
-
32
-
33
-
 34
34 -
 35
35 -
 36
36 -
 37
37 -
 38
38 -
 39
39 -
 40
40 -
 41
41 -
 42
42 -
 43
43 -
 44
44 -
45
-
46
-
47
-
48
-
49
-
50
-
51
-
52
-
53
-
54
-
55
-
56
-
57
-
58
-
59
-
60
-
61
-
62
-
63
-
64
-
65
-
66
-
67
-
68
-
69
-
70
-
71
-
72
-
73
-
74
-
75
-
76
-
77
-
78
-
79
-
80
-
81
-
82
-
83
-
84
-
85
-
86
-
87
-
88
-
89
-
90
-
91
-
92
-
93
-
94
-
95
-
96
-
97
-
98
-
99
-
100
-
101
-
102
-
103
-
104
-
105
-
106
-
107
-
108
-
109
-
110
-
111
-
112
-
113
-
114
-
115
-
116
-
117
-
118
-
119
-
120
-
121
-
122
-
123
-
124
-
125
-
126
-
127
-
128
-
129
-
130
-
131
-
132
-
133
-
134
-
135
-
136
-
137
-
138
-
139
-
140
-
141
-
142
-
143
-
144
-
145
-
146
-
147
-
148
-
149
-
150
-
151
-
152
-
153
-
154
-
155
-
156
-
157
-
158
-
159
-
160
-
161
-
162
-
163
-
164
-
165
-
166
-
167
-
168
-
169
-
170
-
171
-
172
-
173
-
174
-
175
-
176
-
177
-
178
-
179
-
180
-
181
-
182
-
183
-
184
-
185
-
186
-
187
-
188
-
189
-
190
-
191
-
192
-
193
-
194
-
195
-
196
-
197
-
198
-
199
-
200
-
201
-
202
-
203
-
204
-
205
-
206
-
207
-
208
-
209
-
210
-
211
-
212
-
213
-
214
-
215
-
216
-
217
-
218
-
219
-
220
-
221
-
222
-
223
-
224
-
225
-
226
-
227
-
228
-
229
-
230
-
231
-
232
-
233
-
234
-
235
-
236
-
237
-
238
-
239
-
240
-
241
-
242
-
243
-
244
-
245
-
246
-
247
-
248
-
249
-
250
-
251
-
252
-
253
-
254
-
255
-
256
 |
 |

8.
Paper trays (Trays 1–2)
Load paper here. For details, see page 151 "Loading Paper".
9.
Lower paper trays
Load paper here. For details, see page 151 "Loading Paper".
Front and right view
DRY202
1
2
3
4
5
6
7
1.
ADF's extender
Pull this extender to support large paper.
2.
Bypass tray
Use to copy or print on OHP transparencies, adhesive labels, and paper that cannot be loaded in the paper
trays. For details, see page 152 "Loading Paper into the Bypass Tray".
3.
Paper guides
When loading paper in the bypass tray, align the paper guides flush against the paper.
Guide to Names and Functions of Components
37