HP Neverstop Laser MFP 1200 User Guide - Page 88
Check the paper type loaded in the printer, Check the paper type and print quality settings (Windows)
 |
View all HP Neverstop Laser MFP 1200 manuals
Add to My Manuals
Save this manual to your list of manuals |
Page 88 highlights
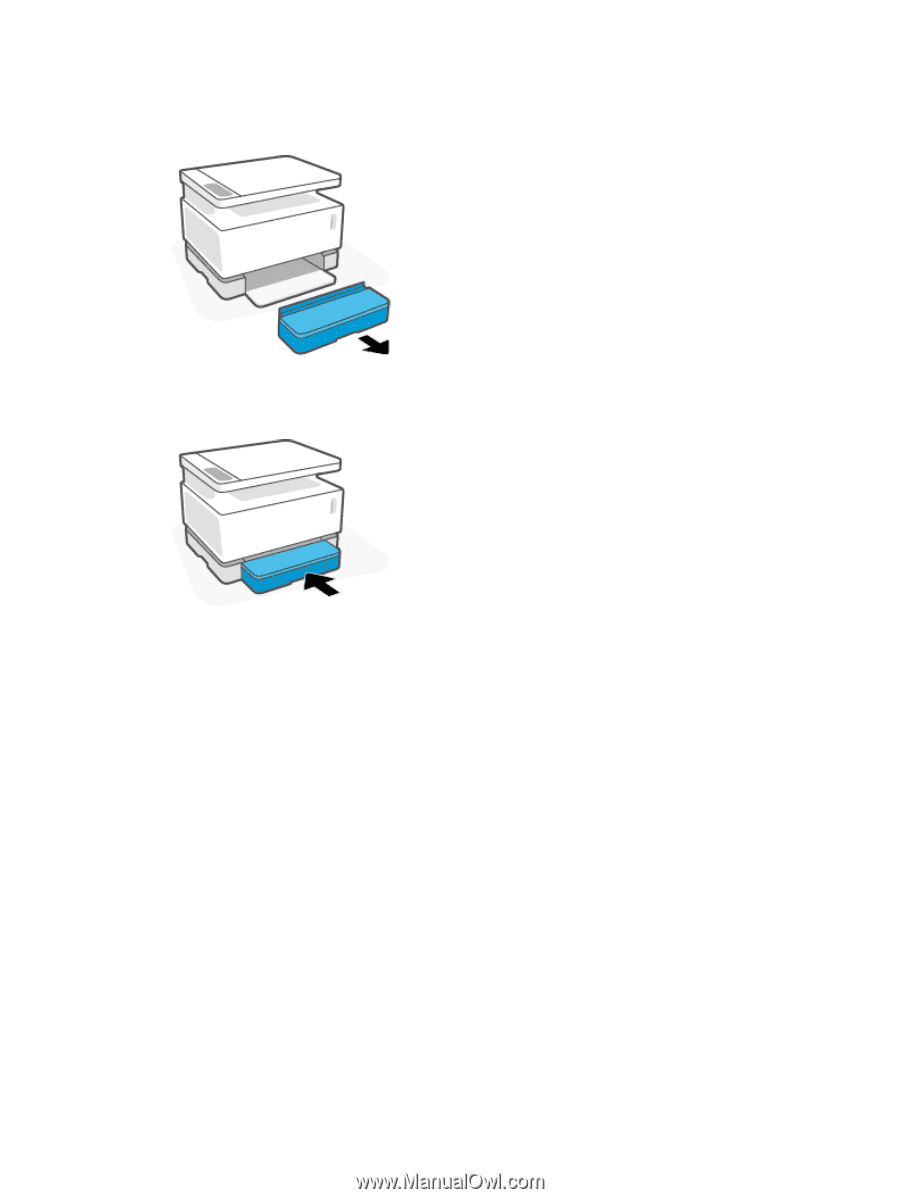
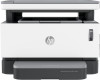
Check the paper type loaded in the printer 1. Remove the input tray cover. 2. Verify that the input tray is loaded with the correct type of paper. 3. Reinstall the input tray cover. Check the paper type and print quality settings (Windows) 1. From the software program, select the Print option. 2. Select the printer, and then click the Properties or Preferences button. 3. Click the Paper/Quality tab. 4. Expand the Paper Type option to see the paper types that are available. 5. Select the option for the type of paper you are using. 6. From the Print Quality drop-down list, select an option. Select lower quality to print faster and save ink, or higher quality to obtain sharper prints. 7. Click the OK button to close the Document Properties dialog box. In the Print dialog box, click the OK button to print the job. Check the paper type and print quality settings (OS X) 1. Click the File menu, and then click the Print option. 2. In the Printer menu, select the printer. 3. Choose paper type from the Media & Quality option.. 80 Chapter 9 Solve problems ENWW
-
 1
1 -
2
-
3
-
4
-
5
-
6
-
7
-
8
-
9
-
10
-
11
-
12
-
13
-
14
-
15
-
16
-
17
-
18
-
19
-
20
-
21
-
22
-
23
-
24
-
25
-
26
-
27
-
28
-
29
-
30
-
31
-
32
-
33
-
34
-
35
-
36
-
37
-
38
-
39
-
40
-
41
-
42
-
43
-
44
-
45
-
46
-
47
-
48
-
49
-
50
-
51
-
52
-
53
-
54
-
55
-
56
-
57
-
58
-
59
-
60
-
61
-
62
-
63
-
64
-
65
-
66
-
67
-
68
-
69
-
70
-
71
-
72
-
73
-
74
-
75
-
76
-
77
-
78
-
79
-
80
-
81
-
82
-
 83
83 -
 84
84 -
 85
85 -
 86
86 -
 87
87 -
 88
88 -
 89
89 -
 90
90 -
 91
91 -
 92
92 -
 93
93 -
94
-
95
-
96
-
97
-
98
-
99
-
100
-
101
-
102
-
103
-
104
-
105
-
106
-
107
-
108
-
109
-
110
-
111
-
112
-
113
-
114
-
115
-
116
-
117
-
118
-
119
-
120
-
121
-
122
-
123
-
124
-
125
-
126
-
127
-
128
-
129
-
130
-
131
-
132
-
133
-
134
-
135
-
136
-
137
-
138
-
139
-
140
-
141
-
142
-
143
-
144
-
145
-
146
-
147
-
148
-
149
-
150
-
151
-
152
-
153
-
154
 |
 |