DeLonghi ESAM6620 Owner Manual - Page 11
Introduction, Description Of The Appliance - esam 6620
 |
View all DeLonghi ESAM6620 manuals
Add to My Manuals
Save this manual to your list of manuals |
Page 11 highlights
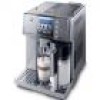
INTRODUCTION Thank you for choosing the ESAM 6620 automatic coffee and cappuccino maker. We hope you enjoy using your new appliance. Take a few minutes to read these instructions. This will avoid all risks and damage to the machine. Symbols used in these instructions Important warnings are identified by these symbols. These warnings must absolutely be respected. Danger! Failure to observe the warning could result in possible life threatening injury from electric shock. Important! Failure to observe the warning could result in injury or damage to the appliance. Danger of burns! Failure to observe the warning could result in scalds or burns. Please note: This symbol identifies important advice or information for the user. Letters in brackets The letters in brackets refer to the legend in the Description of the Appliance on page 3. Troubleshooting and repairs In the event of problems, first try and resolve them following the information given in the section "Displayed messages" on page 20 and "Troubleshooting" on page 21. If this does not resolve the problem or you require further information, you should consult Customer Services by calling the number given on the annexed "Customer Service" sheet. If your country is not among those listed on the sheet, call the number given in the guarantee. If repairs are required, contact De'Longhi Customer Services only. The addresses are given in the guarantee certificate provided with the appliance. DESCRIPTION OF THE APPLIANCE Description of the appliance (page 3 - A ) A1. Grinding adjustment knob A2. Beans container A3. Main switch A4. Beans container lid A5. Cover for funnel and measure compartment A6. Compartment for measure A7. Cup shelf (cup warmer active when Energy Saving is disabled) A8. Pre-ground coffee funnel A9. Control panel A10. Hot water and steam nozzle A11. Infuser A12. Water tank A13. Power cable A14. Cup tray A15. Drip tray A16. Compartment for latte glass A17. Grounds tray A18. Service door A19. Coffee spout (adjustable height) A20. Coffee guide A21. Hot water spout A22. Measure Description of milk container (page 3 - B ) B1. Froth regulator B2. Milk container handle B3. CLEAN button B4. Milk intake tube B5. Frothed milk spout B6. Lid with milk frother Description of control panel (page 3 - C ) A number of buttons on the panel have a double function. This is indicated in brackets in the description. C1. ON/STAND-BY button C2. Display C3. 1 short coffee button C4. 2 short coffees button C5. 1 long coffee button C6. 2 long coffees button C7. italian macchiato button: delivers 1 italian macchiato (or frothed milk if 9
-
 1
1 -
2
-
3
-
4
-
5
-
 6
6 -
 7
7 -
 8
8 -
 9
9 -
 10
10 -
 11
11 -
 12
12 -
 13
13 -
 14
14 -
 15
15 -
 16
16 -
17
-
18
-
19
-
20
-
21
-
22
-
23
-
24
-
25
 |
 |
