BenQ GV31 User Manual
BenQ GV31 Manual
 |
View all BenQ GV31 manuals
Add to My Manuals
Save this manual to your list of manuals |
BenQ GV31 manual content summary:
- BenQ GV31 | User Manual - Page 1
Digital Projector User Manual Portable Series | GV31 V 1.00 - BenQ GV31 | User Manual - Page 2
manual and related document • Firmware and application • Frequently asked questions Servicing • If misuse or other accident occurs, contact qualified service personnel for servicing. • Contact your place of purchase or visit the local website from Support. BenQ.com for more support. Support.BenQ - BenQ GV31 | User Manual - Page 3
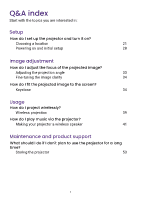
you are interested in: Setup How do I set up the projector and turn it on? Choosing a location 21 Powering on and projection 39 How do I play music via the projector? Making your projector a wireless speaker 41 Maintenance and product support What should I do if I don't plan to use - BenQ GV31 | User Manual - Page 4
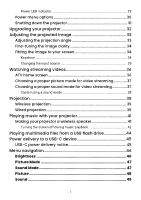
Table of Contents Product support 2 Servicing...2 Q&A index...3 Safety instructions 7 Package contents 10 Introduction 11 Projector overview 11 Overview...11 I/O ports...13 Dimensions...14 Projector connections 15 Wireless connection (via ATV Dongle 15 Wired connection (HDMI port 15 Wired - BenQ GV31 | User Manual - Page 5
for video streaming 37 Customizing a sound mode 38 Projection...39 Wireless projection 39 Wired projection 39 Playing music with your projector 41 Making your projector a wireless speaker 41 Turning the screen off during music playback 42 Playing multimedia files from a USB flash drive 44 - BenQ GV31 | User Manual - Page 6
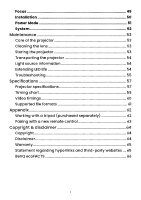
53 Cleaning the lens 53 Storing the projector 53 Transporting the projector 54 Light source information 54 Extending LED life 54 Troubleshooting 55 Specifications 57 Projector specifications 57 Timing chart 59 Video timings 60 Supported file formats 61 Appendix...62 Working with - BenQ GV31 | User Manual - Page 7
equipment. However, to ensure safe use of this product, it is important that you follow the instructions mentioned in this manual and marked on the product. 1. Please read this user manual before you operate your projector. Keep this manual in a safe place for future reference. 2. Always place the - BenQ GV31 | User Manual - Page 8
2000 m (6562 feet). 2000 m (6562 feet) 0 m (0 feet) 5. Do not block the vents holes while the projector is on (even in powersaving mode). • Do not cover the projector with any item. • Do not place the projector on a blanket, bedding or any other soft surface. 6. In areas where the mains power supply - BenQ GV31 | User Manual - Page 9
does become wet, disconnect it from the power point and call BenQ to have the projector repaired. 9. Do not look straight into the projector lens during operation. It may harm your sight. 10. Do not operate the projector LED beyond the rated LED life. Excessive operation of LEDs beyond the rated - BenQ GV31 | User Manual - Page 10
service or repair is required, take the projector only to a suitably qualified technician. Moisture condensation Never operate the projector prevent the projector from possible damage, do not use the projector for at the projector. Do not have rubber or plastic products touching the projector for - BenQ GV31 | User Manual - Page 11
Disposal This product contains the following materials which are harmful to human bodies and environment. • Lead, which is contained in solder. To dispose of the product, consult your local environment authorities for regulations. Note • The illustrations and the images shown in this document are - BenQ GV31 | User Manual - Page 12
your place of purchase. GV31 ATV dongle (QS02) Projector's remote control (With two AAA batteries) Quick start guide Regulatory statements Warranty card notice. • LED replacement is not user-serviceable. When it is needed, please contact the service center. • Some of the accessories may vary - BenQ GV31 | User Manual - Page 13
1 2 7 11 8 3 12 9 10 13 4 No. 1. Strap Descriptions 2. Volume up button 3. Left speaker and vent I/O ports 4. • See "I/O ports" on page 13 for details. • See "Projector connections" on page 15 for connections. 5. Input source button 6. Volume down button 7. Power button and LED 11 - BenQ GV31 | User Manual - Page 14
5 6 1 2 7 11 8 3 12 9 10 13 4 No. 8. Projection lens Descriptions 9. IR sensor 10. Auto focus camera 11. Top speaker 12. Right speaker and vent Tripod screw hole 13. See "Working with a tripod (purchased separately)" on page 62 for details. 12 - BenQ GV31 | User Manual - Page 15
connection (HDMI port)" on page 15 for details. USB Type-C port See the following for details. • "Power supply" on page 27 3. • "Upgrading your projector" on page 32 • "Wired projection" on page 39 • "Playing multimedia files from a USB flash drive" on page 44 • "Power delivery to a USB-C device - BenQ GV31 | User Manual - Page 16
Dimensions With Base: 131.3 (W) x 203.2 (H) x 191.4 (D) mm (5.2 x 8 x 7.5 in) Without Base: 104 (W) x 191.4 (H) x 191.4 (D) mm (4.1 x 7.5 x 7.5 in) 14 - BenQ GV31 | User Manual - Page 17
(speakers, headphone, mouse, etc.) Before making any wireless connections, be sure to: • Install the provided ATV dongle for wireless connection. • Place the projector within range of the wireless AP you plan to connect it to. Wired connection (HDMI port) • A/V device • Smartphone, tablet, laptop/PC - BenQ GV31 | User Manual - Page 18
Notebook or desktop computer A/V device b USB drive a Certified devices with c USB-C DisplayPort d Speakers USB drive QS02 ATV dongle Wireless Connections Wireless AP No. Descriptions No. Descriptions a. USB flash drive for media reader c. Certified USB-C cable b. HDMI cable d. - BenQ GV31 | User Manual - Page 19
are commercially available from electronics stores. • The connection illustrations are for reference only. • If the selected video image is not displayed after the projector is turned on and the correct video source has been selected, check that the video source device is turned on and operating - BenQ GV31 | User Manual - Page 20
2. Power 3. Source 4. Arrow keys 5. OK No. Descriptions 6. Back 7. Mute 8. Rewind 9. Wireless speaker mode 10. Focus 11. Geometry setting: Keystone 12. Projector menu 13. Voice Search 14. Android TV home screen 15. Android TV Settings 16. Volume up 17. Volume down 18. Fast - BenQ GV31 | User Manual - Page 21
during the setup wizard process. See "Powering on and initial setup" on page 28 for more details. Setting to power on projector by remote control Powering on the projector via the remote control is not enabled by default. To enable it, press the > System > Use remote control to power on. Once - BenQ GV31 | User Manual - Page 22
Turning remote control backlight on/ off With the remote control backlight, you can see the buttons when they are pressed in the dark. Press and hold the Mute button and Volume up button on the remote control to turn the backlight function on/off. To save battery power, you can turn off the - BenQ GV31 | User Manual - Page 23
setup and portability. Turn on the projector and select the following settings in the projector's settings menu. See "Installation" on page 50 for more details: Installation > Projector Position > Front Table • Front Ceiling Select this location with the projector elevated near the ceiling in front - BenQ GV31 | User Manual - Page 24
screen is required. • The projector does not feature ceiling mount components/equip- ment. When choosing to use a ceiling location, you must place it on an elevated and even shelf purchased separately. Make sure the shelf is stable enough to support the projector's weight. Secure the shelf properly - BenQ GV31 | User Manual - Page 25
Obtaining a preferred image size The distance from the projector lens to the screen, the zoom setting, and the video format each factors in the projected image size. Projection dimensions The screen aspect ratio is - BenQ GV31 | User Manual - Page 26
so that it best suits your installation location. Using the projector in an outdoor setting The projector is designed mainly for indoor use but its portable design also allows it to support occasional outdoor use. When using the projector outdoors, the following items are suggested to enhance the - BenQ GV31 | User Manual - Page 27
the right speaker cover so that it slides forwards and then remove the cover from the projector. 4. Peel off the adhesive sponge covering the micro USB power cable compartment. 5. Orient the ATV dongle so that the BenQ logo faces up, then connect the micro USB power cable to the port at the - BenQ GV31 | User Manual - Page 28
3 2 1 6. Align the right speaker cover over the projector so that the hooks on the cover line up with the corresponding openings on the projector, and then re-install the top cover onto the projector. 26 - BenQ GV31 | User Manual - Page 29
details. The Power Mode is switched to Normal or the previous mode you set. • Via the built-in battery after it is fully charged. The projector's Power Mode is switched to Low Power Consumption automatically. Note • The USB-C port is able to provide power to connected devices. See "Power delivery to - BenQ GV31 | User Manual - Page 30
initial setup 1. Choose a preferred location and image size as instructed in "Choosing a location" on page 21. Make sure the . 3. Connect power to the projector. If you are starting up the projector for the first time, charge the battery or supply power to the projector until the power LED lights up - BenQ GV31 | User Manual - Page 31
battery level is below 5%. 4. Power on the projector and follow the on-screen instructions to complete the initial setup. When you're promted to set up your remote, select "Not now" to proceed. You can refer to the QS02 user manual from Support.BenQ.com for more information. 5. Check if an updated - BenQ GV31 | User Manual - Page 32
turns off the screen while the music playback continues. See "Turning the screen off during music playback" on page 42 for more information. Sets the projector and the ATV dongle to power saving mode when they are not in use. To disable Power Saving mode, press the button. 30 - BenQ GV31 | User Manual - Page 33
The fans may continue to run in order to cool the system. If the projector will not be used for an extended period, unplug the power cable from remote control. Note Short pressing the power button on the projector or remote control will trigger a shutdown confirmation box. Under this condition, press - BenQ GV31 | User Manual - Page 34
to System > System Update > USB Update on your projector to start the upgrade. Wait until you are instructed to complete the initial setup. The upgrade is complete. Note Check if there are updated firmware files and user manual of QS02 ATV dongle from Support.BenQ. com. Find out the updates from the - BenQ GV31 | User Manual - Page 35
Adjusting the projected image Adjusting the projection angle The projector features a base that holds the projector and allows you to adjust the projection angle. Place the projector properly on the base until it clicks, and rotate the projector to adjust the projection angle. 135° Note • The - BenQ GV31 | User Manual - Page 36
and the projector will automatically focus the image. When the focus is completed, press / to leave. • Manual focus: You may also manually focus the image buttons on the remote control while the focus guide is still on the screen, or by using Focus > Manual Focus in the settings menu. See "Focus" - BenQ GV31 | User Manual - Page 37
. When the projector is moved or the projection angle is changed, the function will be performed automatically. • Manual Keystone: Available by pressing the button on the remote control or from Installation > Vertical Keystone Correction. Simply follow the on-screen instructions to make adjustments - BenQ GV31 | User Manual - Page 38
and use streaming apps. Note For the ATV dongle (QS02) user manual, visit Support.BenQ.com. ATV home screen Upon initial startup or when the input source is set to ATV the projector will display the Android TV interface. If the projector is projecting from a source, you can return to Android TV - BenQ GV31 | User Manual - Page 39
No. Item Description 4 Apps Access to all the installed apps and Google Play. • Access to the recommended apps or video 5 Recommended on demand services. apps/My favorites • Access to the apps that have been added to favorites by the Bookmark key. 6 Recommended Access to the content - BenQ GV31 | User Manual - Page 40
Customizing a sound mode 1. Go to Sound > User. 2. Adjust the frequency as desired. 3. Press / on the remote control to save the changes and exit. To apply the customized sound mode, press the button on the remote control and select User. Note Press Sound > Reset Audio Settings to reset audio - BenQ GV31 | User Manual - Page 41
after the supplied ATV dongle (QS02) is installed, and the projector and your device are connected to the same wireless network. Refer to the QS02 user manual from Support.BenQ.com or scan the following QR code for instructions on how to perform wireless projection. How-to video Wireless projection - BenQ GV31 | User Manual - Page 42
the laptop. Press Fn and the labeled function key simultaneously. Refer to your laptop's documentation to discover your laptop's key combination. Tip Your projector features video/audio transfer and power delivery from the USB-C port. With this feature, you can charge your gaming console (with USB - BenQ GV31 | User Manual - Page 43
a wireless speaker 1. Make sure the ATV dongle is installed properly (see "Installing the ATV dongle" on page 25). 2. Power on the projector (see "Powering on and initial setup" on page 28). 3. Press the wireless speaker mode button on the remote control or press the input source button > - BenQ GV31 | User Manual - Page 44
. To stop the playback or to perform other operations, press any key on the remote control to bring the projection screen back. Connecting the projector to an external Bluetooth speaker / headphone Available only when the input source is ATV. 1. Make sure the ATV dongle is installed properly (see - BenQ GV31 | User Manual - Page 45
is still running in the background, it will continue to transmit audio from ATV to the connected Bluetooth speaker or headphones. • The projector does not support automatic re-connections with previously paired devices. In order to re-connect to a paired device or connect to another device, repeat - BenQ GV31 | User Manual - Page 46
of the projector. 3. Press the source button on the remote control and select USB in the source menu. 4. Follow the on-screen instructions. Click Apps from the ATV home screen. 5. Launch a media reader app to access the multimedia files stored on your USB flash drive. Supported - BenQ GV31 | User Manual - Page 47
is supplied power via the included power adapter. With the power delivery function, your projector is able to supply power to a connected USB-C device certified by USB-IF. Supported USB-C power delivery: • 5V/2A • 9V/2A • 12V/1.5A • 15V/1.2A USB-C power delivery notice • The information is based - BenQ GV31 | User Manual - Page 48
Menu navigation To let you make various adjustments or settings on the projector, the projector provides a settings menu. To access the menu, either press the button on the remote on page 36 for more details. Brightness Allows you to adjust the brightness of the projector on a scale of 0 to 100. 46 - BenQ GV31 | User Manual - Page 49
Game Sports Cinema Day time Options and descriptions Maximizes the brightness of the projected image. This mode is the brightest mode on your projector. With well-saturated colors and fine-tuned sharpness, this mode is slightly brighter than Cinema mode and suitable for playing TV streaming under - BenQ GV31 | User Manual - Page 50
In this mode you can adjust frequency setting according to your needs. Picture Item Picture Mode Brightness Contrast Color Options and descriptions The projector is preset with several predefined picture modes so that you can choose one to suit your operating environment and input signal picture - BenQ GV31 | User Manual - Page 51
the User mode. Reset Audio Settings You can reset to factory defaults. Focus Item Options and descriptions Real Time Adjustment Sensitivity Manual Focus Allows the projector to adjust the focus settings in real time. Allows you to set the level of sensibility the Real Time Adjustment function - BenQ GV31 | User Manual - Page 52
is installed. See "Choosing a location" on page 21 for more details. Auto Vertical Keystone Enables/Disables the projector's automatic keystone adjustment. Allows you to manually adjust the keystone Vertical Keystone Correction settings for the projected image. See "Keystone" on page 34 for more - BenQ GV31 | User Manual - Page 53
. In cases like this, you should switch to High Altitude Mode to solve these symptoms. However, this is not to state that this projector can operate under any and all harsh or extreme conditions. Power Mode Item Options and descriptions Normal 100% LED brightness. This setting reduces system - BenQ GV31 | User Manual - Page 54
, Source, Picture Mode, Power Mode, Color System, Light Usage Time, Firmware Version, and Service Code. Returns the projector to its factory default state. Factory Reset Note This function resets your projector only. If you wish to reset your ATV dongle (QS02), perform factory reset from the - BenQ GV31 | User Manual - Page 55
clean. Never remove any parts of the projector. Contact your dealer or local customer service center if the projector fails to operate as expected. Cleaning the lens case. Storing the projector If you need to store the projector for an extended time, please follow the instructions below: • Make - BenQ GV31 | User Manual - Page 56
following settings via the settings menu. Go to Power Mode and select a suitable light source mode from among the provided modes. Set the projector to Eco or Low Power Consumption mode to extend the LED life. Light source mode Description Normal 100% LED brightness. Eco This setting reduces - BenQ GV31 | User Manual - Page 57
Optical engine temperature error Flashing red G sensor Error Flashing red/blue/green Contact customer service for assistance. Note Refer to "Power LED indicator" on page 29 for power LED indicator details. The projector does not turn on. Cause Remedy There is no power from Plug the power - BenQ GV31 | User Manual - Page 58
of the lens. See "Fine-tuning the image clarity" on page 34. Adjust the projection angle and direction as well as the height of the projector if necessary. Adjust the projection angle. Remote control does not work. Cause Remedy The batteries are out of Replace both of the batteries with new - BenQ GV31 | User Manual - Page 59
Specifications Projector specifications Category Display Optical Picture Compatibility I/O Interface Audio Item (Full-Height) Keystone Adjustment Clear Image Size Rec. 709 Coverage Input Lag Resolution Support Horizontal Frequency Vertical Scan Rate HDTV Compatibility HDMI in USB Type A USB Type - BenQ GV31 | User Manual - Page 60
mins Battery Life Cycle 500 Cycles Mechanical Features Projection angle (Portable only) 135 Smart Features Bluetooth Bluetooth 5.0 Wi-Fi Standard , the media source, or the projector settings. • *: PD out is available only when the projector is supplied power by the power adapter came with your - BenQ GV31 | User Manual - Page 61
1280 x 960 Resolution VGA_60 VGA_72 VGA_75 VGA_85 720x400_70 SVGA_60 SVGA_72 SVGA_75 SVGA_85 XGA_60 XGA_70 XGA_75 XGA_85 1152 x 864_75 BenQ Notebook Timing BenQ Notebook Timing 1280 x 720_60 1280 x 768_60 (Reduce Blanking) 1280 x 768_60 WXGA_60 WXGA_75 WXGA_85 SXGA_60 SXGA_75 SXGA_85 1280 x 960_60 - BenQ GV31 | User Manual - Page 62
Resolution 1360 x 768 1440 x 900 1400X1050 1600x1200 1680x1050 640x480 @67Hz 832x624 @75Hz 1024x768 @75Hz 1152x870 @75Hz 1920x1080 @60HZ 1920X1080 (VESA) Resolution 1360 x 768_60 WXGA+_60 (Reduce Blanking) WXGA+_60 SXGA+_60 UXGA 1680x1050_60 (Reduce Blanking) 1680x1050_60 MAC13 MAC16 MAC19 MAC21 - BenQ GV31 | User Manual - Page 63
.500 148.500 Supported file formats The projector's media reader is powered by the supplied Android TV dongle QS02. See QS02 user manual from Support.BenQ.com for the supported file formats. For details on the supported media formats, please visit: https://developer. android.com/guide/topics/media - BenQ GV31 | User Manual - Page 64
plate's screw. 2. Install the projector onto the tripod. The tripod screw hole on the bottom of your projector is not designed for ceiling mount installation. If you choose a ceiling location for your projector, refer to "Front Ceiling" on page 21 and "Rear Ceiling" on page 22 for instructions. 62 - BenQ GV31 | User Manual - Page 65
remote control model: RCI077 In case you have received a new remote control from BenQ customer service, you need to pair it with your projector (with ATV dongle QS02 installed) before use. 1. Make sure the projector (with ATV dongle QS02 installed) is powered on and the batteries are installed to - BenQ GV31 | User Manual - Page 66
thus all contents may be modified from time to time without prior notice. Please visit http://support. benq.com for the latest version of this manual. It is the sole responsibility of the user if problems (such as data loss and system failure) occurred due to non-factory installed software, parts - BenQ GV31 | User Manual - Page 67
BenQ's written instructions, especially the ambient humidity must be in-between 10% and 90%, temperature in-between 0°C and 40°C, altitude lower than 2000 meters, and avoiding to operate the projector services provided by third parties. BenQ does not warrant or guarantee that the content or services - BenQ GV31 | User Manual - Page 68
you conduct in the websites or similar resources maintained by third parties. You should contact the content or service providers for any questions, concerns, or disputes. BenQ ecoFACTS BenQ has been dedicated to the design and development of greener product as part of its aspiration to realize the - BenQ GV31 | User Manual - Page 69
BenQ.com © 2023 BenQ Corporation. All rights reserved. Rights of modification reserved.
-
 1
1 -
 2
2 -
 3
3 -
 4
4 -
 5
5 -
 6
6 -
 7
7 -
8
-
9
-
10
-
11
-
12
-
13
-
14
-
15
-
16
-
17
-
18
-
19
-
20
-
21
-
22
-
23
-
24
-
25
-
26
-
27
-
28
-
29
-
30
-
31
-
32
-
33
-
34
-
35
-
36
-
37
-
38
-
39
-
40
-
41
-
42
-
43
-
44
-
45
-
46
-
47
-
48
-
49
-
50
-
51
-
52
-
53
-
54
-
55
-
56
-
57
-
58
-
59
-
60
-
61
-
62
-
63
-
64
-
65
-
66
-
67
-
68
-
69
 |
 |

User Manual
V 1.00
Digital Projector
Portable Series
|
GV31