Marantz SACD 30n User Guide English - Page 132
Cautions on using media
 |
View all Marantz SACD 30n manuals
Add to My Manuals
Save this manual to your list of manuals |
Page 132 highlights
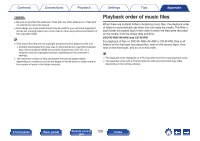
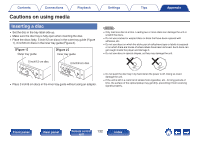
Contents Connections Playback Cautions on using media Inserting a disc 0 Set the disc in the tray label side up. 0 Make sure the disc tray is fully open when inserting the disc. 0 Place the discs flatly, 5 inch/12 cm discs in the outer tray guide (Figure 1), 3 inch/8 cm discs in the inner tray guide (Figure 2). Figure 1 Outer tray guide Figure 2 Inner tray guide 5 inch/12 cm disc 3 inch/8 cm disc Settings Tips Appendix NOTE 0 Only load one disc at a time. Loading two or more discs can damage the unit or scratch the discs. 0 Do not use cracked or warped discs or discs that have been repaired with adhesive, etc. 0 Do not use discs on which the sticky part of cellophane tape or labels is exposed or on which there are traces of where labels have been removed. Such discs can get caught inside the player and damage it. 0 Do not use discs in special shapes, as they may damage the unit. .. 0 Place 3 inch/8 cm discs in the inner tray guide without using an adapter. 0 Do not push the disc tray in by hand when the power is off. Doing so could damage the unit. 0 If the unit is left in a room full of smoke from cigarettes, etc., for long periods of time, the surface of the optical pickup may get dirty, preventing it from receiving signals properly. Front panel Rear panel Remote control 132 unit Index
-
 1
1 -
2
-
3
-
4
-
5
-
6
-
7
-
8
-
9
-
10
-
11
-
12
-
13
-
14
-
15
-
16
-
17
-
18
-
19
-
20
-
21
-
22
-
23
-
24
-
25
-
26
-
27
-
28
-
29
-
30
-
31
-
32
-
33
-
34
-
35
-
36
-
37
-
38
-
39
-
40
-
41
-
42
-
43
-
44
-
45
-
46
-
47
-
48
-
49
-
50
-
51
-
52
-
53
-
54
-
55
-
56
-
57
-
58
-
59
-
60
-
61
-
62
-
63
-
64
-
65
-
66
-
67
-
68
-
69
-
70
-
71
-
72
-
73
-
74
-
75
-
76
-
77
-
78
-
79
-
80
-
81
-
82
-
83
-
84
-
85
-
86
-
87
-
88
-
89
-
90
-
91
-
92
-
93
-
94
-
95
-
96
-
97
-
98
-
99
-
100
-
101
-
102
-
103
-
104
-
105
-
106
-
107
-
108
-
109
-
110
-
111
-
112
-
113
-
114
-
115
-
116
-
117
-
118
-
119
-
120
-
121
-
122
-
123
-
124
-
125
-
126
-
 127
127 -
 128
128 -
 129
129 -
 130
130 -
 131
131 -
 132
132 -
 133
133 -
 134
134 -
 135
135 -
 136
136 -
 137
137 -
138
-
139
-
140
-
141
-
142
-
143
-
144
-
145
-
146
-
147
-
148
-
149
-
150
-
151
-
152
-
153
-
154
-
155
-
156
-
157
-
158
-
159
 |
 |
