Lenovo ThinkServer TD200x Hardware Maintenance Manual for TD200x - Page 97
units FRU.
 |
View all Lenovo ThinkServer TD200x manuals
Add to My Manuals
Save this manual to your list of manuals |
Page 97 highlights
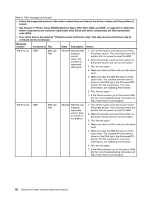
Table 4. DSA messages (continued) • Follow the suggested actions in the order in which they are listed in the Action column until the problem is solved. • See Chapter 8 "Parts Listing, TD200x Machine Types 3719, 3821, 3822, and 3823" on page 221 to determine which components are customer replaceable units (CRU) and which components are field replaceable units (FRU). • If an action step is preceded by "(Trained service technician only)," that step must be performed only by a Trained service technician. Message number Component Test State Description Action 166-807-xxx IMM IMM I2C Test Aborted IMM I2C test stopped: out of space. 1. Turn off the system and disconnect it from the power source. You must disconnect the system from ac power to reset the IMM. 2. After 45 seconds, reconnect the system to the power source and turn on the system. 3. Run the test again. 4. Make sure that the DSA code is at the latest level. 5. Make sure that the IMM firmware is at the latest level. The installed firmware level is shown in the DSA log in the Firmware/VPD section for this component. For more information, see Updating the firmware. 6. Run the test again. 7. If the failure remains, go to the Lenovo Web site for more troubleshooting information at http://www.lenovo.com/support. 166-808-xxx IMM IMM I2C Test Aborted IMM I2C test stopped: reservation aborted or invalid reservation ID. 1. Turn off the system and disconnect it from the power source. You must disconnect the system from ac power to reset the IMM. 2. After 45 seconds, reconnect the system to the power source and turn on the system. 3. Run the test again. 4. Make sure that the DSA code is at the latest level. 5. Make sure that the IMM firmware is at the latest level. The installed firmware level is shown in the DSA log in the Firmware/VPD section for this component. For more information, see Updating the firmware. 6. Run the test again. 7. If the failure remains, go to the Lenovo Web site for more troubleshooting information at http://www.lenovo.com/support. Chapter 5. Diagnostics 89
-
 1
1 -
2
-
3
-
4
-
5
-
6
-
7
-
8
-
9
-
10
-
11
-
12
-
13
-
14
-
15
-
16
-
17
-
18
-
19
-
20
-
21
-
22
-
23
-
24
-
25
-
26
-
27
-
28
-
29
-
30
-
31
-
32
-
33
-
34
-
35
-
36
-
37
-
38
-
39
-
40
-
41
-
42
-
43
-
44
-
45
-
46
-
47
-
48
-
49
-
50
-
51
-
52
-
53
-
54
-
55
-
56
-
57
-
58
-
59
-
60
-
61
-
62
-
63
-
64
-
65
-
66
-
67
-
68
-
69
-
70
-
71
-
72
-
73
-
74
-
75
-
76
-
77
-
78
-
79
-
80
-
81
-
82
-
83
-
84
-
85
-
86
-
87
-
88
-
89
-
90
-
91
-
 92
92 -
 93
93 -
 94
94 -
 95
95 -
 96
96 -
 97
97 -
 98
98 -
 99
99 -
 100
100 -
 101
101 -
 102
102 -
103
-
104
-
105
-
106
-
107
-
108
-
109
-
110
-
111
-
112
-
113
-
114
-
115
-
116
-
117
-
118
-
119
-
120
-
121
-
122
-
123
-
124
-
125
-
126
-
127
-
128
-
129
-
130
-
131
-
132
-
133
-
134
-
135
-
136
-
137
-
138
-
139
-
140
-
141
-
142
-
143
-
144
-
145
-
146
-
147
-
148
-
149
-
150
-
151
-
152
-
153
-
154
-
155
-
156
-
157
-
158
-
159
-
160
-
161
-
162
-
163
-
164
-
165
-
166
-
167
-
168
-
169
-
170
-
171
-
172
-
173
-
174
-
175
-
176
-
177
-
178
-
179
-
180
-
181
-
182
-
183
-
184
-
185
-
186
-
187
-
188
-
189
-
190
-
191
-
192
-
193
-
194
-
195
-
196
-
197
-
198
-
199
-
200
-
201
-
202
-
203
-
204
-
205
-
206
-
207
-
208
-
209
-
210
-
211
-
212
-
213
-
214
-
215
-
216
-
217
-
218
-
219
-
220
-
221
-
222
-
223
-
224
-
225
-
226
-
227
-
228
-
229
-
230
-
231
-
232
-
233
-
234
-
235
-
236
-
237
-
238
-
239
-
240
-
241
-
242
-
243
-
244
-
245
-
246
-
247
-
248
-
249
-
250
-
251
-
252
-
253
-
254
-
255
-
256
-
257
-
258
-
259
-
260
-
261
-
262
-
263
-
264
-
265
-
266
-
267
-
268
-
269
-
270
-
271
-
272
-
273
-
274
-
275
-
276
-
277
-
278
-
279
-
280
-
281
-
282
-
283
-
284
-
285
-
286
-
287
-
288
-
289
-
290
 |
 |
