Lenovo ThinkServer TD200x Hardware Maintenance Manual for TD200x - Page 214
Removing a microprocessor and heat sink
 |
View all Lenovo ThinkServer TD200x manuals
Add to My Manuals
Save this manual to your list of manuals |
Page 214 highlights
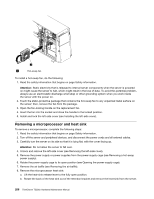
000000 000000 000000 000000 000000 000000 000000 000000 000000 000000 000000 000000 1 Hot-swap fan To install a hot-swap fan, do the following: 1. Read the safety information that begins on page Safety information. Attention: Static electricity that is released to internal server components when the server is powered on might cause the server to halt, which might result in the loss of data. To avoid this potential problem, always use an electrostatic-discharge wrist strap or other grounding system when you work inside the server with the power on. 2. Touch the static-protective package that contains the hot-swap fan to any unpainted metal surface on the server; then, remove the fan from the package. 3. Open the fan-locking handle on the replacement fan. 4. Insert the fan into the socket and close the handle to the locked position. 5. Install and lock the left-side cover (see Installing the left-side cover). Removing a microprocessor and heat sink To remove a microprocessor, complete the following steps: 1. Read the safety information that begins on page Safety information. 2. Turn off the server and peripheral devices, and disconnect the power cords and all external cables. 3. Carefully turn the server on its side so that it is lying flat, with the cover facing up. Attention: Do not allow the server to fall over. 4. Unlock and remove the left-side cover (see Removing the left-side cover). 5. Remove the power supply or power supplies from the power-supply cage (see Removing a hot-swap power supply). 6. Rotate the power-supply cage to its open position (see Opening the power-supply cage). 7. Remove the air baffle (see Removing the air baffle). 8. Remove the microprocessor heat sink: a. Lift the heat-sink release lever to the fully open position. b. Rotate the back of the heat sink out of the retention bracket and remove the heat sink from the server. 206 ThinkServer TD200x Hardware Maintenance Manual
-
 1
1 -
2
-
3
-
4
-
5
-
6
-
7
-
8
-
9
-
10
-
11
-
12
-
13
-
14
-
15
-
16
-
17
-
18
-
19
-
20
-
21
-
22
-
23
-
24
-
25
-
26
-
27
-
28
-
29
-
30
-
31
-
32
-
33
-
34
-
35
-
36
-
37
-
38
-
39
-
40
-
41
-
42
-
43
-
44
-
45
-
46
-
47
-
48
-
49
-
50
-
51
-
52
-
53
-
54
-
55
-
56
-
57
-
58
-
59
-
60
-
61
-
62
-
63
-
64
-
65
-
66
-
67
-
68
-
69
-
70
-
71
-
72
-
73
-
74
-
75
-
76
-
77
-
78
-
79
-
80
-
81
-
82
-
83
-
84
-
85
-
86
-
87
-
88
-
89
-
90
-
91
-
92
-
93
-
94
-
95
-
96
-
97
-
98
-
99
-
100
-
101
-
102
-
103
-
104
-
105
-
106
-
107
-
108
-
109
-
110
-
111
-
112
-
113
-
114
-
115
-
116
-
117
-
118
-
119
-
120
-
121
-
122
-
123
-
124
-
125
-
126
-
127
-
128
-
129
-
130
-
131
-
132
-
133
-
134
-
135
-
136
-
137
-
138
-
139
-
140
-
141
-
142
-
143
-
144
-
145
-
146
-
147
-
148
-
149
-
150
-
151
-
152
-
153
-
154
-
155
-
156
-
157
-
158
-
159
-
160
-
161
-
162
-
163
-
164
-
165
-
166
-
167
-
168
-
169
-
170
-
171
-
172
-
173
-
174
-
175
-
176
-
177
-
178
-
179
-
180
-
181
-
182
-
183
-
184
-
185
-
186
-
187
-
188
-
189
-
190
-
191
-
192
-
193
-
194
-
195
-
196
-
197
-
198
-
199
-
200
-
201
-
202
-
203
-
204
-
205
-
206
-
207
-
208
-
 209
209 -
 210
210 -
 211
211 -
 212
212 -
 213
213 -
 214
214 -
 215
215 -
 216
216 -
 217
217 -
 218
218 -
 219
219 -
220
-
221
-
222
-
223
-
224
-
225
-
226
-
227
-
228
-
229
-
230
-
231
-
232
-
233
-
234
-
235
-
236
-
237
-
238
-
239
-
240
-
241
-
242
-
243
-
244
-
245
-
246
-
247
-
248
-
249
-
250
-
251
-
252
-
253
-
254
-
255
-
256
-
257
-
258
-
259
-
260
-
261
-
262
-
263
-
264
-
265
-
266
-
267
-
268
-
269
-
270
-
271
-
272
-
273
-
274
-
275
-
276
-
277
-
278
-
279
-
280
-
281
-
282
-
283
-
284
-
285
-
286
-
287
-
288
-
289
-
290
 |
 |
