Konica Minolta AccurioPress C6100 AccurioPress C6100/C6085 User Manual Additio - Page 41
Lever [RU5]
 |
View all Konica Minolta AccurioPress C6100 manuals
Add to My Manuals
Save this manual to your list of manuals |
Page 41 highlights
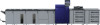
5 Output Option 5.8 24 No. Name Description 1 Relay unit front door Opens to allow removal of paper jam. 2 Lever [RU12] Opens rightward for removal of paper jam. 3 Lever [RU13] Opens rightward for removal of paper jam. 4 Knob [RU14] Turned to allow removal of paper jam. 5 Knob [RU7] Turned to allow removal of paper jam. 6 Lever [RU4] Opens upward for removal of paper jam. 7 Lever [RU5] Opens rightward for removal of paper jam. 8 Knob [RU6] Turned to allow removal of paper jam. 9 Secondary (sub) tray exten- Pulled out to hold large paper sizes delivered to the second- sion ary (sub) tray. 10 Secondary (sub) tray Holds sets output in non offset mode. 11 Top cover Opens upward for removal of paper jam. 12 Supply tank Remove this tank, and replenish water to it. 13 Knob [HM1] Turned to allow removal of paper jam. 14 Lever [RU1] Opens upward for removal of paper jam. 15 Lever [RU2] Catch and open downward for removal of paper jam. 16 Humidifier HM-103 (option) Humidifies both front and back sides of print paper in order to flatten it out. 17 Handle [HM2] Held to pull out the unit when paper jam occurs. 18 Jam position display Indicates the position of paper jam by LED lamps. 19 Water storage tank Used to store water from the supply tank. 20 Lever [RU8] Opens leftward for removal of paper jam. 21 Lever [RU9] Remove upward and open rightward for removal of paper jam. 22 Knob [RU10] Turned to allow removal of paper jam. 23 Lever [RU11] Opens upward for removal of paper jam. 24 Protection container Used to collect drained water when a problem occurs. 5-16 AccurioPress C6100/C6085
-
 1
1 -
2
-
3
-
4
-
5
-
6
-
7
-
8
-
9
-
10
-
11
-
12
-
13
-
14
-
15
-
16
-
17
-
18
-
19
-
20
-
21
-
22
-
23
-
24
-
25
-
26
-
27
-
28
-
29
-
30
-
31
-
32
-
33
-
34
-
35
-
 36
36 -
 37
37 -
 38
38 -
 39
39 -
 40
40 -
 41
41 -
 42
42 -
 43
43 -
 44
44 -
 45
45 -
 46
46 -
47
-
48
-
49
-
50
-
51
-
52
-
53
-
54
-
55
-
56
-
57
-
58
-
59
-
60
-
61
-
62
-
63
-
64
-
65
-
66
-
67
-
68
-
69
-
70
-
71
-
72
-
73
-
74
-
75
-
76
-
77
-
78
-
79
-
80
-
81
-
82
-
83
-
84
-
85
-
86
-
87
-
88
-
89
-
90
-
91
-
92
-
93
-
94
-
95
-
96
-
97
-
98
-
99
-
100
-
101
-
102
-
103
-
104
-
105
-
106
-
107
-
108
-
109
-
110
-
111
-
112
-
113
-
114
-
115
-
116
-
117
-
118
-
119
-
120
-
121
-
122
-
123
-
124
-
125
-
126
-
127
-
128
-
129
-
130
-
131
-
132
-
133
-
134
-
135
-
136
-
137
-
138
-
139
-
140
-
141
-
142
-
143
-
144
-
145
-
146
-
147
-
148
-
149
-
150
-
151
-
152
-
153
-
154
-
155
-
156
-
157
-
158
-
159
-
160
-
161
-
162
-
163
-
164
-
165
-
166
-
167
-
168
-
169
-
170
-
171
-
172
-
173
-
174
-
175
-
176
-
177
-
178
-
179
-
180
-
181
-
182
-
183
-
184
-
185
-
186
-
187
-
188
-
189
-
190
-
191
-
192
-
193
-
194
-
195
-
196
-
197
-
198
-
199
-
200
-
201
-
202
-
203
-
204
-
205
-
206
-
207
-
208
-
209
-
210
-
211
-
212
-
213
-
214
-
215
-
216
-
217
-
218
-
219
-
220
-
221
-
222
-
223
-
224
-
225
-
226
-
227
-
228
-
229
-
230
-
231
-
232
-
233
-
234
-
235
-
236
-
237
-
238
-
239
-
240
-
241
-
242
-
243
-
244
-
245
-
246
-
247
-
248
-
249
-
250
-
251
-
252
-
253
-
254
-
255
-
256
-
257
-
258
-
259
-
260
 |
 |
