Epson SureColor F10070 Users Guide - Page 114
Cleaning suction caps, Cleaning the Maintenance Parts, Suction Cap, Start
 |
View all Epson SureColor F10070 manuals
Add to My Manuals
Save this manual to your list of manuals |
Page 114 highlights
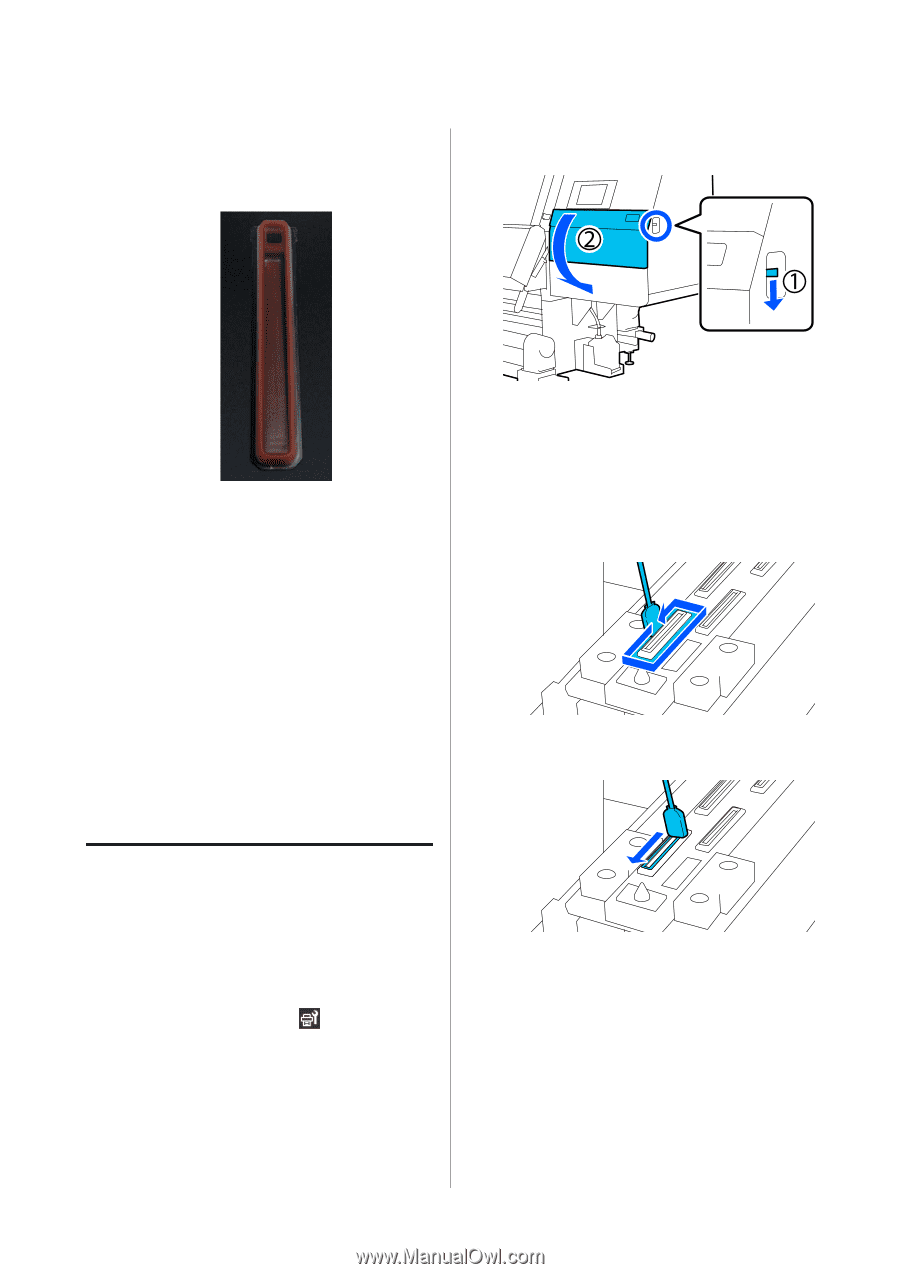
SC-F10000 Series User's Guide Maintenance Wipe up all the ink and cleaning fluid, leaving no residue, as shown in the illustration below. If any ink or cleaning fluid is left over, it could clog the nozzles. C Lower the lock release lever to open the right-side maintenance cover. H Close the maintenance cover, and then press Done. The print head returns to its normal position. D Dampen the cleaning stick with cleaning fluid. Use new cleaning sticks and cleaning fluid. U "Using Cleaning liquid" on page 109 E Hold the cleaning stick in a perpendicular orientation, and wipe the outer areas of all the caps. When the print head returns to its normal position, the screen for checking if the print head is dirty appears. If necessary, clean the print head. U "Cleaning Around the Print Head" on page 115 Disposing of used ink cleaner and cleaning sticks U "Disposal of used consumables" on page 140 F Hold the cleaning stick flat and wipe the edges of all the caps. Cleaning suction caps Clean the suction caps before doing Print Head Refresh. If you do not clean the suction caps, doing Print Head Refresh is not fully effective. Before doing Print Head Refresh, use the following procedure to clean the suction caps. A On the Home screen, press , and then press in the order of Cleaning the Maintenance Parts Suction Cap. B Check the on-screen message, and then press Start. G Check that there are no ink stains, lint, or dust attached to the edges or outer area of the cap. If they are not dirty, cleaning is complete. If any dirt remains, repeat Steps 5 and 6 to wipe off any dirt. 114
-
 1
1 -
2
-
3
-
4
-
5
-
6
-
7
-
8
-
9
-
10
-
11
-
12
-
13
-
14
-
15
-
16
-
17
-
18
-
19
-
20
-
21
-
22
-
23
-
24
-
25
-
26
-
27
-
28
-
29
-
30
-
31
-
32
-
33
-
34
-
35
-
36
-
37
-
38
-
39
-
40
-
41
-
42
-
43
-
44
-
45
-
46
-
47
-
48
-
49
-
50
-
51
-
52
-
53
-
54
-
55
-
56
-
57
-
58
-
59
-
60
-
61
-
62
-
63
-
64
-
65
-
66
-
67
-
68
-
69
-
70
-
71
-
72
-
73
-
74
-
75
-
76
-
77
-
78
-
79
-
80
-
81
-
82
-
83
-
84
-
85
-
86
-
87
-
88
-
89
-
90
-
91
-
92
-
93
-
94
-
95
-
96
-
97
-
98
-
99
-
100
-
101
-
102
-
103
-
104
-
105
-
106
-
107
-
108
-
 109
109 -
 110
110 -
 111
111 -
 112
112 -
 113
113 -
 114
114 -
 115
115 -
 116
116 -
 117
117 -
 118
118 -
 119
119 -
120
-
121
-
122
-
123
-
124
-
125
-
126
-
127
-
128
-
129
-
130
-
131
-
132
-
133
-
134
-
135
-
136
-
137
-
138
-
139
-
140
-
141
-
142
-
143
-
144
-
145
-
146
-
147
-
148
-
149
-
150
-
151
-
152
-
153
-
154
-
155
-
156
-
157
-
158
-
159
-
160
-
161
-
162
-
163
-
164
-
165
-
166
-
167
-
168
-
169
-
170
-
171
-
172
-
173
-
174
-
175
-
176
-
177
-
178
-
179
-
180
-
181
-
182
-
183
-
184
-
185
-
186
-
187
-
188
-
189
-
190
-
191
-
192
-
193
-
194
-
195
-
196
-
197
-
198
-
199
-
200
-
201
-
202
-
203
-
204
-
205
-
206
-
207
-
208
-
209
-
210
-
211
-
212
-
213
-
214
-
215
-
216
-
217
 |
 |