Adaptec FS4500 User Guide - Page 24
Step 3: Installing, the Drive Carriers, Secure the front of the enclosure with one screw on each side
 |
UPC - 760884144275
View all Adaptec FS4500 manuals
Add to My Manuals
Save this manual to your list of manuals |
Page 24 highlights
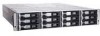
Installing the Storage Enclosure You can choose to have someone continue to support the enclosure until it is secured in the rack, although this extra support is not required. Figure 2-3 Storage Enclosure in Rack 8 Secure the front of the enclosure with one screw on each side, as shown in Figure 2-4. One screw per side Figure 2-4 Secure Front of Enclosure The rack installation is complete. Continue with Step 3: Installing the Drive Carriers on page 2-9. 2-6
-
 1
1 -
2
-
3
-
4
-
5
-
6
-
7
-
8
-
9
-
10
-
11
-
12
-
13
-
14
-
15
-
16
-
17
-
18
-
 19
19 -
 20
20 -
 21
21 -
 22
22 -
 23
23 -
 24
24 -
 25
25 -
 26
26 -
 27
27 -
 28
28 -
 29
29 -
30
-
31
-
32
-
33
-
34
-
35
-
36
-
37
-
38
-
39
-
40
-
41
-
42
-
43
-
44
-
45
-
46
-
47
-
48
-
49
-
50
-
51
-
52
-
53
-
54
-
55
-
56
-
57
-
58
-
59
-
60
-
61
-
62
-
63
-
64
-
65
-
66
-
67
-
68
-
69
-
70
-
71
-
72
-
73
-
74
-
75
-
76
-
77
-
78
-
79
-
80
-
81
-
82
-
83
-
84
-
85
-
86
-
87
-
88
-
89
-
90
-
91
 |
 |

2-6
Installing the Storage Enclosure
You can choose to have someone continue to support the
enclosure until it is secured in the rack, although this extra
support is not required.
Figure 2-3
Storage Enclosure in Rack
8
Secure the front of the enclosure with one screw on each side, as
shown in
Figure 2-4
.
Figure 2-4
Secure Front of Enclosure
The rack installation is complete. Continue with
Step 3: Installing
the Drive Carriers
on page 2-9
.
One screw per side