2010 BMW X5 Owner's Manual - Page 255
2010 BMW X5 Manual
Page 255 highlights
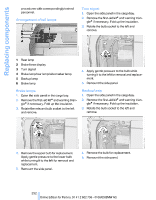
Brake force display 1. Carefully remove the cover in the liftgate panel with a screwdriver. 6. Position the cargo bay lamp and clip it in, refer to arrow. 2. Rotate the bulb socket to the left and remove. 5-watt bulb, C11 12W 1. Slide the lamp to the right with a screwdriver, refer to arrow 1. 2. Remove the lamp, arrow 2. 3. Replace the bulb. 4. Reinstall the lamp. 4. Insert the bulb socket in the liftgate and engage it. 5. Before installing the cap, unclip the cargo bay lamp. Then lay the cap on its upper side and close it, refer to arrow. Center brake lamp This lamp uses LED technology for operation. In case of a defect, please go to a BMW Sports Activity Vehicle Center or a workshop that works according to BMW repair procedures with correspondingly trained personnel. BMW X6: changing lamps Xenon lamps These bulbs have a very long service life and the probability of a failure is very low. If a lamp should nevertheless fail, you can continue driving cautiously with fog lamps* provided that this is permitted by the country-specific laws. Mobility Reference 253 Online Edition for Part no. 01 41 2 602 756 - © 06/09 BMW AG Communications Entertainment 3. Apply gentle pressure to the bulb while turning it to the left for removal and replacement. Navigation Driving tips License plate lamp Controls At a glance
-
 1
1 -
2
-
3
-
4
-
5
-
6
-
7
-
8
-
9
-
10
-
11
-
12
-
13
-
14
-
15
-
16
-
17
-
18
-
19
-
20
-
21
-
22
-
23
-
24
-
25
-
26
-
27
-
28
-
29
-
30
-
31
-
32
-
33
-
34
-
35
-
36
-
37
-
38
-
39
-
40
-
41
-
42
-
43
-
44
-
45
-
46
-
47
-
48
-
49
-
50
-
51
-
52
-
53
-
54
-
55
-
56
-
57
-
58
-
59
-
60
-
61
-
62
-
63
-
64
-
65
-
66
-
67
-
68
-
69
-
70
-
71
-
72
-
73
-
74
-
75
-
76
-
77
-
78
-
79
-
80
-
81
-
82
-
83
-
84
-
85
-
86
-
87
-
88
-
89
-
90
-
91
-
92
-
93
-
94
-
95
-
96
-
97
-
98
-
99
-
100
-
101
-
102
-
103
-
104
-
105
-
106
-
107
-
108
-
109
-
110
-
111
-
112
-
113
-
114
-
115
-
116
-
117
-
118
-
119
-
120
-
121
-
122
-
123
-
124
-
125
-
126
-
127
-
128
-
129
-
130
-
131
-
132
-
133
-
134
-
135
-
136
-
137
-
138
-
139
-
140
-
141
-
142
-
143
-
144
-
145
-
146
-
147
-
148
-
149
-
150
-
151
-
152
-
153
-
154
-
155
-
156
-
157
-
158
-
159
-
160
-
161
-
162
-
163
-
164
-
165
-
166
-
167
-
168
-
169
-
170
-
171
-
172
-
173
-
174
-
175
-
176
-
177
-
178
-
179
-
180
-
181
-
182
-
183
-
184
-
185
-
186
-
187
-
188
-
189
-
190
-
191
-
192
-
193
-
194
-
195
-
196
-
197
-
198
-
199
-
200
-
201
-
202
-
203
-
204
-
205
-
206
-
207
-
208
-
209
-
210
-
211
-
212
-
213
-
214
-
215
-
216
-
217
-
218
-
219
-
220
-
221
-
222
-
223
-
224
-
225
-
226
-
227
-
228
-
229
-
230
-
231
-
232
-
233
-
234
-
235
-
236
-
237
-
238
-
239
-
240
-
241
-
242
-
243
-
244
-
245
-
246
-
247
-
248
-
249
-
 250
250 -
 251
251 -
 252
252 -
 253
253 -
 254
254 -
 255
255 -
 256
256 -
 257
257 -
 258
258 -
 259
259 -
 260
260 -
261
-
262
-
263
-
264
-
265
-
266
-
267
-
268
-
269
-
270
-
271
-
272
-
273
-
274
-
275
-
276
-
277
-
278
-
279
-
280
-
281
-
282
-
283
-
284
-
285
-
286
-
287
-
288
-
289
-
290
-
291
-
292
-
293
-
294
-
295
-
296
-
297
-
298
-
299
-
300
 |
 |
