Polk Audio F/X Wireless Surround F/X Wireless Surround Owner's Manual - Page 7
Transmitter Hookups - manual
 |
View all Polk Audio F/X Wireless Surround manuals
Add to My Manuals
Save this manual to your list of manuals |
Page 7 highlights
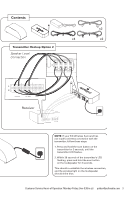
Transmitter Hookups Once you have decided on a location for your loudspeaker, hook up the transmitter to your receiver or processor. Follow the Quickstart Guide at the front of this manual for hookup instructions. Or you may refer to the hookup schematics on page 8. Rear 1 2 Top 4 3 Transmitter Inputs 1 Audio Inputs-Line level and speaker level. This is where you connect your transmitter to your receiver or processor. You may make either speaker level or line level connections, but never make both connections at the same time. 2 Power Connection-The transmitter power supply is connected here. 3 Power LED-Shines blue to indicate the transmitter is active and connected successfully to the loudspeaker. Shines red to indicate the transmitter and loudspeaker have failed to establish a wireless connection. 4 Scan-Push this button should it become necessary to re-establish the communication link between the transmitter and loudspeaker. F/X Wireless Surround Controls 1 Power LED-Shines blue when the speaker is on, red when in stand-by. 2 Room Position Button-This button sets the equalization for the F/X Wireless Surround based on its location, either on the floor, on a 1 2 3 table or on a shelf. An LED indicates which 4 location is chosen. 5 3 Scan-Push this button should it become 6 necessary to re-establish the "communica- tion" link between the transmitter and 7 the loudspeaker. 4 Wireless LED-Shines blue to indicate the transmitter and loudspeaker are connected wirelessly. Flashes blue/red when loudspeaker and transmitter are connecting and shines red when loudspeaker and transmitter are not connected. 5 Power Connection-The loudspeaker power supply is connected here. 6 AC Mains--The AC Mains Switch turns the loudspeaker on and off, though you may leave the switch turned on all the time. 7 Speaker Orientation--Indicates orientation of left and right channels. Be sure to position the speaker accordingly. Customer Service Hours of Operation: Monday-Friday, 9AM-5:30PM EST [email protected] 7
-
 1
1 -
 2
2 -
 3
3 -
 4
4 -
 5
5 -
 6
6 -
 7
7 -
 8
8 -
 9
9 -
 10
10 -
 11
11 -
 12
12 -
13
-
14
-
15
-
16
-
17
-
18
-
19
-
20
-
21
-
22
-
23
-
24
-
25
-
26
-
27
-
28
-
29
-
30
-
31
-
32
-
33
-
34
-
35
-
36
-
37
-
38
-
39
-
40
-
41
-
42
-
43
-
44
-
45
-
46
-
47
-
48
-
49
-
50
-
51
-
52
-
53
-
54
-
55
-
56
-
57
-
58
-
59
-
60
-
61
-
62
-
63
-
64
-
65
-
66
-
67
-
68
-
69
-
70
-
71
-
72
-
73
-
74
-
75
-
76
 |
 |
