NEC NP-PA1505UL-B Installation Manual - Page 27
To the dealer and the installer, Notes on installation and maintenance
 |
View all NEC NP-PA1505UL-B manuals
Add to My Manuals
Save this manual to your list of manuals |
Page 27 highlights
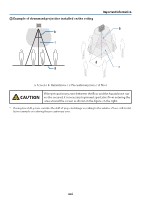
Important Information Notes on installation and maintenance Do not install or store in such places as those described below. • Locations that amplify vibrations and impacts If installed in places where the vibrations from power sources and the like are conveyed, or in vehicles or on vessels, etc. the projector could be affected by vibrations or shocks that may damage internal parts and lead to malfunction. • Close to high voltage power lines and power sources It could disrupt the unit. • Places where strong magnetic fields are generated Doing so could lead to malfunction. • Outdoors and places with humid or dust Places exposed to oil smoke or steam Places where corrosive gases are generated Attached substances such as oil, chemicals and moisture may cause deformation or cracks of the cabinet, corrosion of the metal parts, or malfunction. To the dealer and the installer 1. To prevent the projector from falling, install it on the ceiling in a way with sufficient strength to withstand the combined weight of the projector and the ceiling mount unit for an extended period of time. 2. When installing the projector on the ceiling, be sure to do so correctly in accordance with the installation manual for the Ceiling Mount Unit. Be sure to use the fixed metal fittings and to tighten the screws securely. 3. To prevent the projector from falling, use fall prevention wires. • Use commercially available metal fittings to join the robust part of a building or construction and the security bar of the projector with the fall prevention wires. • Use commercially available metal fittings and fall prevention wires that have sufficient strength to withstand the combined weight of the projector and the ceiling mount unit. • Slightly slack off the fall prevention wires so as not to put a load on the projector. • Refer to the "Part Names of the Projector" for the location of the security bar. (→ page 6) xxvi
-
 1
1 -
2
-
3
-
4
-
5
-
6
-
7
-
8
-
9
-
10
-
11
-
12
-
13
-
14
-
15
-
16
-
17
-
18
-
19
-
20
-
21
-
 22
22 -
 23
23 -
 24
24 -
 25
25 -
 26
26 -
 27
27 -
 28
28 -
 29
29 -
 30
30 -
 31
31 -
 32
32 -
33
-
34
-
35
-
36
-
37
-
38
-
39
-
40
-
41
-
42
-
43
-
44
-
45
-
46
-
47
-
48
-
49
-
50
-
51
-
52
-
53
-
54
-
55
-
56
-
57
-
58
-
59
-
60
-
61
-
62
-
63
-
64
-
65
-
66
-
67
-
68
-
69
-
70
-
71
-
72
-
73
-
74
-
75
-
76
-
77
-
78
-
79
-
80
-
81
-
82
-
83
-
84
-
85
-
86
-
87
-
88
-
89
-
90
-
91
-
92
-
93
-
94
-
95
-
96
-
97
-
98
-
99
-
100
-
101
-
102
-
103
-
104
-
105
-
106
-
107
-
108
-
109
-
110
-
111
-
112
-
113
-
114
-
115
-
116
-
117
-
118
-
119
-
120
-
121
-
122
-
123
-
124
-
125
-
126
-
127
-
128
-
129
-
130
-
131
-
132
-
133
-
134
-
135
-
136
-
137
-
138
-
139
-
140
-
141
-
142
-
143
-
144
-
145
-
146
-
147
-
148
-
149
-
150
-
151
-
152
-
153
-
154
-
155
-
156
-
157
-
158
-
159
-
160
-
161
-
162
-
163
-
164
-
165
-
166
-
167
-
168
-
169
-
170
-
171
-
172
-
173
-
174
-
175
-
176
-
177
-
178
-
179
-
180
-
181
-
182
-
183
-
184
-
185
-
186
-
187
-
188
-
189
-
190
-
191
-
192
-
193
-
194
-
195
-
196
-
197
-
198
-
199
-
200
-
201
-
202
-
203
-
204
-
205
-
206
-
207
-
208
-
209
-
210
-
211
-
212
-
213
-
214
-
215
-
216
-
217
-
218
-
219
-
220
-
221
-
222
-
223
-
224
-
225
-
226
 |
 |
