NEC NP-PA1505UL-B Installation Manual - Page 181
Gently pull the lens unit out from the pro, jector., Attach the lens cover to the projector.
 |
View all NEC NP-PA1505UL-B manuals
Add to My Manuals
Save this manual to your list of manuals |
Page 181 highlights
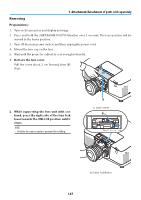
6. Attachment/detachment of parts sold separately 3. Gently pull the lens unit out from the projector. Once the lens unit has been removed, attach the rear lens cap included with the lens unit before storing. 4. Attach the lens cover to the projector. a (1) Leave a gap of about 2 cm when attaching the lens cover. (2) Push it in the direction of the arrow. * When not attaching a lens unit, attach the dust cap supplied with the projector. Align the dust cap with the projector body, place the lower section on the projector, then push the surrounding area. a: Lens cover The bottom side of the dust cover is the side with the longer flat area. 148
-
 1
1 -
2
-
3
-
4
-
5
-
6
-
7
-
8
-
9
-
10
-
11
-
12
-
13
-
14
-
15
-
16
-
17
-
18
-
19
-
20
-
21
-
22
-
23
-
24
-
25
-
26
-
27
-
28
-
29
-
30
-
31
-
32
-
33
-
34
-
35
-
36
-
37
-
38
-
39
-
40
-
41
-
42
-
43
-
44
-
45
-
46
-
47
-
48
-
49
-
50
-
51
-
52
-
53
-
54
-
55
-
56
-
57
-
58
-
59
-
60
-
61
-
62
-
63
-
64
-
65
-
66
-
67
-
68
-
69
-
70
-
71
-
72
-
73
-
74
-
75
-
76
-
77
-
78
-
79
-
80
-
81
-
82
-
83
-
84
-
85
-
86
-
87
-
88
-
89
-
90
-
91
-
92
-
93
-
94
-
95
-
96
-
97
-
98
-
99
-
100
-
101
-
102
-
103
-
104
-
105
-
106
-
107
-
108
-
109
-
110
-
111
-
112
-
113
-
114
-
115
-
116
-
117
-
118
-
119
-
120
-
121
-
122
-
123
-
124
-
125
-
126
-
127
-
128
-
129
-
130
-
131
-
132
-
133
-
134
-
135
-
136
-
137
-
138
-
139
-
140
-
141
-
142
-
143
-
144
-
145
-
146
-
147
-
148
-
149
-
150
-
151
-
152
-
153
-
154
-
155
-
156
-
157
-
158
-
159
-
160
-
161
-
162
-
163
-
164
-
165
-
166
-
167
-
168
-
169
-
170
-
171
-
172
-
173
-
174
-
175
-
 176
176 -
 177
177 -
 178
178 -
 179
179 -
 180
180 -
 181
181 -
 182
182 -
 183
183 -
 184
184 -
 185
185 -
 186
186 -
187
-
188
-
189
-
190
-
191
-
192
-
193
-
194
-
195
-
196
-
197
-
198
-
199
-
200
-
201
-
202
-
203
-
204
-
205
-
206
-
207
-
208
-
209
-
210
-
211
-
212
-
213
-
214
-
215
-
216
-
217
-
218
-
219
-
220
-
221
-
222
-
223
-
224
-
225
-
226
 |
 |

6. Attachment/detachment of parts sold separately
148
3.
Gently pull the lens unit out from the pro-
jector.
Once the lens unit has been removed, attach
the rear lens cap included with the lens unit
before storing.
4.
Attach the lens cover to the projector.
(1)
Leave a gap of about 2 cm when attaching
the lens cover.
(2) Push it in the direction of the arrow.
a
a: Lens cover
*
When not attaching a lens unit, attach the dust
cap supplied with the projector.
Align the dust cap with the projector body, place
the lower section on the projector, then push the
surrounding area.
The bottom side of the dust cover is the side
with the longer flat area.