NEC NP-PA1505UL-B Installation Manual - Page 180
Preparations, While supporting the lens unit with one
 |
View all NEC NP-PA1505UL-B manuals
Add to My Manuals
Save this manual to your list of manuals |
Page 180 highlights
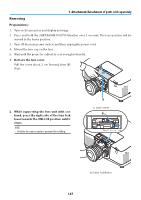
6. Attachment/detachment of parts sold separately Removing Preparations: 1. Turn on the projector and display an image. 2. Press and hold the SHIFT/HOME POSITION button over 2 seconds. The lens position will be moved to the home position. 3. Turn off the main power switch, and then unplug the power cord. 4. Mount the lens cap on the lens. 5. Wait until the projector cabinet is cool enough to handle. 1. Remove the lens cover. Pull the cover about 2 cm forward, then lift it up. 2. While supporting the lens unit with one hand, press the right side of the lens lock lever towards the UNLOCK position until it stops. NOTE: • Hold the lens unit securely to prevent it from falling. a a: Lens cover b b: Lens lock lever 147
-
 1
1 -
2
-
3
-
4
-
5
-
6
-
7
-
8
-
9
-
10
-
11
-
12
-
13
-
14
-
15
-
16
-
17
-
18
-
19
-
20
-
21
-
22
-
23
-
24
-
25
-
26
-
27
-
28
-
29
-
30
-
31
-
32
-
33
-
34
-
35
-
36
-
37
-
38
-
39
-
40
-
41
-
42
-
43
-
44
-
45
-
46
-
47
-
48
-
49
-
50
-
51
-
52
-
53
-
54
-
55
-
56
-
57
-
58
-
59
-
60
-
61
-
62
-
63
-
64
-
65
-
66
-
67
-
68
-
69
-
70
-
71
-
72
-
73
-
74
-
75
-
76
-
77
-
78
-
79
-
80
-
81
-
82
-
83
-
84
-
85
-
86
-
87
-
88
-
89
-
90
-
91
-
92
-
93
-
94
-
95
-
96
-
97
-
98
-
99
-
100
-
101
-
102
-
103
-
104
-
105
-
106
-
107
-
108
-
109
-
110
-
111
-
112
-
113
-
114
-
115
-
116
-
117
-
118
-
119
-
120
-
121
-
122
-
123
-
124
-
125
-
126
-
127
-
128
-
129
-
130
-
131
-
132
-
133
-
134
-
135
-
136
-
137
-
138
-
139
-
140
-
141
-
142
-
143
-
144
-
145
-
146
-
147
-
148
-
149
-
150
-
151
-
152
-
153
-
154
-
155
-
156
-
157
-
158
-
159
-
160
-
161
-
162
-
163
-
164
-
165
-
166
-
167
-
168
-
169
-
170
-
171
-
172
-
173
-
174
-
 175
175 -
 176
176 -
 177
177 -
 178
178 -
 179
179 -
 180
180 -
 181
181 -
 182
182 -
 183
183 -
 184
184 -
 185
185 -
186
-
187
-
188
-
189
-
190
-
191
-
192
-
193
-
194
-
195
-
196
-
197
-
198
-
199
-
200
-
201
-
202
-
203
-
204
-
205
-
206
-
207
-
208
-
209
-
210
-
211
-
212
-
213
-
214
-
215
-
216
-
217
-
218
-
219
-
220
-
221
-
222
-
223
-
224
-
225
-
226
 |
 |

6. Attachment/detachment of parts sold separately
147
Removing
Preparations:
1.
Turn on the projector and display an image.
2.
Press and hold the SHIFT/HOME POSITION button over 2 seconds. The lens position will be
moved to the home position.
3.
Turn off the main power switch, and then unplug the power cord.
4.
Mount the lens cap on the lens.
5.
Wait until the projector cabinet is cool enough to handle.
1.
Remove the lens cover.
Pull the cover about 2 cm forward, then lift
it up.
a
a: Lens cover
2.
While supporting the lens unit with one
hand, press the right side of the lens lock
lever towards the UNLOCK position until it
stops.
NOTE:
•
Hold the lens unit securely to prevent it from falling.
b
b: Lens lock lever