Metabo KH 5-40 Operating Instructions - Page 11
Overview, Commissioning, Cleaning, Maintenance, Accessories - sds max
 |
View all Metabo KH 5-40 manuals
Add to My Manuals
Save this manual to your list of manuals |
Page 11 highlights
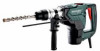
5. Overview See page 2. 1 Additional handle 2 Wing screw (for adjusting the depth stop) * 3 Depth stop * 4 Dust protection cap 5 Tool lock 6 Knob 7 Trigger 8 Handle * equipment-specific 6. Commissioning ENGLISH en Remove the tool: Pull the tool lock (5) backwards in direction indicated by arrow (a) and remove tool (b). See page 3. 7.3 Setting operating mode and chisel position Avoid levering with the machine when a chisel is fitted. KH 5-40: Do not activate the switch button (6) until the motor has completely stopped. Only rotate the switch button (6) in the direction of the arrow. Before plugging in, check that the rated mains voltage and mains frequency, as stated on the type plate match your power supply. Always install an RCD with a maximum trip current of 30 mA upstream. Usescetioonnlyofe1x.t5enmsmio2n. cables with a minimum Extension cables must cross- correspond to the power consumption of the machine (cf Technical Specifications). If a cable roller is used, always roll up the cable completely. 6.1 Assembly of the additional handle For safety reasons, always use the additional handle (1) supplied. Open the clamping ring by turning the additional handle (1) anticlockwise. Secure the additional handle at the required angle. Tighten the additional handle. Turn the switch button (6) to select the desired operating mode. Hammer drilling Chiselling Setting which enables the chisel to be rotated to the desired position. Setting the position of the chisel: The chisel can be locked in different positions. - Insert the chisel. - Turn the switch button (6) to the intermediate position . - Turn the chisel to the required position. - Turn the switch button (6) to position . - Turn the chisel until it engages. When a chisel is fitted, only operate the machine in the chiselling operating mode . 7. Use 7.1 Depth Stop Setting (only for KH 5-40) Release the wing (2) screw. Set the depth stop (3) to the required drilling depth. Retighten the wing screw (2). 7.2 Positioning, removing tool Before inserting, clean tool shank and apply supplied special grease (accessories: Order no. 6.31800)! Use only SDS-max tools. The dust protection cap (4) prevents the ingress of drilling dust during operation. When inserting the tool, pay attention to ensure that the dust protection cap (4) is not damaged. Positioning tool: Hold the tool lock (5) in the front position when inserting the tool. Turn tool and insert until it engages. The tool is being locked. Pull on the tool to check that it is correctly seated. (It must be possible to move the tool a few centimetres in an axial direction.) 7.4 Switching On and Off To switch on the machine, press the trigger switch (7). To switch off release the trigger switch (7). 8. Cleaning, Maintenance The power tool should be cleaned regularly, often and thoroughly through all air vents using a vacuum cleaner or by blowing in dry air. Prior to this operation, separate the power tool from the power source and wear protective glasses and dust mask. A damaged dust protection cap (4) must be replaced immediately. To replace the dust protection cap (4) slide the tool lock (5) back. Grasp the dust protection cap and pull firmly forwards and off. Fit the new dust protection cap onto the spindle at an angle and press hard to secure. 9. Accessories Use only genuine Metabo accessories. Use only accessories which fulfil the requirements and specifications listed in these operating instructions. For a complete range of accessories, see www.metabo.com or the catalogue. 11
-
 1
1 -
2
-
3
-
4
-
5
-
 6
6 -
 7
7 -
 8
8 -
 9
9 -
 10
10 -
 11
11 -
 12
12 -
 13
13 -
 14
14 -
 15
15 -
 16
16 -
17
-
18
-
19
-
20
-
21
-
22
-
23
-
24
-
25
-
26
-
27
-
28
-
29
-
30
-
31
-
32
-
33
-
34
-
35
-
36
-
37
-
38
-
39
-
40
-
41
-
42
-
43
-
44
-
45
-
46
-
47
-
48
-
49
-
50
-
51
-
52
-
53
-
54
-
55
-
56
-
57
-
58
-
59
-
60
-
61
-
62
-
63
-
64
-
65
-
66
-
67
-
68
-
69
-
70
-
71
-
72
-
73
-
74
-
75
-
76
 |
 |
