Marantz M-CR612 Owners Manual English - Page 69
Playing digital input
 |
View all Marantz M-CR612 manuals
Add to My Manuals
Save this manual to your list of manuals |
Page 69 highlights
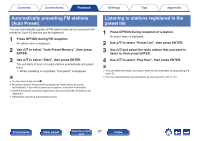
Contents Connections Playback . ANALOG IN OPTICAL IN Settings Tips Appendix Playing digital input 1 Prepare for playback. Check the connection, then turn on this units. ("Connecting a digital device" (v p. 26)) 2 Press OPTICAL IN to switch the input source to "Optical In 1" or "Optical In 2". 3 Play the component connected to this unit. 0 If the sampling frequency cannot be detected, "Signal Unlock" will be displayed. 0 "Unsupported" is displayed when audio signals that are not supported by this unit are input. 0 When "TV Input" is set in the menu, this unit automatically turns on when the TV connected to the unit is turned on, and the input source switches to "Optical In 1" or "Optical In 2". (v p. 96) Front panel Rear panel Remote control 69 unit Index
-
 1
1 -
2
-
3
-
4
-
5
-
6
-
7
-
8
-
9
-
10
-
11
-
12
-
13
-
14
-
15
-
16
-
17
-
18
-
19
-
20
-
21
-
22
-
23
-
24
-
25
-
26
-
27
-
28
-
29
-
30
-
31
-
32
-
33
-
34
-
35
-
36
-
37
-
38
-
39
-
40
-
41
-
42
-
43
-
44
-
45
-
46
-
47
-
48
-
49
-
50
-
51
-
52
-
53
-
54
-
55
-
56
-
57
-
58
-
59
-
60
-
61
-
62
-
63
-
 64
64 -
 65
65 -
 66
66 -
 67
67 -
 68
68 -
 69
69 -
 70
70 -
 71
71 -
 72
72 -
 73
73 -
 74
74 -
75
-
76
-
77
-
78
-
79
-
80
-
81
-
82
-
83
-
84
-
85
-
86
-
87
-
88
-
89
-
90
-
91
-
92
-
93
-
94
-
95
-
96
-
97
-
98
-
99
-
100
-
101
-
102
-
103
-
104
-
105
-
106
-
107
-
108
-
109
-
110
-
111
-
112
-
113
-
114
-
115
-
116
-
117
-
118
-
119
-
120
-
121
-
122
-
123
-
124
-
125
-
126
-
127
-
128
-
129
-
130
-
131
-
132
-
133
-
134
-
135
-
136
-
137
-
138
-
139
-
140
-
141
-
142
-
143
-
144
-
145
-
146
-
147
-
148
-
149
-
150
-
151
-
152
-
153
-
154
-
155
-
156
-
157
-
158
-
159
-
160
-
161
-
162
-
163
-
164
-
165
 |
 |
