LiftMaster 61LM Owners Manual - Page 178
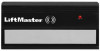
Model 67LM Security Plus, Wireless Keyless Entry
 |
View all LiftMaster 61LM manuals
Add to My Manuals
Save this manual to your list of manuals |
Page 178 highlights
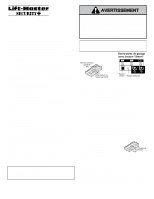
Model 67LM Security Plus™ Wireless Keyless Entry To comply with FCC/IC rules, adjustment or modification of receiver and/or transmitter is prohibited, except for changing the code setting and replacing the transmitter battery. THERE ARE NO OTHER USER SERVICEABLE PARTS. WARNING Features For use with any Security Plus™ compatible garage door opener receiver. Personalized Code: Up to 10,000 possible combinations. Code can be easily changed if desired. Operation: 12 Volt power supply. Opener activates when 4digit code and Enter button is pressed. If wrong numbers are accidentally pressed, correction can be made immediately. The Enter button will transmit only the last four digits. The Keypad will blink for 15 seconds after the code is transmitted. During that time the Enter button can be used to stop or reverse the door travel. A temporary entry code can be added for visitors or service persons. This temporary code can be limited to a programmable number of hours or a programmable number of entries. Setting the Personal Entry Code We recommend that you program your personal code now, before you install the Keyless Entry. Then you can test the reception at the mounting location before you proceed further. 1.Choose a 4-digit personal entry code using the numbers from 0 to 9 (a number can be used more than once, for example, 4,0, 4,1.) 2. Press the four buttons for the code, then press and hold the Enter button. The indicator light on the door opener panel will blink. 3. Press and release the "Smart" button on the door opener panel. After the opener lights blink, release the Enter button. Test by pressing the the code, then press Enter. The door should begin to move. You may also program the Keyless Entry from the door control, as follows: 1.With the door closed, enter the four digit code desired, then press and hold Enter. 2. Press and hold the light button on the door control. 3. Press and hold the door control push bar. 4. After the opener lights blink, release all buttons. Garage Door Opener Receiver (With Smart Button) 1 2 3 2 ABC 1 4 GHI 3 DEF 6 MNO 5 JKL 8 TUV 7 PRS 0 9 WXY ENTER Smart Button Indicator Light 9 1 7 3 5 KG 9 1 7 3 5 KG Children operating or playing with a garage door opener can injure themselves or others. The garage door could close and cause serious injury or death. Do not allow children to operate the wall push button(s) or remote control(s). A moving garage door could injure or kill someone CAUTION under it. Activate the opener only when you can see the door clearly, it is free of obstructions, and is properly adjusted. Installation Choose a convenient location for installation. It should be at eye level, Keypad Typical Sectional Door Installation Exterior Front Wall 1-Piece or Sectional Door reachable by the shortest person who will use it, and within sight of the door. For a one-piece door, Door Jamb Edge (Optional Location for 1-Piece Door) Door Jamb Face SECTIONAL DOOR ONLY choose the optional location shown in the KEYPAD MUST BE INSTALLED WITHIN SIGHT OF THE DOOR illustration to avoid injury as the door swings out. Plug Open the keypad cover and remove the battery compartment screw and cover. AVERTISSEMENT Take out the battery. Clavier Installation typique Hold keypad firmly with the d'une porte articulée cover half open so both top and Mur avant extérieur bottom mounting holes are Porte rigide ou articulée visible. Use a punch to mark each hole. Drill two 1/8" pilot holes. Fasten securely with Bordure étroite du montant de porte (emplacement en option pour les poBrteastterirgyides) screws provided. FaceBadtutemryontant PORTE ARTICCUoLvÉerE SEULEMENT Insert the plug provided into the ATTENTION top hole to cover the fastening scrQeLUEwEC.LLRAAeVPIiOEnRRsTtDEaOlSIlTOthÊITTeVRIbESaIPBtOLteSEÉrDyDU,ECFLAAÇVOIENR matching the + and - markings on the battery compartment. Refasten the compartment cover. Changing the Personal Entry Code Press the four buttons for the present personal entry code, then press and hold the 0 button, then press Enter. Récepteur d'ouvre-porte de garage The opener light will bl(ianvketcwbicoeu.toRnelSemasaert)the buttons. Press the new 4-digit1code you h2 ave chos3en, then press Enter. The opener light will blink once when the code has been learned. 9 1 9 1 Test by pressing the new code, 7 then5 p3 res7 s 5En3 ter. The door KG KG should move. Bouton Témoin SRT Side two contains instructions for setting a temporary code. 1
-
 1
1 -
2
-
3
-
4
-
5
-
6
-
7
-
8
-
9
-
10
-
11
-
12
-
13
-
14
-
15
-
16
-
17
-
18
-
19
-
20
-
21
-
22
-
23
-
24
-
25
-
26
-
27
-
28
-
29
-
30
-
31
-
32
-
33
-
34
-
35
-
36
-
37
-
38
-
39
-
40
-
41
-
42
-
43
-
44
-
45
-
46
-
47
-
48
-
49
-
50
-
51
-
52
-
53
-
54
-
55
-
56
-
57
-
58
-
59
-
60
-
61
-
62
-
63
-
64
-
65
-
66
-
67
-
68
-
69
-
70
-
71
-
72
-
73
-
74
-
75
-
76
-
77
-
78
-
79
-
80
-
81
-
82
-
83
-
84
-
85
-
86
-
87
-
88
-
89
-
90
-
91
-
92
-
93
-
94
-
95
-
96
-
97
-
98
-
99
-
100
-
101
-
102
-
103
-
104
-
105
-
106
-
107
-
108
-
109
-
110
-
111
-
112
-
113
-
114
-
115
-
116
-
117
-
118
-
119
-
120
-
121
-
122
-
123
-
124
-
125
-
126
-
127
-
128
-
129
-
130
-
131
-
132
-
133
-
134
-
135
-
136
-
137
-
138
-
139
-
140
-
141
-
142
-
143
-
144
-
145
-
146
-
147
-
148
-
149
-
150
-
151
-
152
-
153
-
154
-
155
-
156
-
157
-
158
-
159
-
160
-
161
-
162
-
163
-
164
-
165
-
166
-
167
-
168
-
169
-
170
-
171
-
172
-
 173
173 -
 174
174 -
 175
175 -
 176
176 -
 177
177 -
 178
178 -
 179
179 -
 180
180 -
 181
181 -
 182
182 -
 183
183 -
184
-
185
-
186
-
187
-
188
-
189
-
190
-
191
-
192
-
193
-
194
-
195
-
196
-
197
-
198
-
199
-
200
-
201
-
202
-
203
-
204
-
205
-
206
-
207
-
208
-
209
-
210
-
211
-
212
-
213
-
214
-
215
-
216
-
217
-
218
-
219
-
220
-
221
-
222
-
223
-
224
-
225
-
226
-
227
-
228
-
229
-
230
-
231
-
232
-
233
-
234
-
235
-
236
-
237
-
238
-
239
-
240
-
241
-
242
-
243
-
244
-
245
-
246
-
247
-
248
-
249
-
250
-
251
-
252
-
253
-
254
-
255
-
256
-
257
-
258
-
259
-
260
-
261
-
262
-
263
-
264
-
265
-
266
-
267
-
268
-
269
-
270
-
271
-
272
-
273
-
274
-
275
-
276
-
277
-
278
-
279
-
280
-
281
-
282
-
283
-
284
-
285
-
286
 |
 |
